Learn how to execute a SQL query to return features from a feature layer based on spatial and attribute criteria.
A feature layer can contain a large number of features stored in ArcGIS. You can query a layer to access a subset of its features using any combination of spatial and attribute criteria. You can control whether or not each feature's geometry is returned, as well as which attributes are included in the results. Queries allow you to return a well-defined subset of your hosted data for analysis or display in your app.
In this tutorial, you'll write code to perform SQL queries that return a subset of features in the LA County Parcel feature layer (containing over 2.4 million features). Features that meet the query criteria are selected in the map.
Prerequisites
Before starting this tutorial:
-
You need an ArcGIS Location Platform or ArcGIS Online account.
-
Your system meets the system requirements.
-
The ArcGIS Maps SDK for Qt, version 200.8.0 or later is installed.
-
The Qt 6.8.2 software development framework or later is installed.
Develop or Download
You have two options for completing this tutorial:
Option 1: Develop the code
To start the tutorial, complete the Display a map tutorial. This creates a map to display the Santa Monica Mountains in California using the topographic basemap from the ArcGIS Basemap Styles service.
Open a Qt Creator project
- Open the project you created by completing the Display a map tutorial.
- Continue with the following instructions to execute a SQL query to return features from a feature layer based on spatial and attribute criteria.
Update the header file
This app will use various functions and member variables that need to be declared in the header file.
-
In Projects, double-click Headers > Display_a_map.h to open the file.
-
Forward declare the following classes.
Display_a_map.hUse dark colors for code blocks namespace Esri::ArcGISRuntime{ class Map; class MapQuickView; class FeatureLayer; class ServiceFeatureTable; } -
Add the following code to define a function called
runthat will be invokable from the GUI.Query Display_a_map.hUse dark colors for code blocks public: explicit Display_a_map(QObject* parent = nullptr); ~Display_a_map() override; Q_INVOKABLE void runQuery(const QString& expression); -
Finally, declare the following private function and member variables. Then save the file.
Display_a_map.hUse dark colors for code blocks private: Esri::ArcGISRuntime::MapQuickView* mapView() const; void setMapView(Esri::ArcGISRuntime::MapQuickView* mapView); void setupViewpoint(); void addFeatureLayer(); Esri::ArcGISRuntime::FeatureLayer* m_featureLayer = nullptr; Esri::ArcGISRuntime::ServiceFeatureTable* m_featureTable = nullptr;
Include header files in the source code
To create this app you will need to include several class header files from the ArcGIS Maps SDK for Qt C++ API.
-
In Projects, double-click Sources > Display_a_map.cpp to open the file.
-
Add the following include statements needed for this tutorial.
Display_a_map.cppUse dark colors for code blocks #include "Display_a_map.h" #include "Map.h" #include "MapTypes.h" #include "MapQuickView.h" #include "Point.h" #include "Viewpoint.h" #include "SpatialReference.h" #include <QFuture> #include "Envelope.h" #include "Feature.h" #include "FeatureLayer.h" #include "LayerListModel.h" #include "FeatureIterator.h" #include "FeatureQueryResult.h" #include "QueryParameters.h" #include "SelectionProperties.h" #include "ServiceFeatureTable.h" #include <memory> #include <QColor> #include <QList> #include <QUuid> #include <QUrl>
Add a feature layer, query features, and select results
You will add three functions to add a feature layer from ArcGIS online, execute a query of that layer, and create a features list from the query result.
-
Staying within the Display_a_map.cpp file, add code to create the
addfunction. This function adds the LA_County_Parcels feature layer hosted on ArcGIS Online to the map.Feature Layer() Display_a_map.cppUse dark colors for code blocks void Display_a_map::setupViewpoint() { const Point center(-118.80543, 34.02700, SpatialReference::wgs84()); const Viewpoint viewpoint(center, 100000.0); m_mapView->setViewpointAsync(viewpoint); } void Display_a_map::addFeatureLayer() { // Create a ServiceFeatureTable from a QUrl. m_featureTable = new ServiceFeatureTable(QUrl("https://services3.arcgis.com/GVgbJbqm8hXASVYi/arcgis/rest/services/LA_County_Parcels/FeatureServer/0"), this); // Create the feature layer using the feature table. m_featureLayer = new FeatureLayer(m_featureTable, this); // Add the feature layer to the map. m_map->operationalLayers()->append(m_featureLayer); } -
Continuing in the same file, add the
runfunction to implement the query that will execute a query of the parcels layer. This function creates aQuery(const Q String& expression) QueryParametersobject that includes the currently visible map extent and a SQL expression, and then executes the query on the parcels table. When a query completes, the code iterates the returned results and adds those features to a list. That list is then used to select features in the parcels layer.Display_a_map.cppUse dark colors for code blocks void Display_a_map::addFeatureLayer() { // Create a ServiceFeatureTable from a QUrl. m_featureTable = new ServiceFeatureTable(QUrl("https://services3.arcgis.com/GVgbJbqm8hXASVYi/arcgis/rest/services/LA_County_Parcels/FeatureServer/0"), this); // Create the feature layer using the feature table. m_featureLayer = new FeatureLayer(m_featureTable, this); // Add the feature layer to the map. m_map->operationalLayers()->append(m_featureLayer); } void Display_a_map::runQuery(const QString& expression) { if (!m_featureTable) return; // Create a query parameter object and set the WhereClause. QueryParameters queryParams; queryParams.setGeometry(m_mapView->currentViewpoint(ViewpointType::BoundingGeometry).targetGeometry().extent()); queryParams.setWhereClause(expression); m_featureTable->queryFeaturesAsync(queryParams).then(this,[this](FeatureQueryResult* rawQueryResult) { if (!rawQueryResult) return; // Wrap the FeatureQueryResult in a unique_ptr to manage the memory effectively. auto queryResult = std::unique_ptr<FeatureQueryResult>(rawQueryResult); // Clear any existing selection. m_featureLayer->clearSelection(); QList<Feature*> features; // Iterate over the result object. while(queryResult->iterator().hasNext()) { Feature* feature = queryResult->iterator().next(this); // Add each feature to the list. features.append(feature); } // Select features. m_featureLayer->selectFeatures(features); }); } -
Continuing within the Display_a_map.cpp file, locate the
setfunction. Modify the function to call the newMap View( Map Quick View* map View) addfunction and also set the color for displaying selected parcel layer features (or any other selection) in your map view. Note: by default, the selected features in the map view are displayed in cyan. Then save the file.Feature Layer() Display_a_map.cppUse dark colors for code blocks // Set the view (created in QML) void Display_a_map::setMapView(MapQuickView* mapView) { if (!mapView || mapView == m_mapView) { return; } m_mapView = mapView; m_mapView->setMap(m_map); addFeatureLayer(); m_mapView->setSelectionProperties(SelectionProperties(QColor(Qt::yellow))); setupViewpoint(); emit mapViewChanged(); }
Show a list of query expressions for the user to choose from
You will create a UI that allows the user to choose from a list of predefined query expressions. The expressions are presented in a Combo control and when the user makes a choice, the expression is passed to the run method to find parcels that meet the selected criterion within the currently visible map extent.
-
In Projects, double-click Resources > qml\qml.qrc/qml/Display_a_mapForm.qml to open the file.
-
Add the following code to create a
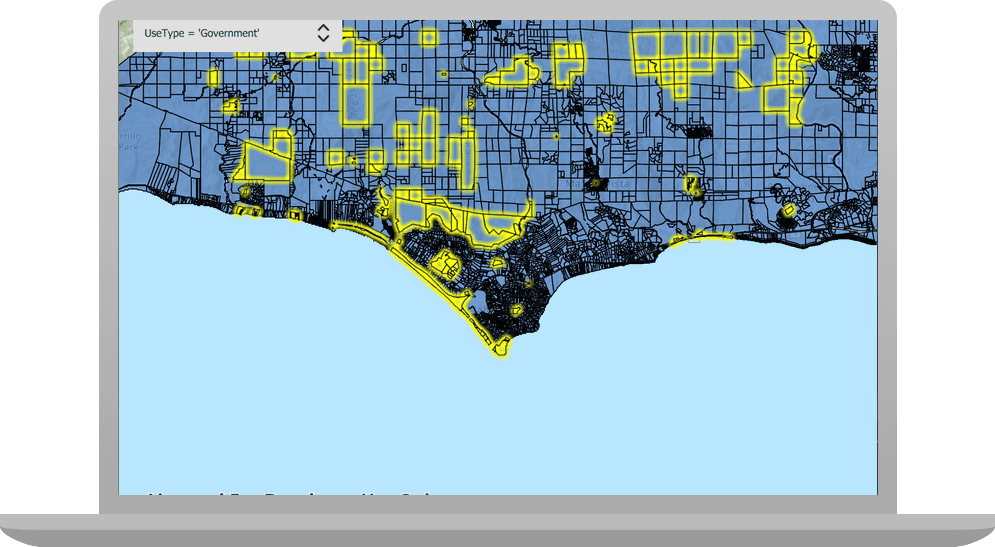
Combocontrol to execute a predefined query expression.Box Display_a_mapForm.qmlUse dark colors for code blocks // Declare the C++ instance that creates the map etc., and supply the view. Display_a_map { id: model mapView: view } ComboBox { id: queryComboBox anchors { left: parent.left top: parent.top margins: 15 } property int bestWidth: implicitWidth width: bestWidth + leftPadding + rightPadding model: ["Choose a SQL where clause", "UseType = 'Government'", "UseType = 'Residential'", "UseType = 'Irrigated Farm'", "TaxRateArea = 10853", "TaxRateArea = 10860", "Roll_LandValue > 1000000", "Roll_LandValue < 1000000"] onCurrentTextChanged: { model.runQuery(queryComboBox.currentText) } }
Set developer credentials
For the final steps of this tutorial, click the tab below that corresponds to the authentication type (API key authentication or User authentication) that you chose when you completed the Display a map tutorial.
Be sure to also provide the same authentication (API key or user authentication Client ID/Redirect URL) that you used for the Display a map tutorial.
Set the API Key
-
In the project Sources folder of Qt Creator, open the main.cpp file.
-
Modify the code to set the
accessusing your API key access token (highlighted in yellow).Token main.cppUse dark colors for code blocks // The following methods grant an access token: // 1. User authentication: Grants a temporary access token associated with a user's ArcGIS account. // To generate a token, a user logs in to the app with an ArcGIS account that is part of an // organization in ArcGIS Online or ArcGIS Enterprise. // 2. API key authentication: Get a long-lived access token that gives your application access to // ArcGIS location services. Go to the tutorial at https://links.esri.com/create-an-api-key. // Copy the API Key access token. const QString accessToken = QString(""); if (accessToken.isEmpty()) { qWarning() << "Use of ArcGIS location services, such as the basemap styles service, requires" << "you to authenticate with an ArcGIS account or set the API Key property."; } else { ArcGISRuntimeEnvironment::setApiKey(accessToken); } -
Save the main.cpp file.
Best Practice: The access token is stored directly in the code as a convenience for this tutorial. Do not store credentials directly in source code in a production environment.
Press Ctrl + R to run the app.
The app loads with the map centered on the Santa Monica Mountains in California with the parcels feature layer displayed. Choose an attribute expression, and parcels in the current extent that meet the selected criteria will display in the specified selection color.
Alternatively, you can download the tutorial solution, as follows.
Option 2: Download the solution
-
Click the
Download solutionlink underSolutionand unzip the file to a location on your machine. -
Open the .pro project file in Qt Creator.
Since the downloaded solution does not contain authentication credentials, you must set up authentication to create the developer credentials and add them to the project.
For the final steps of this tutorial, click the tab below that corresponds to the authentication type (API key authentication or User authentication) that you chose when you completed the Display a map tutorial.
Be sure to also provide the same authentication (API key or user authentication Client ID/Redirect URL) that you used for the Display a map tutorial.
Set developer credentials in the solution
Set the API Key
-
In the project Sources folder of Qt Creator, open the main.cpp file.
-
Modify the code to set the
accessusing your API key access token (highlighted in yellow).Token main.cppUse dark colors for code blocks // The following methods grant an access token: // 1. User authentication: Grants a temporary access token associated with a user's ArcGIS account. // To generate a token, a user logs in to the app with an ArcGIS account that is part of an // organization in ArcGIS Online or ArcGIS Enterprise. // 2. API key authentication: Get a long-lived access token that gives your application access to // ArcGIS location services. Go to the tutorial at https://links.esri.com/create-an-api-key. // Copy the API Key access token. const QString accessToken = QString(""); if (accessToken.isEmpty()) { qWarning() << "Use of ArcGIS location services, such as the basemap styles service, requires" << "you to authenticate with an ArcGIS account or set the API Key property."; } else { ArcGISRuntimeEnvironment::setApiKey(accessToken); } -
Save main.cpp file.
Best Practice: The access token is stored directly in the code as a convenience for this tutorial. Do not store credentials directly in source code in a production environment.
Run the solution
Press Ctrl + R to run the app.
The app loads with the map centered on the Santa Monica Mountains in California with the parcels feature layer displayed. Choose an attribute expression, and parcels in the current extent that meet the selected criteria will display in the specified selection color.
What's next?
Learn how to use additional API features, ArcGIS location services, and ArcGIS tools in these tutorials: