Trace a utility network

In ArcGIS, utility networks offer a framework for modeling utility systems, such as electric, gas, water, storm water, wastewater, and telecommunications systems. Each utility network shows how features are connected and how dynamic devices are configured. 
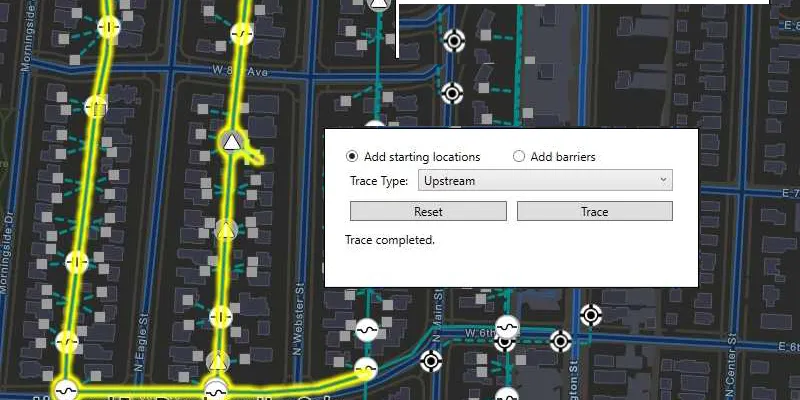
This topic describes how to build apps that can trace the flow of resources, such as gas, water, and electricity, through its network. For an overview of utility networks, see ArcGIS Pro's help topic What is a utility network?.

You can explore how a network is affected by real-world events such as storms, outages, or equipment failure, by asking questions such as:

  • How is my utility's network connected?
  • What path does electricity/gas/water take in order to reach a specific neighborhood?
  • If a device is disabled, what section of the network will be out of power?

To help answer these questions, use the following utility trace types:

  • Upstream—In a source-based network (gas or electric), an upstream trace is against the flow and toward the source, such as a circuit breaker or generator (subnetwork controller). In a sink-based network (sewer or storm water), an upstream trace is against the flow and away from the sink such as a sewage treatment (subnetwork controller). For more information, see ArcGIS Pro's help discussion on upstream traces.
  • Downstream—In a source-based network, a downstream trace is with the flow and away from the source, such as a circuit breaker or generator. In a sink-based network, a downstream trace is with the flow and toward the sink. For more information, see ArcGIS Pro's help discussion on downstream traces.
  • Subnetwork—A trace that discovers all features participating in a subnetwork. This trace type is useful for validating whether subnetworks, such as circuits or zones, are defined or edited appropriately. The trace begins at one or more starting points and spans outward along connected features to find subnetwork controllers that are traversable. A subnetwork trace stops when it encounters a barrier, when it encounters a feature that is not traversable, or when there are no more connected features. For more information see ArcGIS Pro's help discussion on subnetwork trace.
  • Isolation—A trace used to determine the minimum set of operable assets (point and line features) required to stop a network's resource from traveling/flowing, effectively isolating an area of the network. For instance, when a leak occurs on a water network, particular valves must be closed to eliminate water flow at the leak location. This prevents damage and allows field crews to safely start the repair process. For more information, see ArcGIS Pro's help discussion on locating isolating features.
  • Connected—A trace that begins at one or more starting points and spans outward radially along connected features. A trace stops when a barrier is encountered or there are no more connected features. Can be used for validating newly edited features to ensure they are connected as expected. For more information, see ArcGIS Pro's help discussions on connectivity and finding connected features.
  • Shortest path—Identify the shortest path between two starting points using a shortest path trace. The shortest path is calculated using a numeric network attribute such as shape length. Cost- or distance-based paths can both be achieved using this type of trace. For more information, see Discover the shortest path tool in the ArcGIS Pro help.
  • Loops—Loops are areas of the network where flow direction is ambiguous. Within a loop, resources can flow in either direction. Loops are expected with mesh networks but usually indicate error conditions in radial networks. You can also discover loops using a shortest path trace. For more information, see Discover network loops in the ArcGIS Pro help.

To trace a utility network you need to:

  1. Use ArcGIS Pro to create a utility network.

  2. Access the utility network in your app.

  3. Define the trace parameters:

    a. Decide which trace type to perform.

    b. Define the starting and barrier locations.

    c. Specify the trace configuration.

  4. Run the trace.

  5. Examine the results.

Access a utility network

Utility networks are implemented in service-based geodatabases as network controller datasets. These datasets contain a network's service feature tables along with the network's domains, sources, tiers, assets, terminals, rules and associations. This utility network is accessible via these service feature tables stored in a single feature service.

You can display and share a complete utility network with a user via a web map if the map includes one feature layer for every network source.

Diagram of objects loaded when loading a utility network with a map with layers for all network sources.

To display and share the utility network, create a utility network object from a feature service URL and a web map that contains all the layers that participate in the utility network.

The feature service provides access to the topological network in the utility network. So, you could provide a map that contains just a subset of the feature layers, for a specific workflow. Any tracing would be performed using the full topological network provided by the feature service. If you need to add additional utility network layers you can create them from the individual network sources, as required. You can also access a utility network and run a trace completely without a map. Just provide the feature service URL when you create the utility network. If needed, you can create a completely new map by creating feature layers from the network sources.

Utility Network version 2 and later is supported. This is provided from ArcGIS Pro 2.2 and later. For details see utility network upgrade history.

Load the utility network

The utility network follows the loadable pattern described in Loading resources asynchronously.

Loading the utility network loads the entire utility network schema (information about the datasets that participate in the network). Once loaded, your app can navigate this network schema to discover the Domain networks it contains and any further details about the network.

Use dark colors for code blocksCopy
                                                                                                                                                                                                                                                                                                                                                                                
1
2
3
4
5
6
7
8
9
10
11
12
13
14
15
16
17
18
19
20
21
22
23
24
25
26
27
28
29
30
31
32
33
34
35
36
37
38
39
40
41
42
43
44
45
46
47
48
49
50
51
52
53
54
55
56
57
58
59
60
61
62
63
64
65
66
67
68
69
70
71
72
73
74
75
76
77
78
79
80
81
82
83
84
85
86
87
88
89
90
91
92
93
94
95
96
97
98
99
100
101
102
103
104
105
106
107
108
109
110
111
112
113
114
115
116
117
118
119
120
121
122
123
124
125
126
127
128
129
130
131
132
133
134
135
136
137
138
139
140
141
142
143
144
145
146
147
148
149
150
151
152
153
154
155
156
157
158
159
160
161
162
163
164
165
166
167
168
169
170
171
172
173
174
175
176
177
178
179
180
181
182
183
184
185
186
187
188
189
190
191
192
193
194
195
196
197
198
199
200
201
202
203
204
205
206
207
208
209
210
211
212
213
214
215
216
217
218
219
220
221
222
223
224
225
226
227
228
229
230
231
232
233
234
235
236
237
238
239
240
241
242
243
244
245
246
247
248
249
250
251
252
253
254
255
256
257
258
259
260
261
262
263
264
265
266
267
268
269
270
271
272
273
274
275
276
277
278
279
280
281
282
283
284
285
286
287
288
289
290
291
292
293
294
295
296
297
298
299
300
301
302
303
304
305
306
307
308
309
310
311
312
313
314
315
316
317
318
319
320
321
322
323
324
325
326
327
328
329
330
331
332
333
334
335
336
337
338
339
340
341
342
343
344
345
346
347
348
349
350
351
352
353
354
355
356
357
358
359
360
361
362
363
364
365
366
367
368
        do {
            try await utilityNetwork.load()
            guard let schema = utilityNetwork.definition?.schemaVersion else { return }
            // Continue with the utility network.
            print("The utility network schema version is \(schema).")
        } catch {
            print("Error loading utility network.")
        }

Define the trace parameters

Trace parameters define how the trace analysis proceeds across the utility network. These are the essential trace parameters:

  1. Trace type
  2. Start and barrier locations
  3. Trace configuration
  4. Result types

Trace type

The trace types described above (upstream, downstream, and so on) are supported.

Use the utility trace type to create the parameters

Create a set of UtilityTraceParameters by providing a UtilityTraceType of upstream, along with a collection of starting locations (if known at this stage).

Use dark colors for code blocksCopy
                                                                                                                                                                                                                                                                                                                                                                                
1
2
3
4
5
6
7
8
9
10
11
12
13
14
15
16
17
18
19
20
21
22
23
24
25
26
27
28
29
30
31
32
33
34
35
36
37
38
39
40
41
42
43
44
45
46
47
48
49
50
51
52
53
54
55
56
57
58
59
60
61
62
63
64
65
66
67
68
69
70
71
72
73
74
75
76
77
78
79
80
81
82
83
84
85
86
87
88
89
90
91
92
93
94
95
96
97
98
99
100
101
102
103
104
105
106
107
108
109
110
111
112
113
114
115
116
117
118
119
120
121
122
123
124
125
126
127
128
129
130
131
132
133
134
135
136
137
138
139
140
141
142
143
144
145
146
147
148
149
150
151
152
153
154
155
156
157
158
159
160
161
162
163
164
165
166
167
168
169
170
171
172
173
174
175
176
177
178
179
180
181
182
183
184
185
186
187
188
189
190
191
192
193
194
195
196
197
198
199
200
201
202
203
204
205
206
207
208
209
210
211
212
213
214
215
216
217
218
219
220
221
222
223
224
225
226
227
228
229
230
231
232
233
234
235
236
237
238
239
240
241
242
243
244
245
246
247
248
249
250
251
252
253
254
255
256
257
258
259
260
261
262
263
264
265
266
267
268
269
270
271
272
273
274
275
276
277
278
279
280
281
282
283
284
285
286
287
288
289
290
291
292
293
294
295
296
297
298
299
300
301
302
303
304
305
306
307
308
309
310
311
312
313
314
315
316
317
318
319
320
321
322
323
324
325
326
327
328
329
330
331
332
333
334
335
336
337
338
339
340
341
342
343
344
345
346
347
348
349
350
351
352
353
354
355
356
357
358
359
360
361
362
363
364
365
366
367
368
        let utilityTraceParameters = UtilityTraceParameters(traceType: .upstream, startingLocations: [])

Start and barrier locations

Each trace requires one or more locations from which to initiate the trace. Optionally, you can also include barrier locations. Starting and barrier locations are defined using instances of UtilityElement which are added to the trace configuration's starting locations and barriers collection respectively.

You can create a starting location using steps like the following:

  • Create a UtilityElement using a feature.
Use dark colors for code blocksCopy
                                                                                                                                                                                                                                                                                                                                                                                
1
2
3
4
5
6
7
8
9
10
11
12
13
14
15
16
17
18
19
20
21
22
23
24
25
26
27
28
29
30
31
32
33
34
35
36
37
38
39
40
41
42
43
44
45
46
47
48
49
50
51
52
53
54
55
56
57
58
59
60
61
62
63
64
65
66
67
68
69
70
71
72
73
74
75
76
77
78
79
80
81
82
83
84
85
86
87
88
89
90
91
92
93
94
95
96
97
98
99
100
101
102
103
104
105
106
107
108
109
110
111
112
113
114
115
116
117
118
119
120
121
122
123
124
125
126
127
128
129
130
131
132
133
134
135
136
137
138
139
140
141
142
143
144
145
146
147
148
149
150
151
152
153
154
155
156
157
158
159
160
161
162
163
164
165
166
167
168
169
170
171
172
173
174
175
176
177
178
179
180
181
182
183
184
185
186
187
188
189
190
191
192
193
194
195
196
197
198
199
200
201
202
203
204
205
206
207
208
209
210
211
212
213
214
215
216
217
218
219
220
221
222
223
224
225
226
227
228
229
230
231
232
233
234
235
236
237
238
239
240
241
242
243
244
245
246
247
248
249
250
251
252
253
254
255
256
257
258
259
260
261
262
263
264
265
266
267
268
269
270
271
272
273
274
275
276
277
278
279
280
281
282
283
284
285
286
287
288
289
290
291
292
293
294
295
296
297
298
299
300
301
302
303
304
305
306
307
308
309
310
311
312
313
314
315
316
317
318
319
320
321
322
323
324
325
326
327
328
329
330
331
332
333
334
335
336
337
338
339
340
341
342
343
344
345
346
347
348
349
350
351
352
353
354
355
356
357
358
359
360
361
362
363
364
365
366
367
368
        let utilityElement = utilityNetwork.makeElement(arcGISFeature: feature)
  • If the feature represents a line, you can optionally specify a location along the line to use as the starting location. This value is expressed as a percentage of the length of the line, beginning from the line's from point.

  • Set the fractionAlongEdge value to define the location of the point along the line.

Use dark colors for code blocksCopy
                                                                                                                                                                                                                                                                                                                                                                                
1
2
3
4
5
6
7
8
9
10
11
12
13
14
15
16
17
18
19
20
21
22
23
24
25
26
27
28
29
30
31
32
33
34
35
36
37
38
39
40
41
42
43
44
45
46
47
48
49
50
51
52
53
54
55
56
57
58
59
60
61
62
63
64
65
66
67
68
69
70
71
72
73
74
75
76
77
78
79
80
81
82
83
84
85
86
87
88
89
90
91
92
93
94
95
96
97
98
99
100
101
102
103
104
105
106
107
108
109
110
111
112
113
114
115
116
117
118
119
120
121
122
123
124
125
126
127
128
129
130
131
132
133
134
135
136
137
138
139
140
141
142
143
144
145
146
147
148
149
150
151
152
153
154
155
156
157
158
159
160
161
162
163
164
165
166
167
168
169
170
171
172
173
174
175
176
177
178
179
180
181
182
183
184
185
186
187
188
189
190
191
192
193
194
195
196
197
198
199
200
201
202
203
204
205
206
207
208
209
210
211
212
213
214
215
216
217
218
219
220
221
222
223
224
225
226
227
228
229
230
231
232
233
234
235
236
237
238
239
240
241
242
243
244
245
246
247
248
249
250
251
252
253
254
255
256
257
258
259
260
261
262
263
264
265
266
267
268
269
270
271
272
273
274
275
276
277
278
279
280
281
282
283
284
285
286
287
288
289
290
291
292
293
294
295
296
297
298
299
300
301
302
303
304
305
306
307
308
309
310
311
312
313
314
315
316
317
318
319
320
321
322
323
324
325
326
327
328
329
330
331
332
333
334
335
336
337
338
339
340
341
342
343
344
345
346
347
348
349
350
351
352
353
354
355
356
357
358
359
360
361
362
363
364
365
366
367
368
        // Determine how far the starting point is located along a line.
        guard let geometry = feature.geometry as? Polyline else { return }
        let line = GeometryEngine.makeGeometry(from: geometry, z: nil)

        utilityElement.fractionAlongEdge = GeometryEngine.polyline(line, fractionalLengthClosestTo: mapPoint, tolerance: -1)
  • If the feature represents a device with terminals, you must specify which terminal you want to use as the starting point.
Use dark colors for code blocksCopy
                                                                                                                                                                                                                                                                                                                                                                                
1
2
3
4
5
6
7
8
9
10
11
12
13
14
15
16
17
18
19
20
21
22
23
24
25
26
27
28
29
30
31
32
33
34
35
36
37
38
39
40
41
42
43
44
45
46
47
48
49
50
51
52
53
54
55
56
57
58
59
60
61
62
63
64
65
66
67
68
69
70
71
72
73
74
75
76
77
78
79
80
81
82
83
84
85
86
87
88
89
90
91
92
93
94
95
96
97
98
99
100
101
102
103
104
105
106
107
108
109
110
111
112
113
114
115
116
117
118
119
120
121
122
123
124
125
126
127
128
129
130
131
132
133
134
135
136
137
138
139
140
141
142
143
144
145
146
147
148
149
150
151
152
153
154
155
156
157
158
159
160
161
162
163
164
165
166
167
168
169
170
171
172
173
174
175
176
177
178
179
180
181
182
183
184
185
186
187
188
189
190
191
192
193
194
195
196
197
198
199
200
201
202
203
204
205
206
207
208
209
210
211
212
213
214
215
216
217
218
219
220
221
222
223
224
225
226
227
228
229
230
231
232
233
234
235
236
237
238
239
240
241
242
243
244
245
246
247
248
249
250
251
252
253
254
255
256
257
258
259
260
261
262
263
264
265
266
267
268
269
270
271
272
273
274
275
276
277
278
279
280
281
282
283
284
285
286
287
288
289
290
291
292
293
294
295
296
297
298
299
300
301
302
303
304
305
306
307
308
309
310
311
312
313
314
315
316
317
318
319
320
321
322
323
324
325
326
327
328
329
330
331
332
333
334
335
336
337
338
339
340
341
342
343
344
345
346
347
348
349
350
351
352
353
354
355
356
357
358
359
360
361
362
363
364
365
366
367
368
        guard let terminals = utilityElement.assetType.terminalConfiguration?.terminals, let terminal = terminals.first else { return }
        utilityElement.terminal = terminal
  • Add the utility element to the utility trace parameters’ startingLocations.
Use dark colors for code blocksCopy
                                                                                                                                                                                                                                                                                                                                                                                
1
2
3
4
5
6
7
8
9
10
11
12
13
14
15
16
17
18
19
20
21
22
23
24
25
26
27
28
29
30
31
32
33
34
35
36
37
38
39
40
41
42
43
44
45
46
47
48
49
50
51
52
53
54
55
56
57
58
59
60
61
62
63
64
65
66
67
68
69
70
71
72
73
74
75
76
77
78
79
80
81
82
83
84
85
86
87
88
89
90
91
92
93
94
95
96
97
98
99
100
101
102
103
104
105
106
107
108
109
110
111
112
113
114
115
116
117
118
119
120
121
122
123
124
125
126
127
128
129
130
131
132
133
134
135
136
137
138
139
140
141
142
143
144
145
146
147
148
149
150
151
152
153
154
155
156
157
158
159
160
161
162
163
164
165
166
167
168
169
170
171
172
173
174
175
176
177
178
179
180
181
182
183
184
185
186
187
188
189
190
191
192
193
194
195
196
197
198
199
200
201
202
203
204
205
206
207
208
209
210
211
212
213
214
215
216
217
218
219
220
221
222
223
224
225
226
227
228
229
230
231
232
233
234
235
236
237
238
239
240
241
242
243
244
245
246
247
248
249
250
251
252
253
254
255
256
257
258
259
260
261
262
263
264
265
266
267
268
269
270
271
272
273
274
275
276
277
278
279
280
281
282
283
284
285
286
287
288
289
290
291
292
293
294
295
296
297
298
299
300
301
302
303
304
305
306
307
308
309
310
311
312
313
314
315
316
317
318
319
320
321
322
323
324
325
326
327
328
329
330
331
332
333
334
335
336
337
338
339
340
341
342
343
344
345
346
347
348
349
350
351
352
353
354
355
356
357
358
359
360
361
362
363
364
365
366
367
368
        utilityTraceParameters.addStartingLocation(utilityElement)
  • If you need to add a barrier, complete step 1 above then add the utility element representing a barrier to the utility trace parameters’ barriers.

Result type

The following types of results can be returned when you execute the trace:

  • Elements—Element results provide the utility elements that are found by a trace. Use these results when you need access to individual utility elements, their corresponding features, and their attributes. This is the default type of trace results.
  • Geometry—Geometry results contains multipart geometries that represent the union of the geometry for all elements returned. These results are best for displaying the trace result on a map.
  • Functions—A function is a trace configuration that allows you to run calculations on network attributes associated with traced features. A function output is returned for every function defined in the configuration.
Use dark colors for code blocksCopy
                                                                                                                                                                                                                                                                                                                                                                                
1
2
3
4
5
6
7
8
9
10
11
12
13
14
15
16
17
18
19
20
21
22
23
24
25
26
27
28
29
30
31
32
33
34
35
36
37
38
39
40
41
42
43
44
45
46
47
48
49
50
51
52
53
54
55
56
57
58
59
60
61
62
63
64
65
66
67
68
69
70
71
72
73
74
75
76
77
78
79
80
81
82
83
84
85
86
87
88
89
90
91
92
93
94
95
96
97
98
99
100
101
102
103
104
105
106
107
108
109
110
111
112
113
114
115
116
117
118
119
120
121
122
123
124
125
126
127
128
129
130
131
132
133
134
135
136
137
138
139
140
141
142
143
144
145
146
147
148
149
150
151
152
153
154
155
156
157
158
159
160
161
162
163
164
165
166
167
168
169
170
171
172
173
174
175
176
177
178
179
180
181
182
183
184
185
186
187
188
189
190
191
192
193
194
195
196
197
198
199
200
201
202
203
204
205
206
207
208
209
210
211
212
213
214
215
216
217
218
219
220
221
222
223
224
225
226
227
228
229
230
231
232
233
234
235
236
237
238
239
240
241
242
243
244
245
246
247
248
249
250
251
252
253
254
255
256
257
258
259
260
261
262
263
264
265
266
267
268
269
270
271
272
273
274
275
276
277
278
279
280
281
282
283
284
285
286
287
288
289
290
291
292
293
294
295
296
297
298
299
300
301
302
303
304
305
306
307
308
309
310
311
312
313
314
315
316
317
318
319
320
321
322
323
324
325
326
327
328
329
330
331
332
333
334
335
336
337
338
339
340
341
342
343
344
345
346
347
348
349
350
351
352
353
354
355
356
357
358
359
360
361
362
363
364
365
366
367
368
        utilityTraceParameters.addResultTypes([.geometry, .elements, .functionOutputs])

Trace configuration

If you don't want to use the trace configuration as created in ArcGIS Pro, you can either modify it or you can override it with settings. A trace configuration is set on the UtilityTraceParameters.

These settings allow you to do things like:

  • Stop the trace at protective devices if they are open. For example, the flow of electricity in a network will be stopped if a fuse is open.
  • Control the types of features traced. For example, trace only pipes with a diameter greater than six inches.
  • Filter the types of features returned as trace results. For example, only return elements identified by the trace that represent wooden poles.
  • Define functions to run calculations on network attributes associated with traced features. For example, the sum of the length of all the wire traced. Several functions can be specified for a trace.
  • Request different types of trace results. These can include geometry (for easy display on the map), network elements (if you need more information about individual features), and output functions (for calculating values based on network attributes).

Each trace configuration manages basic properties such as:

  • Include barriers in trace results
  • Include containers in trace results
  • Include content in trace results
  • Include structures in trace results
  • Add filter barriers, which are required for isolation traces
  • Ignore barriers if they are the starting points
  • Domain network
  • Source tier

For more advanced properties, such as traversability, output filters, propagators, and target tiers, see the advanced trace configuration section.

When a utility network administrator creates a new tier in ArcGIS Pro, a subnetwork trace configuration is created and populated as described in Configure a trace.

You can choose if your app uses the trace configuration as defined by an administrator, a modified version of the configuration, or your own trace configuration.

Use a trace configuration defined in a utility network tier

To obtain the trace configuration from a utility network tier, you need to know the name of the Domain network and the tier.

  1. Obtain the utility network definition from the utility network.
  2. Get the domain network from the utility network definition.
  3. Obtain the tier from the domain network.
  4. Pass the tier's trace configuration to the utility trace parameters.
  5. Modify any of these properties as required.
Use dark colors for code blocksCopy
                                                                                                                                                                                                                                                                                                                                                                                
1
2
3
4
5
6
7
8
9
10
11
12
13
14
15
16
17
18
19
20
21
22
23
24
25
26
27
28
29
30
31
32
33
34
35
36
37
38
39
40
41
42
43
44
45
46
47
48
49
50
51
52
53
54
55
56
57
58
59
60
61
62
63
64
65
66
67
68
69
70
71
72
73
74
75
76
77
78
79
80
81
82
83
84
85
86
87
88
89
90
91
92
93
94
95
96
97
98
99
100
101
102
103
104
105
106
107
108
109
110
111
112
113
114
115
116
117
118
119
120
121
122
123
124
125
126
127
128
129
130
131
132
133
134
135
136
137
138
139
140
141
142
143
144
145
146
147
148
149
150
151
152
153
154
155
156
157
158
159
160
161
162
163
164
165
166
167
168
169
170
171
172
173
174
175
176
177
178
179
180
181
182
183
184
185
186
187
188
189
190
191
192
193
194
195
196
197
198
199
200
201
202
203
204
205
206
207
208
209
210
211
212
213
214
215
216
217
218
219
220
221
222
223
224
225
226
227
228
229
230
231
232
233
234
235
236
237
238
239
240
241
242
243
244
245
246
247
248
249
250
251
252
253
254
255
256
257
258
259
260
261
262
263
264
265
266
267
268
269
270
271
272
273
274
275
276
277
278
279
280
281
282
283
284
285
286
287
288
289
290
291
292
293
294
295
296
297
298
299
300
301
302
303
304
305
306
307
308
309
310
311
312
313
314
315
316
317
318
319
320
321
322
323
324
325
326
327
328
329
330
331
332
333
334
335
336
337
338
339
340
341
342
343
344
345
346
347
348
349
350
351
352
353
354
355
356
357
358
359
360
361
362
363
364
365
366
367
368
        let utilityNetwork = UtilityNetwork(url: featureServiceURL)
        do {
            try await utilityNetwork.load()

            // Get the network domain called ElectricDistribution.
            guard let utilityNetworkDomain = utilityNetwork.definition?.domainNetwork(named: "ElectricDistribution") else {
                print("Utility Network Domain not found.")
                return
            }

            // Get the tier called Medium Voltage Radial.
            guard let utilityTier = utilityNetworkDomain.tier(named: "Medium Voltage Radial") else {
                print("Utility Tier not found.")
                return
            }

            // Get the tier's trace configuration.
            let traceConfiguration = utilityTier.defaultTraceConfiguration
            utilityTraceParameters.traceConfiguration = traceConfiguration
        } catch {
            print("Error loading utility network.")
        }

Create your own trace configuration

  1. Create a utility trace configuration.

  2. If you are running an upstream, downstream, or subnetwork trace then you must set the domain network as follows:

    a. Obtain the domain network from the utility network definition.

    b. Pass the domain network to the utility trace configuration.

  3. Modify any of the other properties, as required

  4. Pass the utility trace configuration to the utility trace parameters.

Use dark colors for code blocksCopy
                                                                                                                                                                                                                                                                                                                                                                                
1
2
3
4
5
6
7
8
9
10
11
12
13
14
15
16
17
18
19
20
21
22
23
24
25
26
27
28
29
30
31
32
33
34
35
36
37
38
39
40
41
42
43
44
45
46
47
48
49
50
51
52
53
54
55
56
57
58
59
60
61
62
63
64
65
66
67
68
69
70
71
72
73
74
75
76
77
78
79
80
81
82
83
84
85
86
87
88
89
90
91
92
93
94
95
96
97
98
99
100
101
102
103
104
105
106
107
108
109
110
111
112
113
114
115
116
117
118
119
120
121
122
123
124
125
126
127
128
129
130
131
132
133
134
135
136
137
138
139
140
141
142
143
144
145
146
147
148
149
150
151
152
153
154
155
156
157
158
159
160
161
162
163
164
165
166
167
168
169
170
171
172
173
174
175
176
177
178
179
180
181
182
183
184
185
186
187
188
189
190
191
192
193
194
195
196
197
198
199
200
201
202
203
204
205
206
207
208
209
210
211
212
213
214
215
216
217
218
219
220
221
222
223
224
225
226
227
228
229
230
231
232
233
234
235
236
237
238
239
240
241
242
243
244
245
246
247
248
249
250
251
252
253
254
255
256
257
258
259
260
261
262
263
264
265
266
267
268
269
270
271
272
273
274
275
276
277
278
279
280
281
282
283
284
285
286
287
288
289
290
291
292
293
294
295
296
297
298
299
300
301
302
303
304
305
306
307
308
309
310
311
312
313
314
315
316
317
318
319
320
321
322
323
324
325
326
327
328
329
330
331
332
333
334
335
336
337
338
339
340
341
342
343
344
345
346
347
348
349
350
351
352
353
354
355
356
357
358
359
360
361
362
363
364
365
366
367
368
        let utilityNetwork = UtilityNetwork(url: featureServiceURL)
        do {
            try await utilityNetwork.load()

            // Create the utility trace configuration.
            let traceConfiguration = UtilityTraceConfiguration()

            // Set the network domain called ElectricDistribution on the utility trace configuration.
            guard let utilityNetworkDomain = utilityNetwork.definition?.domainNetwork(named: "ElectricDistribution") else { return }
            traceConfiguration.domainNetwork = utilityNetworkDomain

            // Modify any other parameters, as required.
            utilityTraceParameters.traceConfiguration = traceConfiguration
        } catch {
            print("Error loading utility network.")
        }

Named trace configurations

A named trace configuration is a set of tracing parameters that is built with ArcGIS Pro, stored on ArcGIS Enterprise, and published with a web map. Named trace configurations allow you to create utility applications that are independent of individual customer data models. Using this workflow, tracing capabilities can be configured rather than customized.

Execute the trace

Run the trace by calling the trace method on the utility network object. Use the utility trace parameters defined in the previous section. Depending on the trace parameters, results may be returned as one or more trace result types: utility element, output function, or geometry. If not specified, utility element trace results are returned by default.

Use dark colors for code blocksCopy
                                                                                                                                                                                                                                                                                                                                                                                
1
2
3
4
5
6
7
8
9
10
11
12
13
14
15
16
17
18
19
20
21
22
23
24
25
26
27
28
29
30
31
32
33
34
35
36
37
38
39
40
41
42
43
44
45
46
47
48
49
50
51
52
53
54
55
56
57
58
59
60
61
62
63
64
65
66
67
68
69
70
71
72
73
74
75
76
77
78
79
80
81
82
83
84
85
86
87
88
89
90
91
92
93
94
95
96
97
98
99
100
101
102
103
104
105
106
107
108
109
110
111
112
113
114
115
116
117
118
119
120
121
122
123
124
125
126
127
128
129
130
131
132
133
134
135
136
137
138
139
140
141
142
143
144
145
146
147
148
149
150
151
152
153
154
155
156
157
158
159
160
161
162
163
164
165
166
167
168
169
170
171
172
173
174
175
176
177
178
179
180
181
182
183
184
185
186
187
188
189
190
191
192
193
194
195
196
197
198
199
200
201
202
203
204
205
206
207
208
209
210
211
212
213
214
215
216
217
218
219
220
221
222
223
224
225
226
227
228
229
230
231
232
233
234
235
236
237
238
239
240
241
242
243
244
245
246
247
248
249
250
251
252
253
254
255
256
257
258
259
260
261
262
263
264
265
266
267
268
269
270
271
272
273
274
275
276
277
278
279
280
281
282
283
284
285
286
287
288
289
290
291
292
293
294
295
296
297
298
299
300
301
302
303
304
305
306
307
308
309
310
311
312
313
314
315
316
317
318
319
320
321
322
323
324
325
326
327
328
329
330
331
332
333
334
335
336
337
338
339
340
341
342
343
344
345
346
347
348
349
350
351
352
353
354
355
356
357
358
359
360
361
362
363
364
365
366
367
368
        do {
            // Perform the trace.
            utilityTraceResults = try await utilityNetwork.trace(using: utilityTraceParameters)
            // Process the trace results.
        } catch {
            // Handle errors.
        }

If the trace fails you can examine why. For example, failure could be due to dirty areas in the network topology.

Examine the results

The trace results can contain element, geometry and/or function type results as configured in the trace parameters. The default trace result type is UtilityElementTraceResult.

Use dark colors for code blocksCopy
                                                                                                                                                                                                                                                                                                                                                                                
1
2
3
4
5
6
7
8
9
10
11
12
13
14
15
16
17
18
19
20
21
22
23
24
25
26
27
28
29
30
31
32
33
34
35
36
37
38
39
40
41
42
43
44
45
46
47
48
49
50
51
52
53
54
55
56
57
58
59
60
61
62
63
64
65
66
67
68
69
70
71
72
73
74
75
76
77
78
79
80
81
82
83
84
85
86
87
88
89
90
91
92
93
94
95
96
97
98
99
100
101
102
103
104
105
106
107
108
109
110
111
112
113
114
115
116
117
118
119
120
121
122
123
124
125
126
127
128
129
130
131
132
133
134
135
136
137
138
139
140
141
142
143
144
145
146
147
148
149
150
151
152
153
154
155
156
157
158
159
160
161
162
163
164
165
166
167
168
169
170
171
172
173
174
175
176
177
178
179
180
181
182
183
184
185
186
187
188
189
190
191
192
193
194
195
196
197
198
199
200
201
202
203
204
205
206
207
208
209
210
211
212
213
214
215
216
217
218
219
220
221
222
223
224
225
226
227
228
229
230
231
232
233
234
235
236
237
238
239
240
241
242
243
244
245
246
247
248
249
250
251
252
253
254
255
256
257
258
259
260
261
262
263
264
265
266
267
268
269
270
271
272
273
274
275
276
277
278
279
280
281
282
283
284
285
286
287
288
289
290
291
292
293
294
295
296
297
298
299
300
301
302
303
304
305
306
307
308
309
310
311
312
313
314
315
316
317
318
319
320
321
322
323
324
325
326
327
328
329
330
331
332
333
334
335
336
337
338
339
340
341
342
343
344
345
346
347
348
349
350
351
352
353
354
355
356
357
358
359
360
361
362
363
364
365
366
367
368
        utilityTraceResults.forEach { utilityTraceResult in
            switch utilityTraceResult {
            case let elementTraceResult as UtilityElementTraceResult:
                // Process the geometry result.
                let elements = elementTraceResult.elements

            case let geometryTraceResult as UtilityGeometryTraceResult:
                // Process the geometry result.
                let nearestNeighbor = geometryTraceResult.nearestNeighborResult

            case let functionTraceResult as UtilityFunctionTraceResult:
                // Process the function result.
                let functionOutputs = functionTraceResult.functionOutputs

            default:
                break
            }
        }

Work with element results

If you need fine-grained access to the results, such as the ability to work with individual utility elements from the trace, you need to obtain the corresponding features for these elements from the utility element results.

  • Filter the utility element trace results to find those that are part of the map, and group them by network source name.
  • For every group (network source with utility elements), make sure there is a layer in the map for the features. Next find the features corresponding to the utility elements.
Use dark colors for code blocksCopy