Augmented reality (AR) experiences can be implemented with three common patterns: tabletop, flyover, and world-scale.
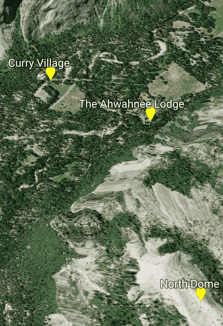
- Flyover – With flyover AR you can explore a scene using your device as a window into the virtual world. A typical flyover AR scenario starts with the scene’s virtual camera positioned over an area of interest. You can walk around and reorient the device to focus on specific content in the scene.
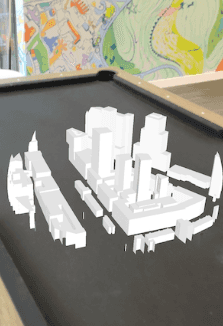
- Tabletop – Tabletop AR provides scene content anchored to a physical surface, as if it were a 3D-printed model. You can walk around the tabletop and view the scene from different angles.
- World-scale – A kind of AR scenario where scene content is rendered exactly where it would be in the physical world. This is used in scenarios ranging from viewing hidden infrastructure to displaying waypoints for navigation. In AR, the real world, rather than a basemap, provides the context for your GIS data. The world scale scene view component in the ArcGIS Maps SDK for Kotlin Toolkit optionally supports Google's ARCore Geospatial API, which leverages Google Street View imagery and global localization to provide accurate device location and orientation outdoors.
| 
| 
|
| On screen, flyover is visually indistinguishable from normal scene rendering. | In tabletop, scene content is anchored to a real-world surface. | In world-scale AR, scene content is integrated with the real world. |
Support for augmented reality is provided through components available in the ArcGIS Maps SDK for Kotlin Toolkit.
Enable your app for AR
No matter which AR pattern you implement, your app must include the following configuration and setup code:
-
Camera permissions. See Request camera permissions for more information.
-
ARCore configuration. Google Play Services for AR (often called simply ARCore) is a system service component installed onto a device via Google Play Store. See Configure ARCore for more information.
-
Installation of ARCore on device. See Install ARCore for more information.
-
Display of privacy policy. See Show privacy policy for more information.
-
Add the AR toolkit dependency. See Add AR toolkit dependency for more information.
AR is a resource-intensive feature. Just because a device supports ARCore does not mean it can provide the performance and reliability required to meet your users' needs. It is important to understand your target audience and test your AR experience on realistic user devices.
Request camera permissions
Your app must be correctly set up to use the device camera.
- Declare camera permissions: Add camera permissions to your AndroidManifest.xml.
- Request permissions at runtime: Prompt users for camera access when starting AR.
Declare camera permissions
To use augmented reality, declare the need to obtain camera permissions in the AndroidManifest.xml:
<uses-permission android:name="android.permission.CAMERA" />
Request permissions at runtime
The toolkit AR components automatically check for camera permissions when the scene view composable is first displayed. If permissions have not been granted, a permission request dialog is shown.
Optionally, you can use Activity.should to determine if the user has previously denied a permission request and selected "Don't ask again." This method helps you decide whether to present a rationale to the user before requesting permission again. For more detail, see Explain why your app needs the permission in the Android documentation.
Configure ARCore
Your app must be correctly set up to use ARCore. See Google's` ARCore developer documentation for detailed information about enabling ArCore and a list of supported devices.
- Require ARCore installation: Require that ARCore is installed on the device.
- Add ARCore dependency: Include the necessary ARCore libraries in your project.
- Control Play Store visibility: Ensure that your app is only visible to devices that support ARCore.
Require ARCore installation
If your app is AR-only and does not contain any non-AR functionality, you should declare a meta-data tag in the AndroidManifest.xml requiring that ARCore is installed on the device. This declaration is made in the application tag, outside any activity tags. If your app contains non-AR functionality workflows, do not include this declaration. Instead, check for ARCore installation at runtime as described in Install ARCore.
<!-- "AR Required" app, requires "Google Play Services for AR" (ARCore)
to be installed, as the app does not include any non-AR features. -->
<meta-data
android:name="com.google.ar.core"
android:value="required" />
Add ARCore dependency
Follow these steps to add the ARCore dependency to your project.
-
Add the ARCore dependency to your app-level
build.gradlefile.Use dark colors for code blocks dependencies { implementation(libs.ar.core) } -
Declare the dependency's version in the
libs.versions.tomlfile.Use dark colors for code blocks arcore = "1.48.0"Use dark colors for code blocks ar-core = { group = "com.google.ar", name = "core", version.ref = "arcore" }
Control Play Store visibility
You can control whether your app is visible in the Play Store to devices that do not support ARCore. Declaring a <uses-feature tag with android and android ensures that your app is available only to devices that support ARCore. If you want your app to be available to all devices, set android.
<!-- Ensures app is only visible in the Google Play Store on devices that support ARCore.
For "AR Optional" apps remove this line. -->
<uses-feature android:name="android.hardware.camera.ar" />
<uses-feature
android:name="android.hardware.camera"
android:required="true" />
Install ARCore
Install ARCore services on the device if they are not already installed. ARCore is available through Google PlayStore. The following code checks whether ARCore is installed and prompts the user to install it, if necessary.
/**
* Check if Google Play Services for AR is installed on the device. If it's not installed, this
* method must get called twice: once to request the installation and once to ensure it was
* installed when the activity resumes.
*/
private fun checkGooglePlayServicesArInstalled() {
try {
when (ArCoreApk.getInstance().requestInstall(this, userRequestedInstall)) {
ArCoreApk.InstallStatus.INSTALL_REQUESTED -> {
userRequestedInstall = false
return
}
ArCoreApk.InstallStatus.INSTALLED -> {
isGooglePlayServicesArInstalled.value = true
return
}
}
} catch (e: Exception) {
Log.e("ArFlyoverApp", "Error checking Google Play Services for AR: ${e.message}")
}
}
Initialization status callback
Once ARCore is detected on the device, the system calls the on lambda of the scene view composable to report the initialization status. Although ARCore may be installed, it may not be ready to use. For example, the user may have denied camera permissions or the device may not support ARCore.
The possible initialization status values are subclasses of a sealed class specific to each type of scene view. These sealed classes are:
For example, the FlyoverSceneViewStatus has the following possible initialization values:
Flyover: AR is initializing.Scene View Status. Initializing Flyover: AR is ready to use.Scene View Status. Initialized Flyover: AR initialization failed.Scene View Status. Failed To Initialize
Follow these general steps to handle the initialization status.
-
Define an observable state variable to hold the initialization status, using a
rememberfunction from the toolkit. For a flyover scene view, that function isrememberFlyoverSceneViewStatus().Use dark colors for code blocks var initializationStatus by rememberFlyoverSceneViewStatus() -
Pass a lambda as the
onparameter of the scene view composable.Initialization Status Changed Use dark colors for code blocks onInitializationStatusChanged = { initializationStatus = it } -
Use a
whenexpression to handle the different status values.Use dark colors for code blocks when (val status = initializationStatus) { // Display a message while the FlyoverSceneView initializes is FlyoverSceneViewStatus.Initializing -> { TextWithScrim(text = stringResource(R.string.setting_up_ar)) } // Display an error message if initialization failed is FlyoverSceneViewStatus.FailedToInitialize -> { val message = status.error.message ?: status.error TextWithScrim( text = stringResource( R.string.failed_to_initialize_ar, message ) ) } else -> { when (sceneLoadStatus) {
Show privacy policy
You must provide a privacy policy in your app if it downloads ARCore. The privacy policy notice should include the following text.
This application runs on Google Play Services for AR (ARCore), which is provided by Google and governed by the Google Privacy Policy.
The notice should includes links to Google Play Services for AR (ARCore) and the Google Privacy Policy. The following code shows how to display the notice as a composable. For more information, see User privacy requirements in Android's ARCore developer documentation.
/**
* Displays the required privacy information for use of ARCore.
*
* @since 200.8.0
*/
@Composable
private fun LegalTextArCore() {
val textLinkStyle = TextLinkStyles(style = SpanStyle(color = Color.Blue))
Text(
text = buildAnnotatedString {
append("This application runs on ")
withLink(
LinkAnnotation.Url(
"https://play.google.com/store/apps/details?id=com.google.ar.core",
textLinkStyle
)
) {
append("Google Play Services for AR")
}
append(" (ARCore), which is provided by Google and governed by the ")
withLink(
LinkAnnotation.Url(
"https://policies.google.com/privacy",
textLinkStyle
)
) {
append("Google Privacy Policy.")
}
}
)
}
Note that the world-scale AR pattern requires an additional privacy policy notice. See Implement world-scale AR for more information.
Add AR toolkit dependency
Add a dependency on the Kotlin Maps SDK toolkit's AR module to your app-level build.gradle file. This allows you to use the composable components for AR defined in the toolkit: FlyoverSceneView, TableTopSceneView, and WorldScaleSceneView
dependencies {
// lib dependencies from rootProject build.gradle.kts
implementation(libs.androidx.core.ktx)
implementation(libs.androidx.lifecycle.runtime.ktx)
implementation(libs.androidx.lifecycle.viewmodel.compose)
implementation(libs.androidx.activity.compose)
// Jetpack Compose Bill of Materials
implementation(platform(libs.androidx.compose.bom))
// Jetpack Compose dependencies
implementation(libs.androidx.compose.ui)
implementation(libs.androidx.compose.navigation)
implementation(libs.androidx.compose.material3)
implementation(libs.androidx.compose.ui.tooling)
implementation(libs.androidx.compose.ui.tooling.preview)
implementation(project(":samples-lib"))
// Toolkit dependencies
implementation(platform(libs.arcgis.maps.kotlin.toolkit.bom))
implementation(libs.arcgis.maps.kotlin.toolkit.geoview.compose)
implementation(libs.arcgis.maps.kotlin.toolkit.ar)
implementation(libs.ar.core)
}Understand Common AR Patterns
There are many AR scenarios you can achieve. This SDK recognizes the following common patterns for AR:
- Flyover – Flyover AR is a kind of AR scenario that allows you to explore a scene using your device as a window into the virtual world. A typical flyover AR scenario will start with the scene’s virtual camera positioned over an area of interest. You can walk around and reorient the device to focus on specific content in the scene.
- Tabletop – A kind of AR scenario where scene content is anchored to a physical surface, as if it were a 3D-printed model. You can walk around the tabletop and view the scene from different angles.
- World-scale – A kind of AR scenario where scene content is rendered exactly where it would be in the physical world. This is used in scenarios ranging from viewing hidden infrastructure to displaying waypoints for navigation. In AR, the real world, rather than a basemap, provides the context for your GIS data.
Each experience is built using a combination of the features, the toolkit, and some basic behavioral assumptions. For example:
| AR pattern | Origin camera | Translation factor | Scene view | Base surface |
|---|---|---|---|---|
| Flyover AR | Above the tallest content in the scene | A large value to enable rapid traversal; 0 to restrict movement | Space effect: Stars Atmosphere: Realistic | Displayed |
| Tabletop AR | On the ground at the center or lowest point on the scene | Based on the size of the target content and the physical table | Space effect: Transparent Atmosphere: None | Optional |
| World-scale AR | At the same location as the physical device camera | 1, to keep virtual content in sync with real-world environment | Space effect: Transparent Atmosphere: None | Optional for calibration |
Decide which of the three common AR patterns you want to implement in your app: tabletop, flyover, or world-scale. Each pattern uses a composable component from the ArcGIS Maps SDK for Kotlin toolkit: FlyoverSceneView, TableTopSceneView, and WorldScaleSceneView. See the following sections for information specific to each pattern.
Add flyover AR to your app
Flyover AR displays a scene using the movement of the physical device to move the scene view camera. For example, you can walk around while holding up your device as a window into the scene. Unlike other AR experiences, the camera feed is not displayed to the user, making flyover similar to a traditional virtual reality (VR) experience.
Flyover is the simplest AR scenario to implement, as there is only a loose relationship between the physical world and the rendered virtual world. With flyover, you can imagine your device as a window into the virtual scene.
Implement flyover AR
- Create the scene and add any content. This example uses the Yosemite Valley Hotspots web scene. On the scene's base surface, the code below sets the camera navigation to
NavigationConstraint.StayAbove. This value prevents the camera from going below the surface, which could disorient users. Note thatSurface.navigationConstrainthasNavigationas the default value, making the line of code optional.Constraint. Stay Above
val arcGISScene = remember {
ArcGISScene(
item = PortalItem(
portal = Portal.arcGISOnline(connection = Portal.Connection.Anonymous),
itemId = "7558ee942b2547019f66885c44d4f0b1"
)
).apply{
baseSurface.navigationConstraint = NavigationConstraint.StayAbove
}
}
-
A
FlyoverSceneViewProxyis a ArcGIS Maps SDK for Kotlin toolkit class that performs operations on aFlyoverSceneView. Such operations include identify operations on layers and graphics overlays or setting the AR session's camera origin. You should place the camera origin above the content you want the user to explore, ideally in the center. Create aFlyoverSceneViewProxyfor the Yosemite Valley Hotspots web scene with the following location and heading.Use dark colors for code blocks Copy val flyoverSceneViewProxy = rememberFlyoverSceneViewProxy( location = Point(x = -119.53312, y = 37.746091, z = 6_000.0, SpatialReference.wgs84() ), heading = 355.0 ) -
FlyoverSceneViewis a ArcGIS Maps SDK for Kotlin Toolkit composable that creates a special scene view for flyover augmented reality apps. Call theFlyoverSceneViewcomposable using the scene, the flyover scene view proxy, a translation factor, and an atmosphere effect.- The
arcparameter is the scene you created above.GIS Scene - The
flyparameter is the proxy you created to allow access to operations on theOver Scene View Proxy FlyoverSceneView. - Set the translation factor to provide an appropriate speed for traversing the scene as the devices moves. The translation factor defines the relationship between physical device movement and virtual camera movement. A relatively high translation factor is probably suitable when flying high above the scene, but a low value may be more suitable when exploring the scene at ground level.
- To create a more immersive experience, set the atmosphere effect to
Atmosphere..Realistic
Use dark colors for code blocks Copy // Display the scene in a FlyoverSceneView FlyoverSceneView( arcGISScene = arcGISScene, flyoverSceneViewProxy = flyoverSceneViewProxy, translationFactor = 1000.0, atmosphereEffect = AtmosphereEffect.Realistic, onInitializationStatusChanged = { initializationStatus = it } ) - The
Add tabletop AR to your app
Tabletop AR allows you to use your device to interact with scenes as if they were 3D-printed models sitting on your desk. You could, for example, use tabletop AR to virtually explore a proposed development without needing to create a physical model.
Implement tabletop AR
Tabletop AR typically allows users to place scene content on a physical surface of their choice, such as the top of a desk. Once the content is placed, it remains anchored to the surface as the user moves around.
-
Create the scene using an
ArcGISTiledElevationSourceand anArcGISSceneLayer. Set the scene's surface navigation constraint toSurface.navigationConstraintand its opacity to0.0. Note thatSurface.navigationConstrainthasNavigationConstraint.StayAboveas the default value, making the line of code optional.For demonstration purposes, this code uses the Terrain3D REST service and the buildings layer because this pairing is particularly well-suited for tabletop display. You can construct your own scene using elevation and scene layer data or use any existing scene provided an appropriate
clippingis passed to theDistance TableTopSceneViewcomposable to ensure a proper tabletop experience.Use dark colors for code blocks Copy // Create a scene layer from buildings REST service val buildingsURL = "https://tiles.arcgis.com/tiles/P3ePLMYs2RVChkJx/arcgis/rest/services/DevA_BuildingShells/SceneServer" val buildingsLayer = ArcGISSceneLayer(uri = buildingsURL) // Create an elevation source from Terrain3D REST service val elevationServiceURL = "https://elevation3d.arcgis.com/arcgis/rest/services/WorldElevation3D/Terrain3D/ImageServer" val elevationSource = ArcGISTiledElevationSource(uri = elevationServiceURL) val surface = Surface().apply { elevationSources.add(elevationSource) } // Create a mutable state variable to hold the scene. Later loaded from the scene package var scene: ArcGISScene? by mutableStateOf(ArcGISScene().apply { baseSurface = surface operationalLayers.add(buildingsLayer) baseSurface.navigationConstraint = NavigationConstraint.None baseSurface.opacity = 0f }) -
TableTopSceneViewis an ArcGIS Maps SDK for Kotlin Toolkit component. Call theTablecomposable, providing the ArcGIS scene you just created, an anchor point, translation factor, and clipping distance.Top Scene View - The
anchoris the location point of the ArcGIS scene that anchors (or "pins") it to the physical surface. This point could be a known value, a user-selected value, or a computed value. For simplicity, this example uses a known value.Point - The translation factor defines how much the scene view translates as the device moves. Set a translation factor that enables the whole scene to be viewed by moving around it. A useful formula for determining this value is translation factor = virtual content width / desired physical content width. The virtual content width is the real-world size of the scene content and the desired physical content width is the physical table top width. The virtual content width is determined by the clipping distance in meters around the camera.
- The clipping distance is the distance in meters that the ArcGIS Scene data will be clipped.
Use dark colors for code blocks Copy // Scene view that provides an augmented reality table top experience TableTopSceneView( arcGISScene = scene, arcGISSceneAnchor = Point( x = -122.68350326165559, y = 45.53257485106716, SpatialReference.wgs84() ), translationFactor = 1_000.0, clippingDistance = 400.0, modifier = Modifier.fillMaxSize(), onInitializationStatusChanged = { statusChanged -> initializationStatus = statusChanged } ) - The
Add world-scale AR to your app
A world-scale AR experience is defined by the following characteristics:
- The scene camera is positioned to precisely match the position and orientation of the device’s physical camera
- Scene content is placed in the context of the real world by matching the scene view’s virtual camera position and orientation to that of the physical device camera.
- Context aids, like the basemap, are hidden; the camera feed provides real-world context.
Some example use cases of world-scale AR include:
- Visualizing hidden infrastructure, like sewers, water mains, and telecom conduits.
- Maintaining context while performing rapid data collection for a survey.
- Visualizing a route line while navigating.
Configure content for world-scale AR
The goal of a world-scale AR experience is to create the illusion that your GIS content is physically present in the world around you. There are several requirements for content that will be used for world-scale AR that go beyond what is typically required for 2D mapping.
- Ensure that all data has an accurate elevation (or Z) value. For dynamically generated graphics (for example, route results) use an elevation surface to add elevation.
- Use an elevation source in your scene to ensure all content is placed accurately relative to the user.
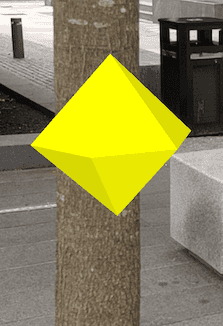
- Don't use 3D symbology that tries to simulate the shape of the feature it represents, such as 3D models. Consider instead using simple, abstract symbols such as the Cone, Cube, Cylinder, Diamond, Sphere, and Tetrahedron values that are the direct subclasses of the sealed class
SimpleMarkerSceneSymbolStyle. The problem with using 3D models—such as a generic tree or fire hydrant—is that any small positioning or orientation errors will be obvious to the user. Generic 3D models often do not capture the unique geometry of real-world objects visible in the camera feed. - Consider how you present content that would otherwise be obscured in the real world, as the parallax effect can make that content appear to move unnaturally. For example, underground pipes will ‘float’ relative to the surface, even though they are at a fixed point underground. Have a plan to educate users, or consider adding visual guides, like lines drawn to link the hidden feature to the obscuring surface (for example, the ground).
- By default, scene content is rendered over a large distance. This can be problematic when you are trying to view a limited subset of nearby features (just the pipes in your building, not for the entire campus, for example). You can use the clipping distance to limit the area over which scene content renders.
Location tracking options for world-scale AR
World-scale uses the device's location based on the WorldScaleTrackingMode, positioning the scene camera to align the scene with real-world features. The two world-scale tracking mode values are:
-
WorldScaleTrackingMode.Geospatial—The camera is positioned with the aid of Google's ARCore Geospatial API. Geospatial tracking uses Google Street View data to calibrate augmented reality positioning and requires ARCore authentication. This mode provides the best tracking accuracy and does not require manual calibration. It works best in urban, outdoor environments with high-resolution Street View data. -
WorldScaleTrackingMode.World—The camera's position and device location are determined using GPS and the device sensors; device orientation is determined by ARCore. Tracking accuracy depends on the accuracy of the GPS signal. It may be necessary to manually calibrate the scene view's camera heading and elevation. The camera's reference (origin) location is updated when the device travels a sufficient distance away (currently 10m) to improve tracking. When this update occurs, the scene may flash (disappear and reappear) and might need to be recalibrated. For these reasons, this mode is best suited to stationary experiences.
Implement world-scale AR
-
World-scale apps require location permissions. In addition to the camera permissions shown above, ensure that your app is also granted location permissions.
Use dark colors for code blocks <uses-permission android:name="android.permission.ACCESS_FINE_LOCATION" /> <uses-permission android:name="android.permission.ACCESS_COARSE_LOCATION" /> <uses-permission android:name="android.permission.INTERNET" /> <uses-permission android:name="android.permission.CAMERA" /> -
If you are using
WorldScaleTrackingMode.Geospatial, you must display a privacy policy notice in your app that includes the following text. This notice is in addition to the privacy policy notice required for ARCore, described in Show privacy policy above.To power this session, Google will process sensor data (e.g., camera and location). Learn more.
Your notice should include a link to How Google Play Services for AR handles your data. The following code shows how to display the notice as a composable.
Use dark colors for code blocks @Composable private fun LegalTextGeospatial() { Text(text = buildAnnotatedString { append("To power this session, Google will process sensor data (e.g., camera and location).") appendLine() withLink( LinkAnnotation.Url( "https://support.google.com/ar?p=how-google-play-services-for-ar-handles-your-data", TextLinkStyles(style = SpanStyle(color = Color.Blue)) ) ) { append("Learn more") } }) } -
When using
World, a Google Cloud project configured for using the Geospatial API is required. There are two possible ways to authenticate your application with the ARCore service:Scale Tracking Mode. Geospatial The following code shows how to include Google API key authentication in your app.
Use dark colors for code blocks <!-- Insert your Google API key in order to use Geospatial tracking. --> <meta-data android:name="com.google.android.ar.API_KEY" android:value="Insert Google API Key here"/> -
Create a scene using the
BasemapStyle.ArcGISHumanGeographybasemap style, and add an elevation source to the scene's base surface usingfromTerrain3dService()to access the Terrain 3D elevation service. Make the background grid invisible and set the opacity to transparent. This ensures that the camera feed is not obscured.An elevation source is required for the scene to be placed at the correct elevation. If not used, the scene may appear far below the device position because the device position is calculated with elevation.
Then create a feature layer from the AR tree survey service, and add the feature layer to the scene's operational layers.
Use dark colors for code blocks private val basemap = Basemap(BasemapStyle.ArcGISHumanGeography) // The AR tree survey service feature table. private val featureTable = ServiceFeatureTable("https://services2.arcgis.com/ZQgQTuoyBrtmoGdP/arcgis/rest/services/AR_Tree_Survey/FeatureServer/0") private val featureLayer = FeatureLayer.createWithFeatureTable(featureTable) val arcGISScene = ArcGISScene(basemap).apply { // An elevation source is required for the scene to be placed at the correct elevation. // If not used, the scene may appear far below the device position because the device position // is calculated with elevation. baseSurface.elevationSources.add(ElevationSource.fromTerrain3dService()) baseSurface.backgroundGrid.isVisible = false baseSurface.opacity = 0.0f // add the AR tree survey feature layer. operationalLayers.add(featureLayer) } -
Call the
WorldScaleSceneViewcomposable to display the scene in world-scale AR. Pass the scene you just created, theWorldScaleTrackingMode, and aWorldScaleSceneViewProxyto the composable. TheWorldallows you to perform operations on theScale Scene View Proxy World, such as identify operations on layers and graphics overlays.Scale Scene View Use dark colors for code blocks WorldScaleSceneView( arcGISScene = augmentedRealityViewModel.arcGISScene, modifier = Modifier.fillMaxSize(), onInitializationStatusChanged = { status -> initializationStatus = status }, worldScaleTrackingMode = worldScaleTrackingMode, worldScaleSceneViewProxy = augmentedRealityViewModel.worldScaleSceneViewProxy, graphicsOverlays = listOf(augmentedRealityViewModel.graphicsOverlay), onSingleTapConfirmed = augmentedRealityViewModel::addMarker, onCurrentViewpointCameraChanged = { camera -> augmentedRealityViewModel.onCurrentViewpointCameraChanged(camera.location) } ) -
If your app includes a workflow that supports
WorldScaleTrackingMode.Worldmode, you should provide a calibration UI that allows users to correct heading and elevation. Users with older devices that do not support ARCore's Geospatial API will need to use this mode. It is also a fallback in case your app is unable to authenticate with the Geospatial service. Use the composableCalibrationViewin the toolkit to provide the calibration UI.Use dark colors for code blocks Box(modifier = Modifier.fillMaxSize()) { if (worldScaleTrackingMode is WorldScaleTrackingMode.World) { if (displayCalibrationView) { CalibrationView( onDismiss = { displayCalibrationView = false }, modifier = Modifier.align(Alignment.BottomCenter), ) } } }
Enable calibration for world-scale AR
World-scale AR depends on a close match between the positions and orientations of the device’s physical camera and the scene view’s virtual camera. Any error in the device’s position or orientation will degrade the experience. Consider each of the following key properties as common sources of error:
- Heading – Usually determined using a magnetometer (compass) on the device
- Elevation/Altitude (Z) – Usually determined using GPS/GNSS or a barometer
- Position (X,Y) – usually determined using GPS/GNSS, cell triangulation, or beacons
The following examples illustrate these errors by showing a semitransparent basemap for comparison with the ground truth provided by the camera:
| Orientation error | Elevation error | Position error |
|---|---|---|

|

|

|
Calibration is important in WorldScaleTrackingMode.World mode. Even small errors in heading or elevation can break the perception that the virtual content is anchored in the real world. GPS determines the device's location and GPS accuracy can vary significantly depending on the device and environmental conditions. Include a calibration UI to allow users to correct heading and elevation errors by calling the composable CalibrationView in the toolkit.
Identify real-world and in-scene objects
To determine the real-world position of a tapped point on the screen, pass a lambda as the on parameter to WorldScaleSceneView. Devices that support ARCore's Depth API return the real-world position of the closest visible object to the device at the tapped screen point in the camera feed. For devices that do not support the Depth API, ARCore attempts to perform a hit test against any planes detected in the scene at that location.
The WorldScaleSceneViewProxy also supports converting screen coordinates to scene points using WorldScaleSceneViewProxy.screenToBaseSurface() and WorldScaleSceneViewProxy.screenToLocation(). These methods test screen coordinates against virtual objects in the scene: real-world objects that do not have spatial geometry (for example a mesh) are not used in the calculation. Therefore, screenToBaseSurface() and screenToLocation() should be used only when the developer is certain that the data contains geometry for real-world objects.
Manage vertical space in world-scale AR
Accurate positioning is particularly important to world-scale AR; even small errors can break the perception that the virtual content is anchored in the real world. Unlike 2D mapping, Z values are important. And unlike traditional 3D experiences, you need to know the position of the user’s device.
Be aware of the following common Z-value challenges that you’re likely to encounter while building AR experiences:
- Many kinds of Z values – Android and devices differ in how they represent altitude/elevation/Z values.
- Imprecise altitude – Altitude/Elevation is the least precise measurement offered by GPS/GNSS. In testing, we found devices reported elevations that were anywhere between 10 and 100 above or below the true value, even under ideal conditions.
Many kinds of Z values
Just as there are many ways to represent position using X and Y values, there are many ways to represent Z values. GPS devices tend to use two primary reference systems for altitude/elevation:
- WGS84 – Height Above Ellipsoid (HAE)
- Orthometric – Height Above Mean Sea Level (MSL)
The full depth of the differences between these two references is beyond the scope of this topic, but do keep in mind the following facts:
- Android devices return elevations in HAE, while iOS devices return altitude in MSL.
- It is not trivial to convert between HAE and MSL; MSL is based on a measurement of the Earth’s gravitational field. There are many models, and you may not know which model was used to when generating data.
- Esri’s world elevation service uses orthometric altitudes.
- The difference between MSL and HAE varies by location and can be on the order of tens of meters. For example, at Esri’s HQ in Redlands, California, the MSL altitude is about 30 meters higher than the HAE elevation.
It is important that you understand how your Z values are defined to ensure that data is placed correctly in the scene. For example, the Esri world elevation service uses MSL for its Z values. If you set the origin camera using an HAE Z value, you could be tens of meters off from the desired location.
To gain a deeper understanding of these issues, see ArcUser: Mean Sea Level, GPS, and the Geoid.
Adjust Z values on Android
Because many existing datasets and Esri services use orthometric (MSL) Z values, it is convenient to get MSL values from the location data source. Although Android natively provides values in WGS84 HAE, you can listen for NMEA messages from the on-board GPS to get elevations relative to MSL if the device supports it.
To consume MSL elevations in the AR scene view, you’ll need to create a custom location data source. See the public samples for a full MSL-adjusted location data source.
Samples and Micro-apps
- Samples are full, runnable apps that incorporate specific functionality in a real-world scenario. You can copy and paste code from the samples into your own projects and modify as needed. The ArcGIS Maps SDK for Kotlin samples are available on GitHub.
- Micro-apps are lightweight, stripped-down, runnable applications that focus on a single functionality. They can be used as starting points for your own apps. The ArcGIS Maps SDK for Kotlin Toolkit includes several micro-apps that illustrate how to implement AR experiences.


