Learn how to implement user authentication to access a secure ArcGIS service with OAuth credentials.

You can use different types of authentication to access secured ArcGIS services. To implement OAuth credentials for user authentication, you can use your ArcGIS account to register an app with your portal and get a Client ID, and then configure your app to redirect users to login with their credentials when the service or content is accessed. This is known as user authentication. If the app uses premium ArcGIS Online services that consume credits, for example, the app user's account will be charged.
In this tutorial, you will build an app that implements user authentication using OAuth credentials so users can sign in and be authenticated through ArcGIS Online to access the ArcGIS World Traffic service.
Prerequisites
Before starting this tutorial:
-
You need an ArcGIS Location Platform or ArcGIS Online account.
-
Your system meets the system requirements.
-
The ArcGIS Maps SDK for Qt, version 300.0.0 or later is installed.
-
The Qt 6.8.2 software development framework or later is installed.
Download the ArcGIS Maps SDK for Qt Toolkit
The open-source ArcGIS Maps SDK for Qt Toolkit contains UI components and utilities to help simplify your Qt app development. For this OAuth tutorial app we will use the toolkit that provides the Authenticator class, which has a dialog that automatically displays the proper authentication for any of the supported authentication types (OAuth, Token, HTTP Basic, HTTP Digest, SAML, PKI).
-
To configure the toolkit for use in this tutorial, you need to copy the ArcGIS Maps SDK for Qt Toolkit repository in GitHub onto your development machine.
-
You can do this by cloning the ArcGIS Maps SDK for Qt Toolkit repo (using the the URL: https://github.com/Esri/arcgis-maps-sdk-toolkit-qt.git) or downloading the .zip version of the repo and unzipping it to your preferred location on your development machine.
IMPORTANT: Make a particular note for the path to the toolkitcpp.pri file that is in the directory structure of the toolkit on your development machine. You will need to reference the path to this file later in the tutorial (for example: C).
Create OAuth credentials for user authentication
OAuth credentials are required to implement user authentication. These credentials are created and stored as an Application item in your organization's portal.
-
Go to the Create OAuth credentials for user authentication tutorial and create OAuth credentials using your ArcGIS Location Platform or ArcGIS Online account.
-
Copy the
Client IDandRedirect URLas you will use them to implement user authentication later in this tutorial. Both theClient IDand theRedirect URLare found on the Settings page.
The Client ID uniquely identifies your app on the authenticating server. If the server cannot find an app with the provided Client ID, your app will be unable to authenticate.
The Redirect URL (also referred to as a callback url) is used to identify a response from the authenticating server when the system returns control back to your app after an OAuth login. Since it does not necessarily represent a valid endpoint that a user could navigate to, the redirect URL can use a custom scheme, such as urn and my-app. You can configure several redirect URLs in your application definition and can remove or edit them. It's important to make sure the redirect URL used in your app's code matches a redirect URL configured for the application.
Develop or download
You have two options for completing this tutorial:
Option 1: Develop the code
Create a new ArcGIS Maps Qt Creator Project
-
Start Qt Creator.
-
In the top menu bar, click File > New Project.
-
In the New Project dialog, in the left frame, under Projects, select ArcGIS. Then select the ArcGIS Maps 300.0.0 Qt Quick C++ app project template (or a later version) and click Choose. This will launch the template wizard.
-
In the Project Location template, name your project AccessServicesWithOAuth. You can specify your own "create in" location for where the project will be created or leave the default. Click Next.
-
In the Define Build System template, select qmake for your build system. Click Next.
-
In the Define Project Details template, give this app a description or leave as is. For the GeoView type dropdown menu, select 2D Map. For the ArcGIS Online Basemap dropdown menu, select Topographic. Do not provide an Access Token (also called an API Key), leave it blank. We will be using OAuth for the project to access secured web mapping services, this will be discussed in a later section. Click Next.
-
In the Kit Selection template, check on the kit you previously set up when you installed Qt (Desktop Qt 6.8.2 MSVC2022 64bit or higher required). Click Next.
-
In the Project Management template, the option to Add as a subproject to root project is only available if you have already created a root project. If you have a version control system set up, you can select it in the dropdown but it is not needed to complete this tutorial. Click Finish to complete the template wizard.
Configure the .pro file
Qt .pro files contains information required by qmake to build an application, a library, or a plugin.
-
In the project Sources folder of Qt Creator, open AccessServicesWithOAuth.pro. To utilize Authenticator, add the path to where the
toolkitcpp.prifile is located on your development system (for example:C). Then add the Qt WebEngine Quick module to your project. The Qt WebEngine is used to display an OAuth sign in webpage in your app. Save and close the:/arcgis-maps-sdk-toolkit-qt/uitools/toolkitcpp/toolkitcpp.pri Accessfile.Services With O Auth.pro See the Install and setup for details on installing the Qt WebEngine on your system.
AccessServicesWithOAuth.proUse dark colors for code blocks ARCGIS_RUNTIME_VERSION = 300.0.0 include($$PWD/arcgisruntime.pri) # TODO: You need to replace the <path_to_toolkit_repo> with a valid location where the Qt Toolkit # resides on your system, example: C:/arcgis-maps-sdk-toolkit-qt/uitools/toolkitcpp/toolkitcpp.pri include(<path_to_toolkit_repo>/uitools/toolkitcpp/toolkitcpp.pri) qtHaveModule(webenginequick) { QT += webenginequick }
Implement user authentication using OAuth credentials
The OAuth sign in web page is implemented using the Authenticator class and the Qt WebEngine, which is part of the ArcGIS Toolkit.
-
In the project Sources folder of Qt Creator, open main.cpp. Remove these
#includestatements. These Qt types are not needed for this tutorial.main.cppUse dark colors for code blocks #include "AccessServicesWithOAuth.h" #include "ArcGISRuntimeEnvironment.h" #include "MapQuickView.h" #include <QDir> #include <QGuiApplication> #include <QQmlApplicationEngine> -
Add
#includestatements forQtandWeb Engine Quick register.hfor the Toolkit.main.cppUse dark colors for code blocks #include "AccessServicesWithOAuth.h" #include "ArcGISRuntimeEnvironment.h" #include "MapQuickView.h" #include <QtWebEngineQuick> #include "Esri/ArcGISRuntime/Toolkit/register.h" -
Add code to initialize
Qt.Web Engine Quick main.cppUse dark colors for code blocks using namespace Esri::ArcGISRuntime; int main(int argc, char *argv[]) { // Initialize the QtWebEngineQuick to use the web based login dialog. QtWebEngineQuick::initialize(); -
Add code to register the Toolkit. Then save and close main.cpp.
main.cppUse dark colors for code blocks // Register the AccessServicesWithOAuth (QQuickItem) for QML qmlRegisterType<AccessServicesWithOAuth>("Esri.AccessServicesWithOAuth", 1, 0, "AccessServicesWithOAuth"); // Initialize application view QQmlApplicationEngine engine; // Register the toolkit Esri::ArcGISRuntime::Toolkit::registerComponents(engine); -
In Qt Creator, navigate to Resources > qml\qml.qrc > qml and open AccessServicesWithOAuthForm.qml. Add an import statement for the Toolkit.
AccessServicesWithOAuthForm.qmlUse dark colors for code blocks import QtQuick import QtQuick.Controls import Esri.AccessServicesWithOAuth import Esri.ArcGISRuntime.Toolkit -
Now that the toolkit is available, declare an Authenticator component. Then save and close AccessServicesWithOAuthForm.qml.
AccessServicesWithOAuthForm.qmlUse dark colors for code blocks // Declare the C++ instance which creates the map etc. and supply the view AccessServicesWithOAuth { id: model mapView: view } // Declare an Authenticator to support login. Authenticator { anchors.centerIn: parent }NOTE: The Authenticator is a Toolkit component that simplifies the authentication workflow to automatically display the correct login user interface for each security method (Token, OAuth, PKI, and so on).
Define a function in the header file
The app will use the map view to display a map centered on the Santa Monica Mountains in California. The map will contain a layer built from the ArcGIS BasemapStyle.
-
In the Projects window, open the Headers folder. Double-click the file AccessServicesWithOAuth.h to open it.
-
Add the declaration
void setupunderViewpoint(); private. Then save the file.: AccessServicesWithOAuth.hUse dark colors for code blocks private: Esri::ArcGISRuntime::MapQuickView* mapView() const; void setMapView(Esri::ArcGISRuntime::MapQuickView* mapView); void setupViewpoint(); Esri::ArcGISRuntime::Map* m_map = nullptr; Esri::ArcGISRuntime::MapQuickView* m_mapView = nullptr; -
After you have added the declaration, right click on the
setupand from the popup context menus choose Refactor > Add definition in AccessServicesWithOauth.cpp. This will open the AccessServicesWithOAuth.cpp file stub out theView Point() setupmethod.View Point
Add required class header files and namespaces
Several additional classes and a namespace are required to support the functionality your app needs. Specifically, for managing OAuth authentication, creating an image layer, and accessing the secured traffic layer portal item.
-
In Qt Creator, find the project Sources folder and open the AccessServicesWithOAuth.cpp file. Add
#includestatements for the required header files as shown.AccessServicesWithOAuth.cppUse dark colors for code blocks #include "AccessServicesWithOAuth.h" #include "Map.h" #include "MapTypes.h" #include "MapQuickView.h" #include "ArcGISMapImageLayer.h" #include "LayerListModel.h" #include "Point.h" #include "Portal.h" #include "PortalItem.h" #include "SpatialReference.h" #include "Viewpoint.h" #include <QFuture> #include "OAuthUserConfigurationManager.h" #include "Authentication/OAuthUserConfiguration.h" -
Add another
namespacestatement as shown.AccessServicesWithOAuth.cppUse dark colors for code blocks using namespace Esri::ArcGISRuntime; using namespace Esri::ArcGISRuntime::Authentication;
Create the view point
-
Add code to implement the
setupmethod. This method creates aViewpoint centerPointbased on aSpatialReferencealong with longitude and latitude. It also creates aViewpointbased oncenterand sets scale. Lastly, it asynchronously sets the initialMapviewpoint.The center
Pointand scale value keep the initialViewpointcentered and focused on the Santa Monica Mountains. The scale value sets the level of detail to focus on the area of interest.The spatial reference created above is set to use World Geodetic System 1984 (WGS84), the spatial reference commonly used for GPS, and it has the well known id
4326. To learn more, seeSpatial Referencesin the ArcGIS Maps SDK for Qt Guide.AccessServicesWithOAuth.cppUse dark colors for code blocks MapQuickView* AccessServicesWithOAuth::mapView() const { return m_mapView; } void AccessServicesWithOAuth::setupViewpoint() { const Point center(-118.80543, 34.02700, SpatialReference::wgs84()); const Viewpoint viewpoint(center, 100000.0); m_mapView->setViewpointAsync(viewpoint); }The
setmethod appearing later in this file gets a handle to theMap View Mapobject that was declared in QML code and sets theView Mapon theMapfor display. This code is installed by the templates that ArcGIS provides when creating a new project in Qt. You should not modify it.View -
Add the following line of code to call the
setupmethod.Viewpoint AccessServicesWithOAuth.cppUse dark colors for code blocks // Set the view (created in QML) void AccessServicesWithOAuth::setMapView(MapQuickView* mapView) { if (!mapView || mapView == m_mapView) { return; } m_mapView = mapView; m_mapView->setMap(m_map); setupViewpoint(); emit mapViewChanged(); }
Create an OAuth user configuration and portal to access secured services
Using the Redirect URL and Client ID information obtained from the earlier prerequisites section Create OAuth credentials for user authentication in the tutorial when creating your OAuth credentials, you will create a new OAuthUserConfiguration object. This object is used as the input for the Qt Toolkit O to make use of the Qt WebEngine based login dialog. You will then use an instance of the Portal class to access secure services on your portal.
-
In the
setupfunction, add the following code to create aViewpoint OAuthUserConfigurationobject. Replace the "REDIRECT_URL" and "CLIENT_ID" placeholders strings (created earlier in this tutorial in the section Create OAuth credentials for user authentication).AccessServicesWithOAuth.cppUse dark colors for code blocks void AccessServicesWithOAuth::setupViewpoint() { const Point center(-118.80543, 34.02700, SpatialReference::wgs84()); const Viewpoint viewpoint(center, 100000.0); m_mapView->setViewpointAsync(viewpoint); // Define the Redirect URL string obtained when creating the OAuth credentials. // TODO: You need to replace the "REDIRECT_URL" with your own valid string, // ex: "urn:ietf:wg:oauth:2.0:oob" const auto qStringRedirectUrl = QString{"REDIRECT_URL"}; // Define the URL of the portal to authenticate with. const QUrl qUrlPortal = QUrl{"https://www.arcgis.com/"}; // Define a unique identifier associated with an application registered with the // portal that assists with client/server OAuth authentication. // TODO: You need to replace the "CLIENT_ID" with your own valid string. const QString qStringClientId = QString{"CLIENT_ID"}; // Create a new OAuth user configuration using: the Url to ArcGIS online, the Client ID // string, and the Redirect Url string. auto* oAuthUserConfiguration = new OAuthUserConfiguration(qUrlPortal, qStringClientId, qStringRedirectUrl, this); // Call the Toolkit's OAuthUserConfigurationManager static `addConfiguration` // method to use the OAuth dialog. This will require the input of a valid username/password. Toolkit::OAuthUserConfigurationManager::addConfiguration(oAuthUserConfiguration); -
Now add code to create a
Portalthat will use the booleantruewhich forces the login to occur to gain access to the secured ArcGIS World Traffic service.AccessServicesWithOAuth.cppUse dark colors for code blocks // Call the Toolkit's OAuthUserConfigurationManager static `addConfiguration` // method to use the OAuth dialog. This will require the input of a valid username/password. Toolkit::OAuthUserConfigurationManager::addConfiguration(oAuthUserConfiguration); // Create a new portal using the boolean `true` which forces the login to occur. constexpr auto loginRequired = true; Portal* portal = new Portal(loginRequired, this);
Add the secured traffic layer
The ArcGIS World Traffic service is a dynamic map service that presents historical and near real-time traffic information for different regions of the world. This service requires an ArcGIS Online organizational subscription. You will add a portal item referencing this service, and create a traffic layer from that.
ArcGIS World Traffic service data is updated every five minutes to provide traffic speed and traffic incident visualization and identification. Traffic speeds are displayed as a percentage of free-flow speeds, which is frequently the speed limit or how fast cars tend to travel when unencumbered by other vehicles. The streets are color coded as follows:
- Green (fast): 85 - 100% of free flow speeds
- Yellow (moderate): 65 - 85%
- Orange (slow); 45 - 65%
- Red (stop and go): 0 - 45%
-
Add code to create a
PortalItemusing the traffic service's item ID. Then create anArcGISMapImageLayerto display the traffic service. Finally, append the traffic layer to the map's collection of data layers (operational layers).AccessServicesWithOAuth.cppUse dark colors for code blocks // Create a new portal using the boolean `true` which forces the login to occur. constexpr auto loginRequired = true; Portal* portal = new Portal(loginRequired, this); // Create a new portal item using the inputs of: a portal and the String ID for the // ArcGIS World Traffic service. This causes the OAuth challenge to occur. PortalItem* portalItem = new PortalItem(portal, "ff11eb5b930b4fabba15c47feb130de4", this); // Create a new ArcGIS map image layer using the input of the portal item. ArcGISMapImageLayer* arcGISMapImageLayer = new ArcGISMapImageLayer(portalItem, this); // Append the traffic layer to the map's data layer collection. m_map->operationalLayers()->append(arcGISMapImageLayer); -
Press Ctrl + R to run the app.
The app will open and you should see the Sign In prompt you for to enter your ArcGIS Online Username and Password for the Authenticator Qt Toolkit control. When entered, click the Sign In button.
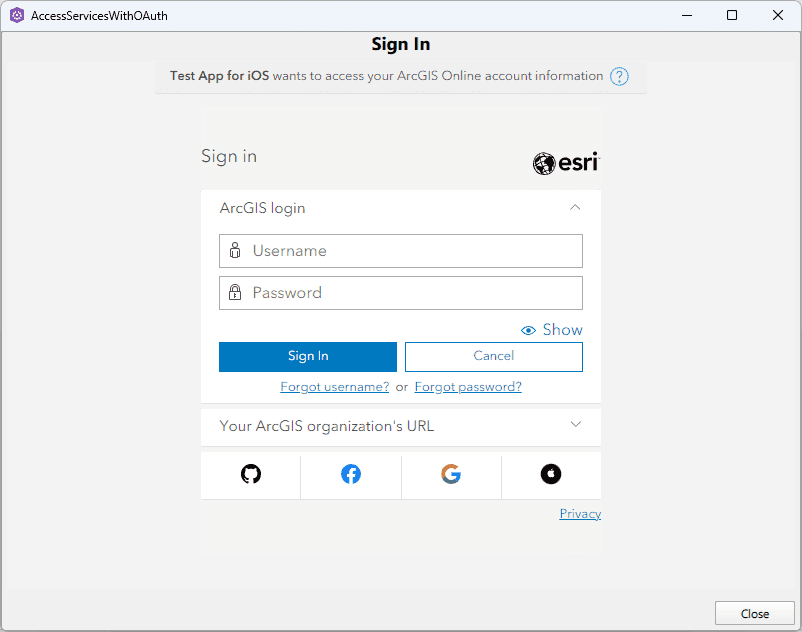
After authenticating successfully with ArcGIS Online, a map with the topographic basemap layer centered on the Santa Monica Mountains in California. The map will appear with the traffic layer also displayed.

Alternatively, you can download the tutorial solution, as follows.
Option 2: Download the solution
-
Click the Download solution link in the right-hand panel of the page.
-
Unzip the file to a location on your machine.
-
Using Windows Explorer, double click on the
Accessfile to launch Qt Creator.Services With O Auth.pro
Set path to the Qt Toolkit in the project
-
Ensure you have completed the prerequisites listed at the beginning of this tutorial. In particular, ensure you have done the step Download the ArcGIS Maps SDK for Qt Toolkit and have noted the path to the
toolkitcpp.prifile that is in the directory structure of the Qt Toolkit on your development machine. -
In the project Sources folder of Qt Creator, open the AccessServicesWithOAuth.pro file and locate the following line and update the
includestatement to the path of thetoolkitcpp.prifile.AccessServicesWithOAuth.proUse dark colors for code blocks ARCGIS_RUNTIME_VERSION = 300.0.0 include($$PWD/arcgisruntime.pri) # TODO: You need to replace the <path_to_toolkit_repo> with a valid location where the Qt Toolkit # resides on your system, example: C:/arcgis-maps-sdk-toolkit-qt/uitools/toolkitcpp/toolkitcpp.pri include(<path_to_toolkit_repo>/uitools/toolkitcpp/toolkitcpp.pri) qtHaveModule(webenginequick) { QT += webenginequick }
Set developer credentials in the solution
To allow your app users to access ArcGIS location services, use the developer credentials that you created in the Create OAuth credentials for user authentication step to authenticate requests for resources.
-
In the project Sources folder of Qt Creator, open the AccessServicesWithOAuth.cpp file.
-
Set your values for the REDIRECT_URL (
q) and the CLIENT_ID (String Redirect Url q).String Client Id AccessServicesWithOAuth.cppUse dark colors for code blocks // Define the Redirect URL string obtained when creating the OAuth credentials. // TODO: You need to replace the "REDIRECT_URL" with your own valid string, // ex: "urn:ietf:wg:oauth:2.0:oob" const auto qStringRedirectUrl = QString{"REDIRECT_URL"}; // Define the URL of the portal to authenticate with. const QUrl qUrlPortal = QUrl{"https://www.arcgis.com/"}; // Define a unique identifier associated with an application registered with the // portal that assists with client/server OAuth authentication. // TODO: You need to replace the "CLIENT_ID" with your own valid string. const QString qStringClientId = QString{"CLIENT_ID"};
Best Practice: The OAuth credentials are stored directly in the code as a convenience for this tutorial. Do not store credentials directly in source code in a production environment.
-
Press Ctrl + R to run the app.
The app will open and you should see the Sign In prompt you for to enter your ArcGIS Online Username and Password for the Authenticator Qt Toolkit control. When entered, click the Sign In button.
After authenticating successfully with ArcGIS Online, a map with the topographic basemap layer centered on the Santa Monica Mountains in California. The map will appear with the traffic layer also displayed.