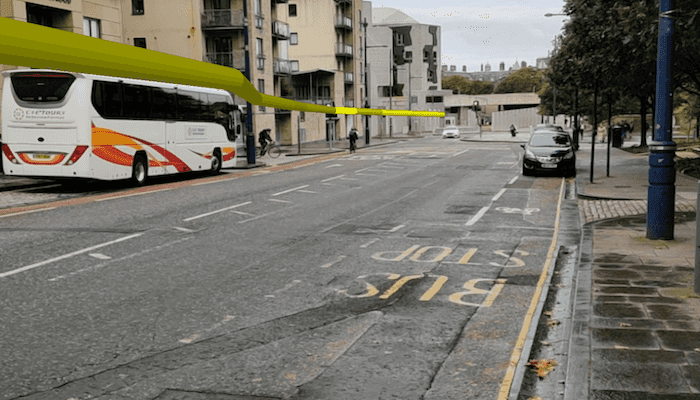
Use a route displayed in the real world to navigate.
Use case
It can be hard to navigate using 2D maps in unfamiliar environments. You can use full-scale AR to show a route overlaid on the real-world for easier navigation.
How to use the sample
The sample opens with a map centered on the current location. Tap the map to add an origin and a destination; the route will be shown as a line. Calibrate the heading before starting to navigate. When ready, tap 'Start AR' to start the AR navigation. When you start, route instructions will be displayed and spoken. As you proceed through the route, new directions will be provided until you arrive.
How it works
- The map page is used to plan the route before starting the AR experience. See the Find a route and Offline routing samples for a more focused demonstration of that workflow.
- Pass the resulting
RouteResultto the activity used for the AR portion of the navigation experience.- The route task and parameters are used to support a rerouting capability where routes are recalculated on-the-fly if you deviate. Due to service limitations, this sample doesn't support on-the-fly rerouting. You can incorporate offline routing to support rerouting in your apps.
- Start ARCore tracking with continuous location updates when the AR view is shown.
- Get the route geometry from the first route in the
RouteResult. Use the scene's base surface to apply elevation to the line so that it will follow the terrain. - Add the route geometry to a graphics overlay and add a renderer to the graphics overlay. This sample uses a
MultilayerPolylineSymbolwith aSolidStrokeSymbolLayerto visualize a tube along the route line. - Create a calibration view. This sample uses a slider to manipulate the heading (direction you are facing). Because of limitations in on-device compasses, calibration is often necessary; small errors in heading cause big problems with the placement of scene content in the world.
- Note that while this sample implemented a slider, there are many possible strategies for implementing heading calibration.
- While calibrating, the basemap is shown at 50% opacity, to allow you to compare the basemap imagery with what is seen by the camera. While this works in some environments, it won't work indoors, in forested areas, or if the ground truth has changed since the basemap imagery was updated. Alternative scenarios can involve orienting relative to landmarks (for example, stage sets at a concert) or starting at a known orientation by lining up with a static image.
- The slider in the sample implements a 'joystick' interaction; the heading is adjusted faster the further you move from the center of the slider. There are many possible slider interactions you could choose to implement.
- When the user starts navigating, create a
RouteTracker, providing aRouteResultand the index of the route you want to use; this sample always picks the first returned result. - Create a location data source and listen for location change events. When the location changes, call
routeTracker.trackLocationAsyncwith the updated location. - Keep the calibration view accessible throughout the navigation experience. As the user walks, small heading errors may become more noticeable and require recalibration.
Relevant API
- ArcGISArView
- LocationDataSource
- RouteResult
- RouteTask
- RouteTracker
- Surface
About the data
This sample uses Esri's world elevation service to ensure that route lines are placed appropriately in 3D space. It uses Esri's world routing service to calculate routes. The world routing service requires an API key and does consume ArcGIS Online credits.
Additional information
This sample requires a device that is compatible with ARCore 1.8 on Android.
Unlike other scene samples, there's no need for a basemap while navigating, because context is provided by the camera feed showing the real environment. The base surface's opacity is set to zero to prevent it from interfering with the AR experience. During calibration, the basemap is shown at 50% opacity to help the user verify that they have calibrated properly.
A digital elevation model is used to ensure that the displayed route is positioned appropriately relative to the terrain of the route. If you don't want to display the route line floating, you could show the line draped on the surface instead.
World-scale AR is one of three main patterns for working with geographic information in augmented reality. Augmented reality is made possible with the ArcGIS Runtime Toolkit. See Augmented reality in the guide for more information about augmented reality and adding it to your app.
Because most navigation scenarios involve traveling beyond the accurate range for ARKit/ARCore positioning, this sample relies on continuous location updates from the location data source. Because the origin camera is constantly being reset by the location data source, the sample doesn't allow the user to pan to calibrate or adjust the altitude with a slider. The location data source doesn't provide a heading, so it isn't overwritten when the location refreshes.
Tags
augmented reality, directions, full-scale, guidance, mixed reality, navigate, navigation, real-scale, route, routing, world-scale
Sample Code
/*
* Copyright 2019 Esri
*
* Licensed under the Apache License, Version 2.0 (the "License");
* you may not use this file except in compliance with the License.
* You may obtain a copy of the License at
*
* http://www.apache.org/licenses/LICENSE-2.0
*
* Unless required by applicable law or agreed to in writing, software
* distributed under the License is distributed on an "AS IS" BASIS,
* WITHOUT WARRANTIES OR CONDITIONS OF ANY KIND, either express or implied.
* See the License for the specific language governing permissions and
* limitations under the License.
*/
package com.esri.arcgisruntime.sample.navigateinar;
import java.util.ArrayList;
import java.util.LinkedList;
import android.Manifest;
import android.content.pm.PackageManager;
import android.content.res.Resources;
import android.graphics.Color;
import android.os.Bundle;
import android.speech.tts.TextToSpeech;
import androidx.annotation.NonNull;
import androidx.core.app.ActivityCompat;
import androidx.core.content.ContextCompat;
import androidx.appcompat.app.AppCompatActivity;
import android.util.Log;
import android.view.View;
import android.widget.Button;
import android.widget.TextView;
import android.widget.Toast;
import com.esri.arcgisruntime.ArcGISRuntimeEnvironment;
import com.esri.arcgisruntime.geometry.Point;
import com.esri.arcgisruntime.location.AndroidLocationDataSource;
import com.esri.arcgisruntime.mapping.ArcGISScene;
import com.esri.arcgisruntime.mapping.ArcGISTiledElevationSource;
import com.esri.arcgisruntime.mapping.Basemap;
import com.esri.arcgisruntime.mapping.BasemapStyle;
import com.esri.arcgisruntime.mapping.NavigationConstraint;
import com.esri.arcgisruntime.mapping.Surface;
import com.esri.arcgisruntime.mapping.view.Camera;
import com.esri.arcgisruntime.mapping.view.Graphic;
import com.esri.arcgisruntime.mapping.view.GraphicsOverlay;
import com.esri.arcgisruntime.mapping.view.LayerSceneProperties;
import com.esri.arcgisruntime.navigation.RouteTracker;
import com.esri.arcgisruntime.symbology.MultilayerPolylineSymbol;
import com.esri.arcgisruntime.symbology.SimpleRenderer;
import com.esri.arcgisruntime.symbology.SolidStrokeSymbolLayer;
import com.esri.arcgisruntime.symbology.StrokeSymbolLayer;
import com.esri.arcgisruntime.symbology.SymbolLayer;
import com.esri.arcgisruntime.tasks.networkanalysis.RouteResult;
import com.esri.arcgisruntime.toolkit.ar.ArLocationDataSource;
import com.esri.arcgisruntime.toolkit.ar.ArcGISArView;
import com.esri.arcgisruntime.toolkit.control.JoystickSeekBar;
public class ARNavigateActivity extends AppCompatActivity {
private static final String TAG = ARNavigateActivity.class.getSimpleName();
private ArcGISArView mArView;
private TextView mHelpLabel;
private View mCalibrationView;
public static RouteResult sRouteResult;
private ArcGISScene mScene;
private boolean mIsCalibrating = false;
private RouteTracker mRouteTracker;
private TextToSpeech mTextToSpeech;
private float mCurrentVerticalOffset;
@Override
protected void onCreate(Bundle savedInstanceState) {
super.onCreate(savedInstanceState);
setContentView(R.layout.activity_ar);
// ensure at route has been set by the previous activity
if (sRouteResult.getRoutes().get(0) == null) {
String error = "Route not set before launching activity!";
Toast.makeText(this, error, Toast.LENGTH_SHORT).show();
Log.e(TAG, error);
}
requestPermissions();
}
private void navigateInAr() {
// get a reference to the ar view
mArView = findViewById(R.id.arView);
mArView.registerLifecycle(getLifecycle());
// disable touch interactions with the scene view
mArView.getSceneView().setOnTouchListener((view, motionEvent) -> true);
// create a scene and add it to the scene view
mScene = new ArcGISScene(BasemapStyle.ARCGIS_IMAGERY);
mArView.getSceneView().setScene(mScene);
// create and add an elevation surface to the scene
ArcGISTiledElevationSource elevationSource = new ArcGISTiledElevationSource(getString(R.string.elevation_url));
Surface elevationSurface = new Surface();
elevationSurface.getElevationSources().add(elevationSource);
mArView.getSceneView().getScene().setBaseSurface(elevationSurface);
// allow the user to navigate underneath the surface
elevationSurface.setNavigationConstraint(NavigationConstraint.NONE);
// hide the basemap. The image feed provides map context while navigating in AR
elevationSurface.setOpacity(0f);
// disable plane visualization. It is not useful for this AR scenario.
mArView.getArSceneView().getPlaneRenderer().setEnabled(false);
mArView.getArSceneView().getPlaneRenderer().setVisible(false);
// add an ar location data source to update location
mArView.setLocationDataSource(new ArLocationDataSource(this));
// create and add a graphics overlay for showing the route line
GraphicsOverlay routeOverlay = new GraphicsOverlay();
mArView.getSceneView().getGraphicsOverlays().add(routeOverlay);
Graphic routeGraphic = new Graphic(sRouteResult.getRoutes().get(0).getRouteGeometry());
routeOverlay.getGraphics().add(routeGraphic);
// display the graphic 3 meters above the ground
routeOverlay.getSceneProperties().setSurfacePlacement(LayerSceneProperties.SurfacePlacement.RELATIVE);
routeOverlay.getSceneProperties().setAltitudeOffset(3);
// create a renderer for the route geometry
SolidStrokeSymbolLayer strokeSymbolLayer = new SolidStrokeSymbolLayer(1, Color.YELLOW, new LinkedList<>(),
StrokeSymbolLayer.LineStyle3D.TUBE);
strokeSymbolLayer.setCapStyle(StrokeSymbolLayer.CapStyle.ROUND);
ArrayList<SymbolLayer> layers = new ArrayList<>();
layers.add(strokeSymbolLayer);
MultilayerPolylineSymbol polylineSymbol = new MultilayerPolylineSymbol(layers);
SimpleRenderer polylineRenderer = new SimpleRenderer(polylineSymbol);
routeOverlay.setRenderer(polylineRenderer);
// create and start a location data source for use with the route tracker
AndroidLocationDataSource trackingLocationDataSource = new AndroidLocationDataSource(this);
trackingLocationDataSource.addLocationChangedListener(locationChangedEvent -> {
if (mRouteTracker != null) {
// pass new location to the route tracker
mRouteTracker.trackLocationAsync(locationChangedEvent.getLocation());
}
});
trackingLocationDataSource.startAsync();
// get references to the ui views defined in the layout
mHelpLabel = findViewById(R.id.helpLabelTextView);
mArView = findViewById(R.id.arView);
mCalibrationView = findViewById(R.id.calibrationView);
// show/hide calibration view
Button calibrationButton = findViewById(R.id.calibrateButton);
calibrationButton.setOnClickListener(v -> {
// toggle calibration
mIsCalibrating = !mIsCalibrating;
if (mIsCalibrating) {
mScene.getBaseSurface().setOpacity(0.5f);
mCalibrationView.setVisibility(View.VISIBLE);
} else {
mScene.getBaseSurface().setOpacity(0f);
mCalibrationView.setVisibility(View.GONE);
}
});
// start navigation
Button navigateButton = findViewById(R.id.navigateStartButton);
// start turn-by-turn when the user is ready
navigateButton.setOnClickListener(v -> {
// create a route tracker with the route result
mRouteTracker = new RouteTracker(this, sRouteResult, 0, true);
// initialize text-to-speech to play navigation voice guidance
mTextToSpeech = new TextToSpeech(this, status -> {
if (status != TextToSpeech.ERROR) {
mTextToSpeech.setLanguage(Resources.getSystem().getConfiguration().locale);
}
});
mRouteTracker.addNewVoiceGuidanceListener((RouteTracker.NewVoiceGuidanceEvent newVoiceGuidanceEvent) -> {
// Get new guidance
String newGuidanceText = newVoiceGuidanceEvent.getVoiceGuidance().getText();
// Display and then read out the new guidance
mHelpLabel.setText(newGuidanceText);
// read out directions
mTextToSpeech.stop();
mTextToSpeech.speak(newGuidanceText, TextToSpeech.QUEUE_FLUSH, null);
});
mRouteTracker
.addTrackingStatusChangedListener((RouteTracker.TrackingStatusChangedEvent trackingStatusChangedEvent) -> {
// Display updated guidance
mHelpLabel.setText(mRouteTracker.generateVoiceGuidance().getText());
});
});
// wire up joystick seek bars to allow manual calibration of height and heading
JoystickSeekBar headingJoystick = findViewById(R.id.headingJoystick);
// listen for calibration value changes for heading
headingJoystick.addDeltaProgressUpdatedListener(delta -> {
// get the origin camera
Camera camera = mArView.getOriginCamera();
// add the heading delta to the existing camera heading
double heading = camera.getHeading() + delta;
// get a camera with a new heading
Camera newCam = camera.rotateTo(heading, camera.getPitch(), camera.getRoll());
// apply the new origin camera
mArView.setOriginCamera(newCam);
});
JoystickSeekBar altitudeJoystick = findViewById(R.id.altitudeJoystick);
// listen for calibration value changes for altitude
altitudeJoystick.addDeltaProgressUpdatedListener(delta -> {
mCurrentVerticalOffset += delta;
// get the origin camera
Camera camera = mArView.getOriginCamera();
// elevate camera by the delta
Camera newCam = camera.elevate(delta);
// apply the new origin camera
mArView.setOriginCamera(newCam);
});
// this step is handled on the back end anyways, but we're applying a vertical offset to every update as per the
// calibration step above
mArView.getLocationDataSource().addLocationChangedListener(locationChangedEvent -> {
Point updatedLocation = locationChangedEvent.getLocation().getPosition();
mArView.setOriginCamera(new Camera(
new Point(updatedLocation.getX(), updatedLocation.getY(), updatedLocation.getZ() + mCurrentVerticalOffset),
mArView.getOriginCamera().getHeading(), mArView.getOriginCamera().getPitch(),
mArView.getOriginCamera().getRoll()));
});
// remind the user to calibrate the heading and altitude before starting navigation
Toast.makeText(this, "Calibrate your heading and altitude before navigating!", Toast.LENGTH_LONG).show();
}
/**
* Request read external storage for API level 23+.
*/
private void requestPermissions() {
// define permission to request
String[] reqPermission = { Manifest.permission.CAMERA };
int requestCode = 2;
if (ContextCompat.checkSelfPermission(this, reqPermission[0]) == PackageManager.PERMISSION_GRANTED) {
navigateInAr();
} else {
// request permission
ActivityCompat.requestPermissions(this, reqPermission, requestCode);
}
}
/**
* Handle the permissions request response.
*/
@Override
public void onRequestPermissionsResult(int requestCode, @NonNull String[] permissions, @NonNull int[] grantResults) {
if (grantResults.length > 0 && grantResults[0] == PackageManager.PERMISSION_GRANTED) {
navigateInAr();
} else {
// report to user that permission was denied
Toast.makeText(this, getString(R.string.navigate_ar_permission_denied), Toast.LENGTH_SHORT).show();
}
super.onRequestPermissionsResult(requestCode, permissions, grantResults);
}
@Override
protected void onPause() {
if (mArView != null) {
mArView.stopTracking();
}
super.onPause();
}
@Override
protected void onResume() {
super.onResume();
if (mArView != null) {
mArView.startTracking(ArcGISArView.ARLocationTrackingMode.CONTINUOUS);
}
}
}