Learn how to create and display a map with a basemap layer.
A map contains layers of geographic data. A map contains a basemap layer and, optionally, one or more data layers. You can display a specific area of a map by using a map view and setting the location and zoom level.
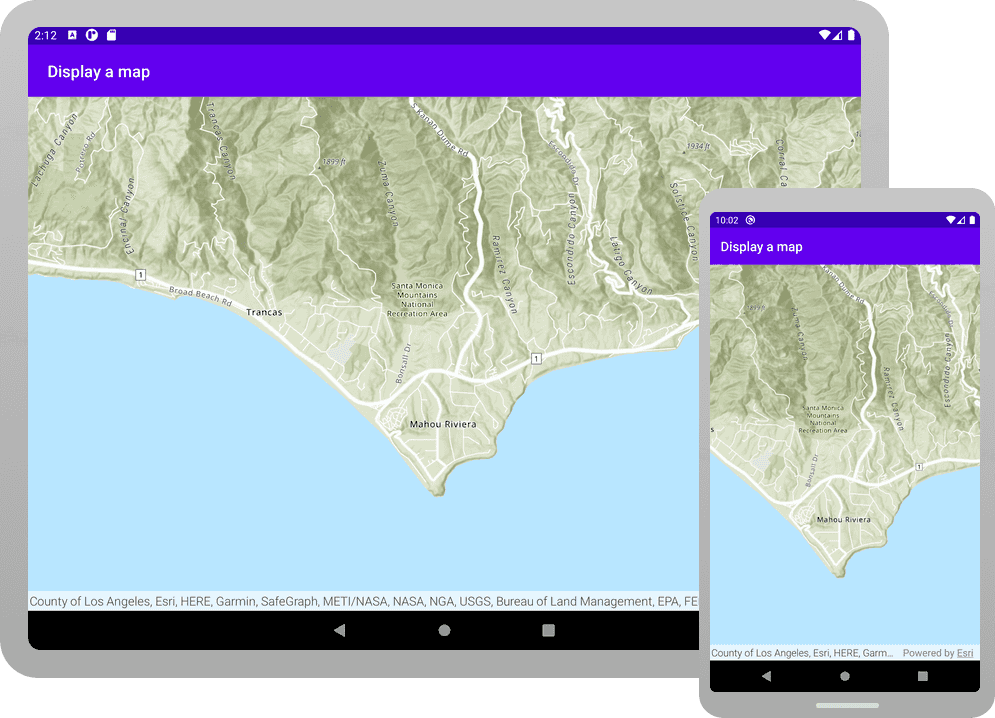
In this tutorial, you create and display a map of the Santa Monica Mountains in California using the topographic basemap layer.
The map and code will be used as the starting point for other 2D tutorials.
Prerequisites
Before starting this tutorial, you need the following:
-
An ArcGIS Location Platform or ArcGIS Online account.
-
A development and deployment environment that meets the system requirements.
-
An IDE for Android development in Kotlin.
Set up authentication
To access the secure ArcGIS location services used in this tutorial, you must implement API key authentication or user authentication using an ArcGIS Location Platform or an ArcGIS Online account.
You can implement API key authentication or user authentication in this tutorial. Compare the differences below:
API key authentication
- Users are not required to sign in.
- Requires creating an API key credential with the correct privileges.
- API keys are long-lived access tokens.
- Service usage is billed to the API key owner/developer.
- Simplest authentication method to implement.
- Recommended approach for new ArcGIS developers.
Learn more in API key authentication.
User authentication
- Users are required to sign in with an ArcGIS account.
- User accounts must have privilege to access the ArcGIS services used in application.
- Requires creating OAuth credentials.
- Application uses a redirect URL and client ID.
- Service usage is billed to the organization of the user signed into the application.
Learn more in User authentication.
To complete this tutorial, click on the tab in the switcher below for your authentication type of choice, either API key authentication or User authentication.
Create a new API key access token with privileges to access the secure resources used in this tutorial.
-
Complete the Create an API key tutorial and create an API key with the following privilege(s):
- Privileges
- Location services > Basemaps
- Privileges
-
Copy and paste the API key access token into a safe location. It will be used in a later step.
Develop or download
You have two options for completing this tutorial:
Option 1: Develop the code
Create a new Android Studio project
Use Android Studio to create an app and configure it to reference the API.
-
Open Android Studio.
-
In the Welcome to Android Studio window, click New Project.
Or if you already have Android Studio opened, click File > New > New Project in the menu bar.
-
In the New Project window, make sure Phone and Tablet tab is selected, and then select Empty Activity. Click Next.
-
In the next window, set the following options and then click Finish.
- Name:
Tutorial. - Package name: Change to
com.example.app. Or change to match your organization. - Save location: Set to a new folder.
- Minimum SDK: API 28 ("Pie"; Android 9.0)
- Build configuration language: Kotlin DSL (build.gradle.kts)
- Name:
-
-
In the Project tool window, make sure that your current view is Android. These tutorial instructions refer to that view.
If your view name is something other than Android (such as Project or Packages), click on the dropdown arrow and select Android from the list.

-
From the Android view, open Gradle Scripts > build.gradle.kts (Project: Tutorial). Replace the contents of the file with the following code.
build.gradle.kts (Project: Tutorial)Use dark colors for code blocks // Top-level build file where you can add configuration options common to all sub-projects/modules. plugins { alias(libs.plugins.android.application) apply false alias(libs.plugins.kotlin.android) apply false alias(libs.plugins.kotlin.compose) apply false } -
From the Android view, open Gradle Scripts > build.gradle.kts (Module :app). Replace the contents of the file with the entire expanded code below.
build.gradle.kts (Module: app)Use dark colors for code blocks // ArcGIS Maps for Kotlin - SDK dependency implementation(libs.arcgis.maps.kotlin) // Toolkit dependencies implementation(platform(libs.arcgis.maps.kotlin.toolkit.bom)) implementation(libs.arcgis.maps.kotlin.toolkit.geoview.compose) implementation(libs.arcgis.maps.kotlin.toolkit.authentication)Kotlin 2.0+ requires the Compose Compiler Gradle plugin, which is referenced as
alias(libs.plugins.kotlin.compose)in thepluginsblock at the top of thebuild.gradle.kts (and declared asModule :app) kotlin-compose = { id = "org.jetbrains.kotlin.plugin.compose", version.ref = "kotlin" }in thelibs.versions.tomlfile. The version of the Compose Compiler Gradle plugin and the Kotlin Android plugin are the same.If you are using a Kotlin version earlier than 2.0, you must verify that the Compose compiler and the Kotlin compiler versions are compatible. For details, see Compose to Kotlin Compatibility Map.
-
From the Android view, open Gradle Scripts > libs.versions.toml. In the
[versions]section, you need to declare the version number for ArcGIS Maps SDK for Kotlin. And in the[libraries]section, you need to add the library declarations for the following:arcgis-maps-kotlinarcgis-maps-kotlin-toolkit-bomarcgis-maps-kotlin-toolkit-geoview-composearcgis-maps-kotlin-toolkit-authentication
The version for the Toolkit BOM applies to all the Toolkit modules you declare.
Gradle version catalogs are the standard Android approach to declaring dependency versions. They are preferred over specifying versions numbers in the
build.gradle.ktsor listing version numbers in aversion.gradle. In recent releases of Android Studio, the New Project Wizard generatesbuild.gradle.ktsandgradle/libs.versions.tomlfiles that support this standard.Gradle version catalogs can also use BOM files to specify a single version number for all artifacts in the BOM. For more details, see
Using the BOMin theREADMEof the ArcGIS Maps SDK for Kotlin Toolkit.Expand the code below, copy the entire expanded contents, and paste it into
libs.version.tomlfile, replacing the original contents generated by the New Project Wizard.gradle/libs.versions.tomlUse dark colors for code blocks [versions] arcgisMapsKotlin = "200.8.0" # Version numbers added by Android Studio New Project Wizard agp = "8.9.2" kotlin = "2.1.20" coreKtx = "1.16.0" junit = "4.13.2" -
From the Android view, open Gradle Scripts > settings.gradle.kts. Replace the contents of the file with the expanded code below.
settings.gradle.kts (Tutorial)Use dark colors for code blocks dependencyResolutionManagement { repositoriesMode.set(RepositoriesMode.FAIL_ON_PROJECT_REPOS) repositories { google() mavenCentral() maven { url = uri("https://esri.jfrog.io/artifactory/arcgis") } } } rootProject.name = "Tutorial" include(":app") -
Sync the Gradle changes. Click the Sync now prompt or click the refresh icon (Sync Project with Gradle Files) in the toolbar. This may take several minutes.
-
From the Android view, open app > manifests > AndroidManifest.xml. Update the Android manifest to allow internet access.
Insert these new elements within the
manifestelement. Do not alter or remove any other statements.Depending on what ArcGIS functionality you add in future tutorials, it is likely you will need to add additional permissions to your manifest.
AndroidManifest.xmlUse dark colors for code blocks 3 4 5Add line. <manifest xmlns:android="http://schemas.android.com/apk/res/android" xmlns:tools="http://schemas.android.com/tools"> <uses-permission android:name="android.permission.INTERNET" />
Create a map
-
From the Android view, right click on app > kotlin+java > com.example.app, select New > package from the list. Enter com.example.app.screens as the package name. Hit Enter on your keyboard. This step creates a new package that will contain the UI files.
-
Right click on the screens package you just created, select New > Kotlin Class/File from the list. In the pop-up window, select File and enter MainScreen as the file name. Hit Enter on your keyboard.
-
In MainScreen.kt, delete any lines of code that were inserted automatically by Android Studio. Then add the following OptIn annotation, package name, and imports.
MainScreen.ktUse dark colors for code blocks @file:OptIn(ExperimentalMaterial3Api::class) package com.example.app.screens import androidx.compose.foundation.layout.fillMaxSize import androidx.compose.foundation.layout.padding import androidx.compose.material3.ExperimentalMaterial3Api import androidx.compose.material3.Scaffold import androidx.compose.material3.Text import androidx.compose.material3.TopAppBar import androidx.compose.runtime.Composable import androidx.compose.runtime.remember import androidx.compose.ui.Modifier import androidx.compose.ui.res.stringResource import com.arcgismaps.mapping.ArcGISMap import com.arcgismaps.mapping.BasemapStyle import com.arcgismaps.mapping.Viewpoint import com.arcgismaps.toolkit.geoviewcompose.MapView import com.example.app.R -
Create a top-level function named
createthat returns anMap() ArcGISMap.MainScreen.ktUse dark colors for code blocks fun createMap(): ArcGISMap { } -
Create an
ArcGISMapusing theBasemapStyle.ArcGISTopographic, and callapply {}on the map. The function returns thisArcGISMap.For more information on
apply {}, see Kotlin scope functions.MainScreen.ktUse dark colors for code blocks fun createMap(): ArcGISMap { return ArcGISMap(BasemapStyle.ArcGISTopographic).apply { } } -
In the
applyblock, create aViewpointwith x (longitude) and y (latitude) coordinates, and a scale. Assign the view point to theinitialproperty of theViewpoint ArcGISMap.Scale is an integral part of creating a viewpoint. It determines how closely you view your map. Scale is a ratio between measurements on a map view and measurements in the real-world. Use this conversion tool to see how scale works relative to zoom level and learn more about their relationship.
MainScreen.ktUse dark colors for code blocks fun createMap(): ArcGISMap { return ArcGISMap(BasemapStyle.ArcGISTopographic).apply { initialViewpoint = Viewpoint( latitude = 34.0270, longitude = -118.8050, scale = 72000.0 ) } }
Create a MainScreen to hold the map
-
Create a composable function named
Main, which will callScreen MapView.MainScreen.ktUse dark colors for code blocks @Composable fun MainScreen() { } -
Add a
rememberblock and callcreateinside it. Then assignMap() rememberto a local variable namedmap.The top-level composable function
rememberis used to retain state across recompositions.MainScreen.ktUse dark colors for code blocks @Composable fun MainScreen() { val map = remember { createMap() } } -
You will now call several composable functions from Android Jetpack Compose. Call
Scaffoldand pass aTopwith aApp Bar Textthat contains the app name (R.string.app)._name MainScreen.ktUse dark colors for code blocks @Composable fun MainScreen() { val map = remember { createMap() } Scaffold( topBar = { TopAppBar(title = { Text(text = stringResource(id = R.string.app_name)) }) } ) { } } -
In the trailing lambda for
Scaffold, call theMapViewcomposable defined in the ArcGIS Maps SDK for Kotlin Toolkit. Pass a Modifier that has maximum size and default padding. And passmapas thearcparameter.GIS Map MainScreen.ktUse dark colors for code blocks @Composable fun MainScreen() { val map = remember { createMap() } Scaffold( topBar = { TopAppBar(title = { Text(text = stringResource(id = R.string.app_name)) }) } ) { MapView( modifier = Modifier.fillMaxSize().padding(it), arcGISMap = map ) } }
Call MainScreen inside MainActivity class
-
Open the app > kotlin+java > com.example.app > MainActivity.kt. Delete all lines of code in the file. Then add the package declaration, import statements, and the
Mainclass.Activity MainActivity.ktUse dark colors for code blocks package com.example.app import android.os.Bundle import androidx.activity.ComponentActivity import androidx.activity.compose.setContent import androidx.activity.enableEdgeToEdge import com.arcgismaps.ApiKey import com.arcgismaps.ArcGISEnvironment import com.arcgismaps.httpcore.authentication.OAuthUserConfiguration import com.arcgismaps.toolkit.authentication.AuthenticatorState import com.arcgismaps.toolkit.authentication.DialogAuthenticator import com.example.app.screens.MainScreen import com.example.app.ui.theme.TutorialTheme class MainActivity : ComponentActivity() { } -
In the
setblock of theContent onlifecycle function, you will call the composable functionCreate() Main, with default theming applied. To do this, addScreen onwith the following code.Create() MainActivity.ktUse dark colors for code blocks class MainActivity : ComponentActivity() { override fun onCreate(savedInstanceState: Bundle?) { super.onCreate(savedInstanceState) enableEdgeToEdge() setContent { TutorialTheme { MainScreen() } } } }
Set developer credentials
To allow your app users to access ArcGIS Location Services, use the developer credentials that you created in the Set up authentication step to authenticate requests for resources.
-
In the Android view of Android Studio, open app > kotlin+java > com.example.app > MainActivity.
-
In the
onlifecycle method of theCreate() Mainclass, set theActivity ArcGISEnvironment.apiKeyproperty by callingApiKey.create(). Pass in your API key access token as a string and don't forget the double quotes. Do this before thesetblock.Content MainActivity.ktUse dark colors for code blocks class MainActivity : ComponentActivity() { override fun onCreate(savedInstanceState: Bundle?) { super.onCreate(savedInstanceState) ArcGISEnvironment.apiKey = ApiKey.create("YOUR_ACCESS_TOKEN") enableEdgeToEdge() setContent { TutorialTheme { MainScreen() } } } }
Best Practice: The access token is stored directly in the code as a convenience for this tutorial. Do not store credentials directly in source code in a production environment.
Run your app
-
Click Run > Run > app to run the app.
In Android Studio, you have two choices for running your app: an actual Android device or the Android Emulator.
Android device
Connect your computer to your Android device, using USB or Wi-Fi. For more details, see How to connect your Android device.
Android Emulator
Create an AVD (Android Virtual Device) to run in the Android Emulator. For details, see Run apps on the Android Emulator.
Selecting a device
When you build and run an app in Android Studio, you must first select a device. From the Android Studio toolbar, you can access the drop-down list of your currently available devices, both virtual and physical.
 .
.If you cannot access the list on the toolbar, click Tools > Device Manager.
You should see a map with the topographic basemap layer centered on the Santa Monica Mountains in California. Pinch, drag, and double-tap the map view to explore the map.
Alternatively, you can download the tutorial solution, as follows.
Option 2: Download the solution
-
Click the Download solution link in the right-hand side of this page.
-
Unzip the file to a location on your machine.
-
Run Android Studio.
-
Go to File > Open.... Navigate to the solution folder and click Open.
On Windows: If you are in the Welcome to Android Studio dialog, click Open and navigate to the solution folder. Then click Open.
Since the downloaded solution does not contain authentication credentials, you must add the developer credentials that you created in the Set up authentication section.
Set developer credentials in the solution
To allow your app users to access ArcGIS location services, use the developer credentials that you created in the Set up authentication step to authenticate requests for resources.
-
In the Android view of Android Studio, open app > kotlin+java > com.example.app > MainActivity. Set the
AuthenticationtoMode ..API _KEY MainActivity.ktUse dark colors for code blocks class MainActivity : ComponentActivity() { private enum class AuthenticationMode { API_KEY, USER_AUTH } private val authenticationMode = AuthenticationMode.API_KEY -
Set the
apiproperty with your API key access token.Key MainActivity.ktUse dark colors for code blocks override fun onCreate(savedInstanceState: Bundle?) { super.onCreate(savedInstanceState) when (authenticationMode) { AuthenticationMode.API_KEY -> { ArcGISEnvironment.apiKey = ApiKey.create("YOUR_ACCESS_TOKEN") }
Best Practice: The access token is stored directly in the code as a convenience for this tutorial. Do not store credentials directly in source code in a production environment.
Run the app
Click Run > Run > app to run the app.
You should see a map with the topographic basemap layer centered on the Santa Monica Mountains in California. Pinch, drag, and double-tap the map view to explore the map.
What's next?
Learn how to use additional API features, ArcGIS location services, and ArcGIS tools in these tutorials: