Learn how to implement user authentication to access a secure ArcGIS service with OAuth credentials in a cross-platform app.
You can use different types of authentication to access secured ArcGIS services. To implement OAuth credentials for user authentication, you can use your ArcGIS account to register an app with your portal and get a Client ID, and then configure your app to redirect users to login with their credentials when the service or content is accessed. This is known as user authentication. If the app uses premium ArcGIS Online services that consume credits, for example, the app user's account will be charged.
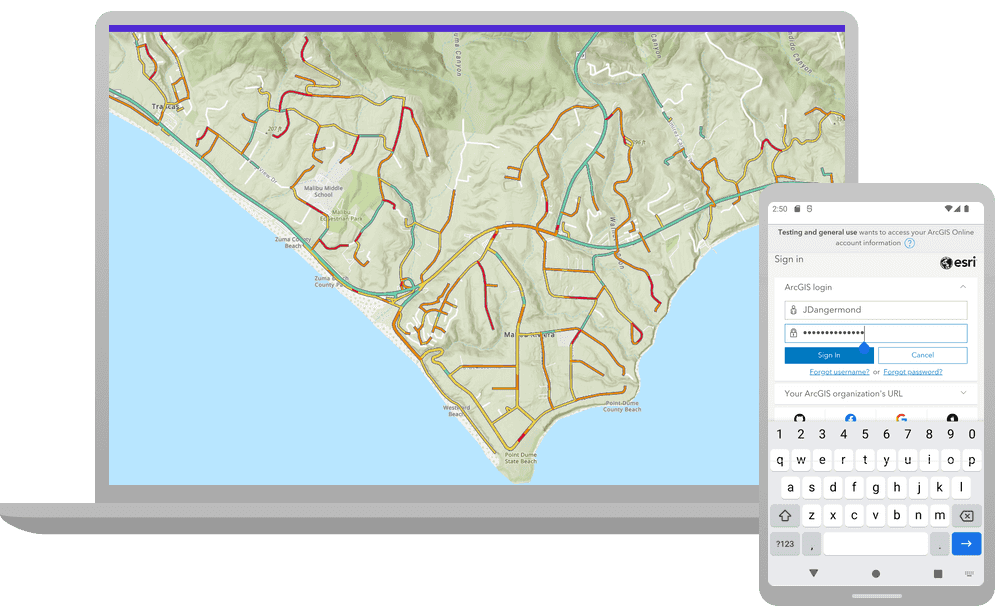
In this tutorial, you will build an app that implements user authentication using OAuth credentials so users can sign in and be authenticated through ArcGIS Online to access the ArcGIS World Traffic service.
Prerequisites
Before starting this tutorial:
-
You need an ArcGIS Location Platform or ArcGIS Online account.
-
Ensure your development environment meets the system requirements.
Optionally, you may want to install the ArcGIS Maps SDK for .NET to get access to project templates in Visual Studio (Windows only) and offline copies of the NuGet packages.
Create OAuth credentials for user authentication
OAuth credentials are required to implement user authentication. These credentials are created and stored as an Application item in your organization's portal.
-
Go to the Create OAuth credentials for user authentication tutorial and create OAuth credentials using your ArcGIS Location Platform or ArcGIS Online account.
-
Copy the
Client IDandRedirect URLas you will use them to implement user authentication later in this tutorial. Both theClient IDand theRedirect URLare found on the Settings page.
The Client ID uniquely identifies your app on the authenticating server. If the server cannot find an app with the provided Client ID, it will not proceed with authentication.
The Redirect URL (also referred to as a callback url) is used to identify a response from the authenticating server when the system returns control back to your app after an OAuth login. Since it does not necessarily represent a valid endpoint that a user could navigate to, the redirect URL can use a custom scheme, such as my-app. You can configure several redirect URLs in your application definition and can remove or edit them. It's important to make sure the redirect URL used in your app's code matches a redirect URL configured for the application.
Develop or download
You have two options for completing this tutorial:
Option 1: Develop the code
Create a new Visual Studio Project
ArcGIS Maps SDK for .NET supports apps for Windows Presentation Framework (WPF), Universal Windows Platform (UWP), Windows UI Library (WinUI), and Multi-platform App UI (.NET MAUI). The instructions for this tutorial are specific to creating a .NET MAUI project using Visual Studio for Windows.
-
Start Visual Studio and create a new project.
- In the Visual Studio start screen, click Create a new project.
- Choose the .NET MAUI App template for C#. If you don't see the template listed, you can find it by typing
MAUIinto the Search for templates text box. - Click Next.
- Provide required values in the Configure your new project panel:
- Project name:
AccessServices With O Auth - Location:
choose a folder
- Project name:
- Click Next.
- Choose the .NET 9 as framework you intend to target.
- Click Create to create the project.
If you are developing with Visual Studio for Windows, ArcGIS Maps SDK for .NET provides a set of project templates for each supported .NET platform. These templates provide all of the code needed for a basic Model-View-ViewModel (MVVM) app. Install the ArcGIS Maps SDK for .NET Visual Studio Extension to add the templates to Visual Studio (Windows only). See Install and set up for details.
Add a reference to the API
-
Add a reference to the API by installing a NuGet package.
-
In Solution Explorer, right-click Dependencies and choose Manage NuGet Packages.
-
In the NuGet Package Manager window, ensure the selected Package source is
nuget.org(upper-right). -
Select the Browse tab and search for ArcGIS Maps SDK.
-
In the search results, select the appropriate package for your platform. For this tutorial project, choose the Esri.ArcGISRuntime.Maui NuGet package.
-
Confirm the Latest stable version of the package is selected in the Version dropdown.
-
Click Apply.
-
The Preview Changes dialog confirms any package(s) dependencies or conflicts. Review the changes and click OK to continue installing the packages.
-
Review the license information on the License Acceptance dialog and click I Accept to add the package(s) to your project.
-
In the Visual Studio Output window, ensure the packages were successfully installed.
-
Close the NuGet Package Manager window.
-
Correct minimum OS versions
The .NET MAUI App template may have operating system (OS) requirements below what ArcGIS Maps SDK for .NET requires for a .NET MAUI app. You must modify the minimum OS versions in your .csproj to satisfy the ArcGIS Maps SDK for .NET requirements.
-
In Visual Studio > Solution Explorer, double-click AccessServicesWithOAuth to open the .csproj.
-
Modify the
<Supportedproperties in theOS Platform Version > <Propertyas shown below. This reflects the minimum OS requirements for ArcGIS Maps SDK for .NET MAUI for the current release.Group > AccessServicesWithOAuth.csprojUse dark colors for code blocks <!-- Versions --> <ApplicationDisplayVersion>1.0</ApplicationDisplayVersion> <ApplicationVersion>1</ApplicationVersion> <SupportedOSPlatformVersion Condition="$([MSBuild]::GetTargetPlatformIdentifier('$(TargetFramework)')) == 'ios'">16.0</SupportedOSPlatformVersion> <SupportedOSPlatformVersion Condition="$([MSBuild]::GetTargetPlatformIdentifier('$(TargetFramework)')) == 'maccatalyst'">14.0</SupportedOSPlatformVersion> <SupportedOSPlatformVersion Condition="$([MSBuild]::GetTargetPlatformIdentifier('$(TargetFramework)')) == 'android'">28.0</SupportedOSPlatformVersion> <SupportedOSPlatformVersion Condition="$([MSBuild]::GetTargetPlatformIdentifier('$(TargetFramework)')) == 'windows'">10.0.19041.0</SupportedOSPlatformVersion> <TargetPlatformMinVersion Condition="$([MSBuild]::GetTargetPlatformIdentifier('$(TargetFramework)')) == 'windows'">10.0.19041.0</TargetPlatformMinVersion> <SupportedOSPlatformVersion Condition="$([MSBuild]::GetTargetPlatformIdentifier('$(TargetFramework)')) == 'tizen'">6.5</SupportedOSPlatformVersion>The .NET MAUI App template includes Tizen as a platform. ArcGIS Maps SDK for .NET does not support Tizen, so feel free to remove Tizen code and resources from the solution. This step is optional, your project will work fine if you keep it as-is.
-
Save and close the .csproj file.
Set developer credentials
To allow your app users to access ArcGIS Location Services, use the developer credentials that you created in the Set up authentication step to authenticate requests for resources.
-
From the Visual Studio Project menu, choose Add class .... Name the class
ArcGISthen click Add. The new class is added to your project and opens in Visual Studio.Login Prompt.cs -
Select all the code in the new class and delete it.
-
Copy all of the code below and paste it into the
ArcGISclass in your project.Login Prompt.cs ArcGISLoginPrompt.csUse dark colors for code blocks Copy // Copyright 2022 Esri. // // Licensed under the Apache License, Version 2.0 (the "License"); you may not use this file except in compliance with the License. // You may obtain a copy of the License at: http://www.apache.org/licenses/LICENSE-2.0 // // Unless required by applicable law or agreed to in writing, software distributed under the License is distributed on an // "AS IS" BASIS, WITHOUT WARRANTIES OR CONDITIONS OF ANY KIND, either express or implied. See the License for the specific // language governing permissions and limitations under the License. using Esri.ArcGISRuntime.Security; using Esri.ArcGISRuntime.Portal; #if ANDROID using Android.App; using Application = Microsoft.Maui.Controls.Application; using Android.Content; using Android.Content.PM; #endif namespace UserAuth { internal static class ArcGISLoginPrompt { private const string ArcGISOnlineUrl = "https://www.arcgis.com/sharing/rest"; // Specify the Client ID and Redirect URL to use with OAuth authentication. // See the instructions here for creating OAuth app settings: // https://developers.arcgis.com/documentation/security-and-authentication/user-authentication/tutorials/create-oauth-credentials-user-auth/ public const string AppClientId = @"YOUR_CLIENT_ID"; private const string OAuthRedirectUrl = @"YOUR_REDIRECT_URL"; public static async Task<bool> EnsureAGOLCredentialAsync() { bool loggedIn = false; Credential? currentCredential = AuthenticationManager.Current.FindCredential(new Uri(ArcGISOnlineUrl), AuthenticationType.Token); if (currentCredential != null) { return true; // already logged in } try { // Create the portal, prompting the user to log in if they haven't already. var portal = await ArcGISPortal.CreateAsync(new Uri(ArcGISOnlineUrl), loginRequired: true); // If the user logged in successfully, the portal's User property will be non-null. loggedIn = portal.User != null; } catch (OperationCanceledException) { // OAuth login was canceled, no need to display error to user. } catch (Exception ex) { var mainPage = Application.Current?.Windows.FirstOrDefault()?.Page; if (mainPage != null) { await mainPage.DisplayAlert("Login failed", ex.Message, "OK"); } } return loggedIn; } public static void RegisterOAuthConfig() { var userConfig = new OAuthUserConfiguration(new Uri(ArcGISOnlineUrl), AppClientId, new Uri(OAuthRedirectUrl)); AuthenticationManager.Current.OAuthUserConfigurations.Add(userConfig); AuthenticationManager.Current.OAuthAuthorizeHandler = new OAuthAuthorize(); } } #region IOAuthAuthorizationHandler implementation public class OAuthAuthorize : IOAuthAuthorizeHandler { #if IOS || MACCATALYST TaskCompletionSource<IDictionary<string, string>> _taskCompletionSource; public Task<IDictionary<string, string>> AuthorizeAsync(Uri serviceUri, Uri authorizeUri, Uri callbackUri) { _taskCompletionSource = new TaskCompletionSource<IDictionary<string, string>>(); Microsoft.Maui.ApplicationModel.MainThread.BeginInvokeOnMainThread(async () => { try { var result = await WebAuthenticator.AuthenticateAsync(authorizeUri, callbackUri); _taskCompletionSource.TrySetResult(result.Properties); } catch (Exception ex) { _taskCompletionSource.TrySetException(ex); } }); return _taskCompletionSource.Task; } #elif ANDROID public async Task<IDictionary<string, string>> AuthorizeAsync(Uri serviceUri, Uri authorizeUri, Uri callbackUri) { var result = await WebAuthenticator.AuthenticateAsync(authorizeUri, callbackUri); return result.Properties; } #elif WINDOWS public async Task<IDictionary<string, string>> AuthorizeAsync(Uri serviceUri, Uri authorizeUri, Uri callbackUri) { var result = await WinUIEx.WebAuthenticator.AuthenticateAsync(authorizeUri, callbackUri); return result.Properties; } #else public async Task<IDictionary<string, string>> AuthorizeAsync(Uri serviceUri, Uri authorizeUri, Uri callbackUri) { throw new NotImplementedException(); } #endif } #if ANDROID [Activity(NoHistory = true, Exported = true, LaunchMode = LaunchMode.SingleTop)] [IntentFilter(new[] { Intent.ActionView }, Categories = new[] { Intent.CategoryDefault, Intent.CategoryBrowsable }, DataScheme = "my-app", DataHost = "auth")] public class WebAuthenticationCallbackActivity : WebAuthenticatorCallbackActivity { } #endif #endregion IOAuthAuthorizationHandler implementation } -
Add your values for the client ID (
App) and for the redirect URL (Client Id O). These are the user authentication settings you created in the Set up authentication step.Auth Redirect Url ArcGISLoginPrompt.csUse dark colors for code blocks internal static class ArcGISLoginPrompt { private const string ArcGISOnlineUrl = "https://www.arcgis.com/sharing/rest"; // Specify the Client ID and Redirect URL to use with OAuth authentication. // See the instructions here for creating OAuth app settings: // https://developers.arcgis.com/documentation/security-and-authentication/user-authentication/tutorials/create-oauth-credentials-user-auth/ public const string AppClientId = @"YOUR_CLIENT_ID"; private const string OAuthRedirectUrl = @"YOUR_REDIRECT_URL"; -
Save and close the
ArcGISfile.Login Prompt.cs -
In the Solution Explorer, open MauiProgram.cs by double-clicking.
-
Add the following required
usingdirectives at the top of the file.MauiProgram.csUse dark colors for code blocks namespace DisplayAMap; using Esri.ArcGISRuntime; using Esri.ArcGISRuntime.Maui; using Microsoft.Extensions.Logging; public static class MauiProgram { public static MauiApp CreateMauiApp() { -
In the
Createfunction, below the code that creates theMaui App() Maui, callApp Builder Useon theArcGIS Runtime buildervariable. Also add a line to set the OAuth challenge handler (defined in the staticArcGISclass).Login Prompt MauiProgram.csUse dark colors for code blocks var builder = MauiApp.CreateBuilder(); builder .UseMauiApp<App>() .ConfigureFonts(fonts => { fonts.AddFont("OpenSans-Regular.ttf", "OpenSansRegular"); fonts.AddFont("OpenSans-Semibold.ttf", "OpenSansSemibold"); }); builder.UseArcGISRuntime(config => { }); // Set up the AuthenticationManager to use OAuth for secure ArcGIS Online requests. UserAuth.ArcGISLoginPrompt.RegisterOAuthConfig(); #if DEBUG builder.Logging.AddDebug(); #endif -
Save and close the MauiProgram.cs file.
Best Practice: The OAuth credentials are stored directly in the code as a convenience for this tutorial. Do not store credentials directly in source code in a production environment.
-
Follow the steps below to set up the .NET MAUI
Webfor the desired platform(s). Note that these configuration settings assume your redirect URL begins withAuthenticator my-app. The .NET MAUI WebAuthenticator helps you implement browser-based authentication flows, which listen for a callback to a specific URL registered to the app.://
Currently Web does not work on Windows without some additional work. See the .NET MAUI GitHub issue #2702 for details. There are a number of possible workarounds. For this tutorial, you will use a third-party nuget library.
-
In the Visual Studio > Solution Explorer, double-click the project node to open the project file.
-
Include the following package reference in the .csproj file.
Project file (csproj)Use dark colors for code blocks <ItemGroup Condition="'$(TargetFramework)' == 'net9.0-windows10.0.19041.0'"> <PackageReference Include="WinUIEx" Version="2.6.0" /> </ItemGroup> </Project> -
Also add the following settings to the
<Propertyin the project file.Group > Project file (csproj)Use dark colors for code blocks <!-- Versions --> <ApplicationDisplayVersion>1.0</ApplicationDisplayVersion> <ApplicationVersion>1</ApplicationVersion> <SupportedOSPlatformVersion Condition="$([MSBuild]::GetTargetPlatformIdentifier('$(TargetFramework)')) == 'ios'">16.0</SupportedOSPlatformVersion> <SupportedOSPlatformVersion Condition="$([MSBuild]::GetTargetPlatformIdentifier('$(TargetFramework)')) == 'maccatalyst'">14.0</SupportedOSPlatformVersion> <SupportedOSPlatformVersion Condition="$([MSBuild]::GetTargetPlatformIdentifier('$(TargetFramework)')) == 'android'">28.0</SupportedOSPlatformVersion> <SupportedOSPlatformVersion Condition="$([MSBuild]::GetTargetPlatformIdentifier('$(TargetFramework)')) == 'windows'">10.0.19041.0</SupportedOSPlatformVersion> <TargetPlatformMinVersion Condition="$([MSBuild]::GetTargetPlatformIdentifier('$(TargetFramework)')) == 'windows'">10.0.19041.0</TargetPlatformMinVersion> <SupportedOSPlatformVersion Condition="$([MSBuild]::GetTargetPlatformIdentifier('$(TargetFramework)')) == 'tizen'">6.5</SupportedOSPlatformVersion> <WindowsSdkPackageVersion>10.0.22621.38</WindowsSdkPackageVersion> <AllowUnsafeBlocks>true</AllowUnsafeBlocks> </PropertyGroup> -
Save and close the project file.
-
In your application constructor (
App.xaml.csfile), add the following code to perform an OAuth startup activation check (Windows only).App.xaml.csUse dark colors for code blocks namespace DisplayAMap; public partial class App : Application { public App() { #if WINDOWS if (WinUIEx.WebAuthenticator.CheckOAuthRedirectionActivation()) return; #endif InitializeComponent(); } protected override Window CreateWindow(IActivationState? activationState) { // Create and return the main application window return new Window(new AppShell()); } } -
Save and close the
App.xaml.csfile.
For WinUI 3, the callback URI protocol needs to be included in the Package.appxmanifest file. The Protocol Name must match the URI scheme of the redirect URL on your ArcGIS Location Platform account.
-
In the Visual Studio > Solution Explorer, navigate to the Platforms\Windows folder.
-
Right-click the Package.appxmanifest file and choose Open with ... to open the file in an XML (Text) Editor then add the following lines.
Package.appxmanifestUse dark colors for code blocks <Applications> <Application Id="App" Executable="$targetnametoken$.exe" EntryPoint="$targetentrypoint$"> <uap:VisualElements DisplayName="$placeholder$" Description="$placeholder$" Square150x150Logo="$placeholder$.png" Square44x44Logo="$placeholder$.png" BackgroundColor="transparent"> <uap:DefaultTile Square71x71Logo="$placeholder$.png" Wide310x150Logo="$placeholder$.png" Square310x310Logo="$placeholder$.png" /> <uap:SplashScreen Image="$placeholder$.png" /> </uap:VisualElements> <Extensions> <uap:Extension Category="windows.protocol"> <uap:Protocol Name="my-app"/> </uap:Extension> </Extensions> </Application> </Applications>
The iOS and Mac Catalyst platforms require the inclusion of your app's callback URI pattern in their Info.plist files. The CF value must match the URI scheme of the redirect URL on your ArcGIS Location Platform account.
-
In the Visual Studio > Solution Explorer, navigate to the Platforms\iOS folder.
-
Right-click the Info.plist file and choose Open with ... to open the file in an XML (Text) Editor then add the following lines. Make the same edits in the Platforms\MacCatalyst\Info.plist file.
Info.plistUse dark colors for code blocks <key>XSAppIconAssets</key> <string>Assets.xcassets/appicon.appiconset</string> <key>CFBundleURLTypes</key> <array> <dict> <key>CFBundleURLName</key> <string>My App</string> <key>CFBundleURLSchemes</key> <array> <string>my-app</string> </array> <key>CFBundleTypeRole</key> <string>Editor</string> </dict> </array>
For Android, the AndroidManifest.xml file must be updated to include the Custom, which is required by the Web.
-
In the Visual Studio > Solution Explorer, navigate to the Platforms\Android folder.
-
Right-click the AndroidManifest.xml file and choose Open with ... to open the file in an XML (Text) Editor then add the following lines.
<!--https://github.com/dotnet/maui/issues/3760#issuecomment-1046241094-->
<queries>
<intent>
<action android:name="android.support.customtabs.action.CustomTabsService" />
</intent>
</queries>
Android also requires the implementation of WebAuthenticatorCallbackActivity class, which is included in the ArcGISLoginPrompt.cs class you added above.
Add a traffic layer
You will add a layer to display the ArcGIS World Traffic service, a dynamic map service that presents historical and near real-time traffic information for different regions in the world. This is a secure service and requires an ArcGIS Online organizational subscription.
ArcGIS World Traffic service data is updated every five minutes to provide traffic speed and traffic incident visualization and identification.
Traffic speeds are displayed as a percentage of free-flow speeds, which is frequently the speed limit or how fast cars tend to travel when unencumbered by other vehicles. The streets are color coded as follows:
- Green (fast): 85 - 100% of free flow speeds
- Yellow (moderate): 65 - 85%
- Orange (slow); 45 - 65%
- Red (stop and go): 0 - 45%
-
In the Visual Studio > Solution Explorer, double-click MapViewModel.cs to open the file.
The project uses the Model-View-ViewModel (MVVM) design pattern to separate the application logic (view model) from the user interface (view).
Mapcontains the view model class for the application, calledView Model.cs Map. See the Microsoft documentation for more information about the Model-View-ViewModel pattern.View Model -
In the
Setupfunction, update the line that sets theMap() Mapproperty for the view model to instead store the map in a variable. Also change the line that sets the map's initial extent to use the variable.MapViewModel.csUse dark colors for code blocks private void SetupMap() { // Create a new map with a 'topographic vector' basemap. var trafficMap = new Map(BasemapStyle.ArcGISTopographic); var mapCenterPoint = new MapPoint(-118.805, 34.027, SpatialReferences.Wgs84); trafficMap.InitialViewpoint = new Viewpoint(mapCenterPoint, 100000); } -
Create an
ArcGISMapImageLayerto display the traffic service and add it to the map's collection of data layers (operational layers).MapViewModel.csUse dark colors for code blocks private void SetupMap() { // Create a new map with a 'topographic vector' basemap. var trafficMap = new Map(BasemapStyle.ArcGISTopographic); var mapCenterPoint = new MapPoint(-118.805, 34.027, SpatialReferences.Wgs84); trafficMap.InitialViewpoint = new Viewpoint(mapCenterPoint, 100000); // Create a layer to display the ArcGIS World Traffic service. var trafficServiceUrl = "https://traffic.arcgis.com/arcgis/rest/services/World/Traffic/MapServer"; var trafficLayer = new ArcGISMapImageLayer(new Uri(trafficServiceUrl)); // Add the traffic layer to the map's data layer collection. trafficMap.OperationalLayers.Add(trafficLayer); } -
Set the view model's
Mapproperty. Data binding handles displaying the map in the view.MapViewModel.csUse dark colors for code blocks private void SetupMap() { // Create a new map with a 'topographic vector' basemap. var trafficMap = new Map(BasemapStyle.ArcGISTopographic); var mapCenterPoint = new MapPoint(-118.805, 34.027, SpatialReferences.Wgs84); trafficMap.InitialViewpoint = new Viewpoint(mapCenterPoint, 100000); // Create a layer to display the ArcGIS World Traffic service. var trafficServiceUrl = "https://traffic.arcgis.com/arcgis/rest/services/World/Traffic/MapServer"; var trafficLayer = new ArcGISMapImageLayer(new Uri(trafficServiceUrl)); // Add the traffic layer to the map's data layer collection. trafficMap.OperationalLayers.Add(trafficLayer); // Set the view model Map property with the new map. this.Map = trafficMap; }
Run the app
Click Debug > Start Debugging (or press <F5> on the keyboard) to run the app.
If creating apps for Android or iOS, you will need the appropriate emulator, simulator, or device configured for testing (see System requirements for details)
You will be prompted for a username and password. Once you authenticate successfully, you will see a traffic map centered on the Santa Monica Mountains in California.

Alternatively, you can download the tutorial solution, as follows.
Option 2: Download the solution
-
Click the Download solution link in the right-hand panel of the page.
-
Unzip the file to a location on your machine.
-
Open the
.slnfile in Visual Studio.
Since the downloaded solution does not contain authentication credentials, you must add the developer credentials that you created in the Set up authentication section.
Set developer credentials in the solution
To allow your app users to access ArcGIS location services, use the developer credentials that you created in the Set up authentication step to authenticate requests for resources.
-
From the Visual Studio Solution explorer window, open the
ArcGISfile.Login Prompt.cs -
Set your values for the client ID (
O) and the redirect URL (Auth Client ID O). These are the user authentication settings you created in the Set up authentication step.Auth Redirect Url ArcGISLoginPrompt.csUse dark colors for code blocks internal static class ArcGISLoginPrompt { private const string ArcGISOnlineUrl = "https://www.arcgis.com/sharing/rest"; // Specify the Client ID and Redirect URL to use with OAuth authentication. // See the instructions here for creating OAuth app settings: // https://developers.arcgis.com/documentation/security-and-authentication/user-authentication/tutorials/create-oauth-credentials-user-auth/ public const string AppClientId = @"YOUR_CLIENT_ID"; private const string OAuthRedirectUrl = @"YOUR_REDIRECT_URL";
Best Practice: The OAuth credentials are stored directly in the code as a convenience for this tutorial. Do not store credentials directly in source code in a production environment.
Run the app
Click Debug > Start Debugging (or press <F5> on the keyboard) to run the app.
If creating apps for Android or iOS, you will need the appropriate emulator, simulator, or device configured for testing (see System requirements for details)
You will be prompted for a username and password. Once you authenticate successfully, you will see a traffic map centered on the Santa Monica Mountains in California.
Additional resources
If you are implementing OAuth for another .NET platform, you might find some of the following resources helpful.
- ArcGIS Maps SDK for .NET OAuth sample: The WPF version of this sample uses code similar to code used in this tutorial. The sample is available for other .NET platforms (use the switcher control at the top of the page) to illustrate implementing OAuth for apps targeting WinUI, UWP, and .NET MAUI.
- Web authentication broker: Use this authentication broker to implement OAuth in your Universal Windows Platform (UWP) apps.