Learn how to create and display a scene with a basemap layer and an elevation layer. Set properties of the scene's camera to control the 3D perspective.
Like a map, a scene contains layers of geographic data. It contains a basemap layer and, optionally, one or more data layers. To provide a realistic view of the terrain, you can also add elevation layers to define the height of the surface across the scene. The 3D perspective of the scene is controlled by the scene's camera, which defines the position of the scene observer in 3D space.
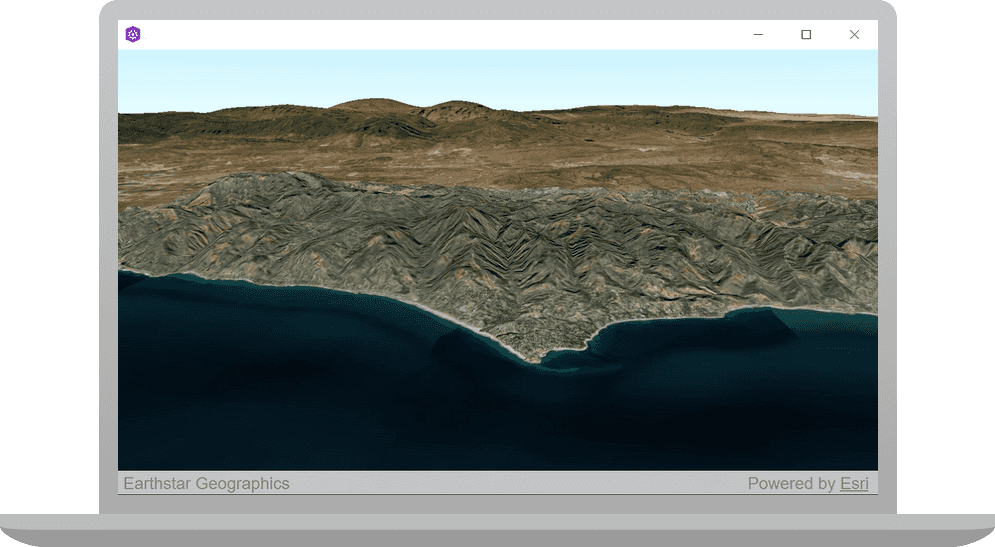
In this tutorial, you create and display a scene using the imagery basemap layer. The surface of the scene is defined with an elevation layer and the camera is positioned to display an area of the Santa Monica Mountains in the scene view.
The scene and code will be used as the starting point for other 3D tutorials.
Prerequisites
Before starting this tutorial:
-
You need an ArcGIS Location Platform or ArcGIS Online account.
-
Your system meets the system requirements.
-
The ArcGIS Maps SDK for Qt, version 200.8.0 or later is installed.
-
The Qt 6.8.2 software development framework or later is installed.
Set up authentication
To access the secure ArcGIS location services used in this tutorial, you must implement API key authentication or user authentication using an ArcGIS Location Platform or an ArcGIS Online account.
You can implement API key authentication or user authentication in this tutorial. Compare the differences below:
API key authentication
- Users are not required to sign in.
- Requires creating an API key credential with the correct privileges.
- API keys are long-lived access tokens.
- Service usage is billed to the API key owner/developer.
- Simplest authentication method to implement.
- Recommended approach for new ArcGIS developers.
Learn more in API key authentication.
User authentication
- Users are required to sign in with an ArcGIS account.
- User accounts must have privilege to access the ArcGIS services used in application.
- Requires creating OAuth credentials.
- Application uses a redirect URL and client ID.
- Service usage is billed to the organization of the user signed into the application.
Learn more in User authentication.
To complete this tutorial, click on the tab in the switcher below for your authentication type of choice, either API key authentication or User authentication.
Create a new API key access token with privileges to access the secure resources used in this tutorial.
-
Complete the Create an API key tutorial and create an API key with the following privilege(s):
- Privileges
- Location services > Basemaps
- Privileges
-
Copy and paste the API key access token into a safe location. It will be used in a later step.
Because this tutorial is the foundation (or starting point) for several other tutorials, you will want to follow one path for authentication (either API Key authentication or User authentication (via OAuth)) and use that same pattern for the other tutorials. If you wish to change authentication patterns as you move through the other tutorials you will want to complete this tutorial, Display a scene, again using the other authentication pattern.
Develop or Download
You have two options for completing this tutorial:
Option 1: Develop the code
Create a new ArcGIS Maps Qt Creator Project
-
Start Qt Creator.
-
In the top menu bar, click File > New Project.
-
In the New Project dialog, in the left frame, under Projects, select ArcGIS. Then select the ArcGIS Maps 200.8.0 Qt Quick C++ app project template (or a later version) and click Choose. This will launch the template wizard.
-
In the Project Location template, name your project Display_a_scene. You can specify your own "create in" location for where the project will be created or leave the default. Click Next.
-
In the Define Build System template, select qmake for your build system. Click Next.
-
In the Define Project Details template, give this app a description or leave as is. Check ON the 3D project check box. At the ArcGIS Online Basemap dropdown menu, select Imagery. Accept the default value for the ArcGIS Online Elevation (WorldElevation3D) dropdown. Do not supply an API Key (also called an access token) at this time, leave it blank. You will do this in another step when you set your developer credentials. Click Next.
-
In the Kit Selection template, check on the kit you previously set up when you installed Qt (Desktop Qt 6.8.2 MSVC2022 64bit or higher required). Click Next.
-
In the Project Management template, the option to Add as a subproject to root project is only available if you have already created a root project. If you have a version control system set up, you can select it in the dropdown but it is not needed to complete this tutorial. Click Finish to complete the template wizard.
Display a scene
-
In the project Headers folder of Qt Creator, double-click the file Display_a_scene.h to open it.
-
Add the declaration
void setupunderScene(); private. Then save the file.: Display_a_scene.hUse dark colors for code blocks private: Esri::ArcGISRuntime::SceneQuickView* sceneView() const; void setSceneView(Esri::ArcGISRuntime::SceneQuickView* sceneView); Esri::ArcGISRuntime::Scene* m_scene = nullptr; Esri::ArcGISRuntime::SceneQuickView* m_sceneView = nullptr; void setupScene(); }; #endif // DISPLAY_A_SCENE_H -
In the project Sources folder of Qt Creator, open the Display_a_scene.cpp file. This app will use a Camera object to display the scene. Add the following
#includestatement.Display_a_scene.cppUse dark colors for code blocks #include "Display_a_scene.h" #include "ArcGISTiledElevationSource.h" #include "Camera.h" #include "ElevationSourceListModel.h" #include "MapTypes.h" #include "Scene.h" #include "SceneQuickView.h" #include "Surface.h" #include <QUrl> -
Add the following line of code in the
Displayconstructor to call to the new method,_a _scene setup, that you will create.Scene Display_a_scene.cppUse dark colors for code blocks Display_a_scene::Display_a_scene(QObject* parent /* = nullptr */): QObject(parent), m_scene(new Scene(BasemapStyle::ArcGISImagery, this)) { // create a new elevation source from Terrain3D rest service ArcGISTiledElevationSource* elevationSource = new ArcGISTiledElevationSource( QUrl("https://elevation3d.arcgis.com/arcgis/rest/services/WorldElevation3D/Terrain3D/ImageServer"), this); // add the elevation source to the scene to display elevation m_scene->baseSurface()->elevationSources()->append(elevationSource); setupScene(); } -
Create a new method named
setup, near the end of the file.Scene Display_a_scene.cppUse dark colors for code blocks void Display_a_scene::setupScene() { } -
Within the
setupmethod, create anScene() ElevationSourceinstance to define the base surface for the scene. An elevation source can define a surface with 3D terrain in a scene. Without an elevation source, the default globe surface is used to display the scene.Display_a_scene.cppUse dark colors for code blocks void Display_a_scene::setupScene() { ArcGISTiledElevationSource* elevationSource = new ArcGISTiledElevationSource(QUrl("https://elevation3d.arcgis.com/arcgis/rest/services/WorldElevation3D/Terrain3D/ImageServer"), this); } -
Continuing within the
setupmethod, create aScene() Surfaceinstance and append theelevationto it.Source
void Display_a_scene::setupScene()
{
ArcGISTiledElevationSource* elevationSource = new ArcGISTiledElevationSource(QUrl("https://elevation3d.arcgis.com/arcgis/rest/services/WorldElevation3D/Terrain3D/ImageServer"), this);
Surface* elevationSurface = new Surface(this);
elevationSurface->elevationSources()->append(elevationSource);
}-
Concluding the code changes within the
setupmethod, set theScene() Elevationvalue (to improve elevation visibility), and then set theExaggeration elevationforSurface m._scene Display_a_scene.cppUse dark colors for code blocks void Display_a_scene::setupScene() { ArcGISTiledElevationSource* elevationSource = new ArcGISTiledElevationSource(QUrl("https://elevation3d.arcgis.com/arcgis/rest/services/WorldElevation3D/Terrain3D/ImageServer"), this); Surface* elevationSurface = new Surface(this); elevationSurface->elevationSources()->append(elevationSource); elevationSurface->setElevationExaggeration(2.5); m_scene->setBaseSurface(elevationSurface); } -
The next code change will be within the
setfunction, to create aScene View( Scene Quick View* scene View) Camerawith the given parameters.The position from which you view the scene from is defined by a
Camera. The following properties of the camera are used to define an observation point in the scene:- latitude: The measurement of distance north or south of the Equator
- longitude: The measurement east or west of the prime meridian
- altitude: The distance above sea level
- heading: Azimuth of the camera's direction
- pitch: Up and down angle
- roll: Side-to-side angle
Display_a_scene.cppUse dark colors for code blocks // Set the view (created in QML) void Display_a_scene::setSceneView(SceneQuickView* sceneView) { if (!sceneView || sceneView == m_sceneView) { return; } m_sceneView = sceneView; m_sceneView->setArcGISScene(m_scene); constexpr double latitude = 33.909; constexpr double longitude = -118.805; constexpr double altitude = 5330.0; constexpr double heading = 355.0; constexpr double pitch = 72.0; constexpr double roll = 0.0; const Camera sceneCamera(latitude, longitude, altitude, heading, pitch, roll); m_sceneView->setViewpointCameraAndWait(sceneCamera); emit sceneViewChanged(); }
Set developer credentials
To allow your app users to access ArcGIS location services, use the developer credentials that you created in the Set up authentication step to authenticate requests for resources.
For the final steps of this tutorial, click the tab below for either API key authentication or User authentication to use the correct authentication pattern to run the application.
Set the API Key
-
In the project Sources folder of Qt Creator, open the main.cpp file.
-
Modify the code to set the
accessusing your API key access token (highlighted in yellow).Token main.cppUse dark colors for code blocks // The following methods grant an access token: // 1. User authentication: Grants a temporary access token associated with a user's ArcGIS account. // To generate a token, a user logs in to the app with an ArcGIS account that is part of an // organization in ArcGIS Online or ArcGIS Enterprise. // 2. API key authentication: Get a long-lived access token that gives your application access to // ArcGIS location services. Go to the tutorial at https://links.esri.com/create-an-api-key. // Copy the API Key access token. const QString accessToken = QString(""); if (accessToken.isEmpty()) { qWarning() << "Use of ArcGIS location services, such as the basemap styles service, requires" << "you to authenticate with an ArcGIS account or set the API Key property."; } else { ArcGISRuntimeEnvironment::setApiKey(accessToken); } -
Save the main.cpp file.
Best Practice: The access token is stored directly in the code as a convenience for this tutorial. Do not store credentials directly in source code in a production environment.
Press Ctrl + R to run the app.
You should see a scene with the topographic basemap layer centered on the Santa Monica Mountains in California. Double-click, drag, and scroll the mouse wheel over the scene view to explore the scene.
Alternatively, you can download the tutorial solution, as follows.
Option 2: Download the solution
-
Click the
Download solutionlink underSolutionand unzip the file to a location on your machine. -
Open the .pro project file in Qt Creator.
Since the downloaded solution does not contain authentication credentials, you must add the developer credentials that you created in the Set up authentication section.
Set developer credentials in the solution
Set the API Key
To allow your app users to access ArcGIS location services, use your API key access token that you created in the Set up authentication section to authenticate requests for resources.
-
In the project Sources folder of Qt Creator, open the main.cpp file.
-
Modify the code to set the
accessusing your API key access token (highlighted in yellow).Token main.cppUse dark colors for code blocks // The following methods grant an access token: // 1. User authentication: Grants a temporary access token associated with a user's ArcGIS account. // To generate a token, a user logs in to the app with an ArcGIS account that is part of an // organization in ArcGIS Online or ArcGIS Enterprise. // 2. API key authentication: Get a long-lived access token that gives your application access to // ArcGIS location services. Go to the tutorial at https://links.esri.com/create-an-api-key. // Copy the API Key access token. const QString accessToken = QString(""); if (accessToken.isEmpty()) { qWarning() << "Use of ArcGIS location services, such as the basemap styles service, requires" << "you to authenticate with an ArcGIS account or set the API Key property."; } else { ArcGISRuntimeEnvironment::setApiKey(accessToken); } -
Save main.cpp file.
Best Practice: The access token is stored directly in the code as a convenience for this tutorial. Do not store credentials directly in source code in a production environment.
Run the app
Press Ctrl + R to run the app.
You should see a scene with the topographic basemap layer centered on the Santa Monica Mountains in California. Double-click, drag, and scroll the mouse wheel over the scene view to explore the scene.
What's next?
Learn how to use additional API features, ArcGIS location services, and ArcGIS tools in these tutorials: