Learn how to display the current device location on a map or scene.
You can display the device location on a map or scene. This is important for workflows that require the user's current location, such as finding nearby businesses, navigating from the current location, or identifying and collecting geospatial information.
By default, location display uses the device's location provider. Your app can also process input from other location providers, such as an external GPS receiver or a provider that returns a simulated location. For more information, see the Show device location topic.
This tutorial builds a cross-platform app using the .NET Multi-platform App UI (.NET MAUI) framework. .NET MAUI allows you to build native cross-platform apps from a shared code base. If you'd prefer to build this app as a Windows desktop app, see the Windows Presentation Foundation (WPF) version of this tutorial.
Prerequisites
Before starting this tutorial:
-
You need an ArcGIS Location Platform or ArcGIS Online account.
-
Ensure your development environment meets the system requirements.
Optionally, you may want to install the ArcGIS Maps SDK for .NET to get access to project templates in Visual Studio (Windows only) and offline copies of the NuGet packages.
Develop or download
You have two options for completing this tutorial:
Option 1: Develop the code
Open a Visual Studio solution
- Open the Visual Studio solution you created by completing the Display a map (.NET MAUI) tutorial.
- Continue with the following instructions to display the current device location on the map.
Update the tutorial name used in the project (optional)
The Visual Studio solution, project, and the namespace for all classes currently use the name Display. Follow the steps below if you prefer the name to reflect the current tutorial. These steps are not required, your code will still work if you keep the original name.
The tutorial instructions and code use the name Display for the solution, project, and namespace. You can choose any name you like, but it should be the same for each of these.
-
Update the name for the solution and the project.
- In Visual Studio, in the Solution Explorer, right-click the solution name and choose Rename. Provide the new name for your solution.
- In the Solution Explorer, right-click the project name and choose Rename. Provide the new name for your project.
-
Rename the namespace used by classes in the project.
-
Open the Quick Find tool (Ctrl + f on the keyboard).
-
Toggle to replace mode by clicking the down arrow (⌄) to the left of the "Find..." entry.
-
Enter the current namespace in the top ("Find...") textbox.
-
Enter the new name for the namespace in the bottom ("Replace...") textbox.
-
Ensure Entire solution is selected in the dropdown below the text entries.
-
Click the Replace all button to the far right of the "Replace..." text box (or press Alt + a on the keyboard).
-
-
Rename the app title and ID.
-
In the Solution Explorer, right-click the project name and choose Properties.
-
In the project properties dialog that appears, navigate to MAUI Shared > General.
-
Rename the Application Title to match your new namespace.
-
Following the reverse domain name and lowercase lettering conventions, modify the Application ID to reflect your new namespace and title.
-
-
Build the project.
- Choose Build > Build solution (or press <F6>).
Android location permissions
Android apps do not have access to location information by default. In the app manifest, you must add properties to request location permissions.
-
In the Visual Studio > Solution Explorer, navigate to the Platforms\Android folder.
-
Click AndroidManifest.xml to open the manifest editor.
-
In the Required permissions section, check ACCESS_COARSE_LOCATION and ACCESS_FINE_LOCATION.
-
Save and close AndroidManifest.xml.
-
Location services need to be enabled on your Android device if they aren't already. Navigate to Settings > Location and make sure Use location is switched on.
iOS and MacOS location permissions
iOS and MacOS prevent apps from accessing location information until the user grants permission. In the Information Property List, you must add a key-value pair to request authorization to use location services.
-
In the Visual Studio > Solution Explorer, navigate to Platforms\iOS.
-
Right-click Info.plist. Click Open With.. from the context menu and select Automatic Editor Selector (XML). Click OK to open the file.
-
Add the required key-value pair.
Info.plistUse dark colors for code blocks <key>XSAppIconAssets</key> <string>Assets.xcassets/appicon.appiconset</string> <key>NSLocationWhenInUseUsageDescription</key> <string>Your location is displayed on the map.</string> </dict> </plist> -
Save and close Info.plist.
-
Repeat steps 2-4, this time modifying the Info.plist file in the Platforms\MacCatalyst folder.
-
Location services need to be enabled on your Apple devices if they aren't already. Navigate to Settings > Privacy & Security > Location Services and make sure Location Services is switched on.
Show the current location
Each map view has its own instance of a LocationDisplay for showing the current location (point) of the device. The location is displayed as an overlay in the map view.
Instances of this class manage the display of device location on a map view: the symbols, animation, auto pan behavior, and so on. Location display is an overlay of the map view, and displays above everything else, including graphics overlays.
The location display does not retrieve location information, that is the job of the associated data source, which provides location updates on a regular basis. In addition to the default system location data source, you can use location providers based on external GPS devices or a simulated location source.
Each map view has its own instance of a location display and instances of location display and location data source are not shared by multiple map views. This allows you to start and stop location display independently on multiple map views without affecting each other.
-
In the Visual Studio > Solution Explorer, double-click MapViewModel.cs to open the file.
-
Remove code from the
Setupfunction that sets the map'sMap() InitialViewpoint. The map will zoom to the extent of the current location, so this code is no longer needed.MapViewModel.csUse dark colors for code blocks private void SetupMap() { // Create a new map with a 'topographic vector' basemap. Map = new Map(BasemapStyle.ArcGISTopographic); var mapCenterPoint = new MapPoint(-118.805, 34.027, SpatialReferences.Wgs84); Map.InitialViewpoint = new Viewpoint(mapCenterPoint, 100000); } -
Save and close the MapViewModel.cs file.
-
In the Visual Studio > Solution Explorer, double-click MainPage.xaml.cs to open the file.
-
Add
usingstatements at the top of the file, after the namespace declaration.MainPage.xaml.csUse dark colors for code blocks namespace DisplayDeviceLocation; using Esri.ArcGISRuntime.UI; using System.ComponentModel; public partial class MainPage : ContentPage { -
Add a new function
Displaybelow theDevice Location Async Mainconstructor.Page MainPage.xaml.csUse dark colors for code blocks public MainPage() { InitializeComponent(); } private async Task DisplayDeviceLocationAsync() { } -
Add code to
Displaythat requests access to location.Device Location Async() MainPage.xaml.csUse dark colors for code blocks private async Task DisplayDeviceLocationAsync() { PermissionStatus status = await Permissions.RequestAsync<Permissions.LocationWhenInUse>(); } -
Add code to
Displaythat enables theDevice Location Async() LocationDisplayfor the map view if permission was granted. Assign aLocationDisplayAutoPanModethat centers the map at the device location.MainPage.xaml.csUse dark colors for code blocks private async Task DisplayDeviceLocationAsync() { PermissionStatus status = await Permissions.RequestAsync<Permissions.LocationWhenInUse>(); MainMapView.LocationDisplay.IsEnabled = status == PermissionStatus.Granted || status == PermissionStatus.Restricted; MainMapView.LocationDisplay.AutoPanMode = LocationDisplayAutoPanMode.Recenter; } -
In the
Mainconstructor, add code to subscribe to thePage Propertyevent of the map view. IfChanged LocationDisplayis the property being changed, callDisplay.Device Location Async() MainPage.xaml.csUse dark colors for code blocks public MainPage() { InitializeComponent(); MainMapView.PropertyChanged += (object sender, PropertyChangedEventArgs e) => { // The map view's location display is initially null, so check for a location display property change before enabling it. if (e.PropertyName == nameof(LocationDisplay)) { _ = DisplayDeviceLocationAsync(); } }; } private async Task DisplayDeviceLocationAsync() { PermissionStatus status = await Permissions.RequestAsync<Permissions.LocationWhenInUse>(); MainMapView.LocationDisplay.IsEnabled = status == PermissionStatus.Granted || status == PermissionStatus.Restricted; MainMapView.LocationDisplay.AutoPanMode = LocationDisplayAutoPanMode.Recenter; }
Run the app
Click Debug > Start Debugging (or press <F5> on the keyboard) to run the app. If your app uses user authentication, enter your ArcGIS Online credentials when prompted.
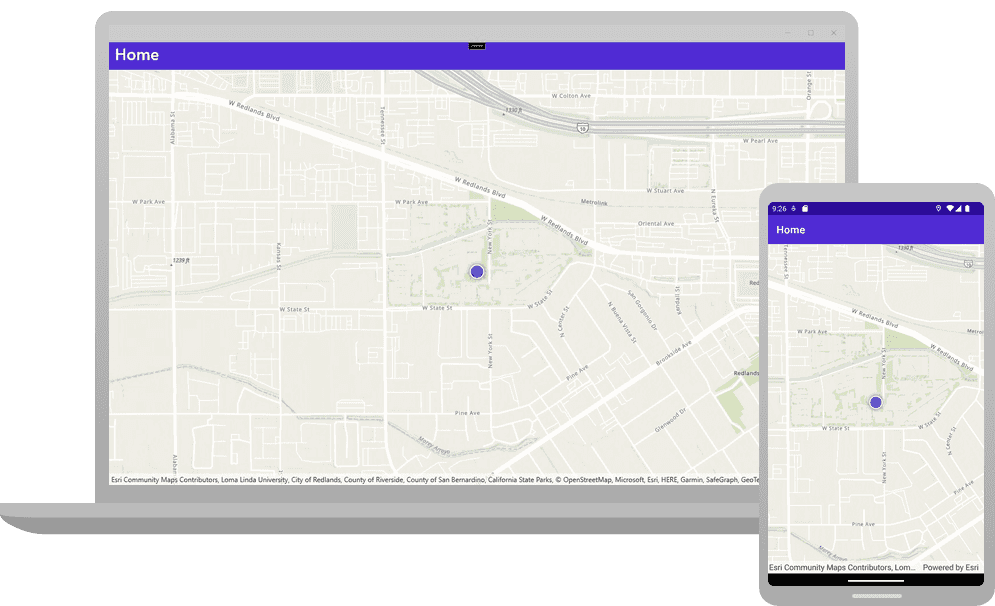
Deploy the app to a Windows, Mac, iOS, or Android device. Allow the app to access your precise location if prompted. You will see your device's current location displayed on the map. Different location symbols are used depending on the auto pan mode and whether a location is acquired. See LocationDisplayAutoPanMode for details.
By default, a round blue symbol is used to display the device's location. The location data source tries to get the most accurate location available but depending upon signal strength, satellite positions, and other factors, the location reported could be an approximation. A semi-transparent circle around the location symbol indicates the range of accuracy. As the device moves and location updates are received, the location symbol will be repositioned on the map.
Alternatively, you can download the tutorial solution, as follows.
Option 2: Download the solution
-
Click the Download solution link in the right-hand panel of the page.
-
Unzip the file to a location on your machine.
-
Open the
.slnfile in Visual Studio.
Since the downloaded solution does not contain authentication credentials, you must first set up authentication to create credentials, and then add the developer credentials to the solution.
Set up authentication
To access the secure ArcGIS location services used in this tutorial, you must implement API key authentication or user authentication using an ArcGIS Location Platform or an ArcGIS Online account.
You can implement API key authentication or user authentication in this tutorial. Compare the differences below:
API key authentication
- Users are not required to sign in.
- Requires creating an API key credential with the correct privileges.
- API keys are long-lived access tokens.
- Service usage is billed to the API key owner/developer.
- Simplest authentication method to implement.
- Recommended approach for new ArcGIS developers.
Learn more in API key authentication.
User authentication
- Users are required to sign in with an ArcGIS account.
- User accounts must have privilege to access the ArcGIS services used in application.
- Requires creating OAuth credentials.
- Application uses a redirect URL and client ID.
- Service usage is billed to the organization of the user signed into the application.
Learn more in User authentication.
To complete this tutorial, click on the tab in the switcher below for your authentication type of choice, either API key authentication or User authentication.
Create a new API key access token with privileges to access the secure resources used in this tutorial.
-
Complete the Create an API key tutorial and create an API key with the following privilege(s):
- Privileges
- Location services > Basemaps
- Privileges
-
Copy and paste the API key access token into a safe location. It will be used in a later step.
Set developer credentials in the solution
To allow your app users to access ArcGIS location services, use the developer credentials that you created in the Set up authentication step to authenticate requests for resources.
-
In the Solution Explorer, open MauiProgram.cs by double-clicking.
-
Update the call to
Useon theApi Key() configparameter to set your API key access token.MauiProgram.csUse dark colors for code blocks var builder = MauiApp.CreateBuilder(); builder .UseMauiApp<App>() .ConfigureFonts(fonts => { fonts.AddFont("OpenSans-Regular.ttf", "OpenSansRegular"); fonts.AddFont("OpenSans-Semibold.ttf", "OpenSansSemibold"); }); builder.UseArcGISRuntime(config => { config.UseApiKey("YOUR_ACCESS_TOKEN"); }); #if DEBUG builder.Logging.AddDebug(); #endif -
Remove the line of code that sets the user authentication handler.
MauiProgram.csUse dark colors for code blocks var builder = MauiApp.CreateBuilder(); builder .UseMauiApp<App>() .ConfigureFonts(fonts => { fonts.AddFont("OpenSans-Regular.ttf", "OpenSansRegular"); fonts.AddFont("OpenSans-Semibold.ttf", "OpenSansSemibold"); }); builder.UseArcGISRuntime(config => { config.UseApiKey("YOUR_ACCESS_TOKEN"); }); // Set up the AuthenticationManager to use OAuth for secure ArcGIS Online requests. UserAuth.ArcGISLoginPrompt.RegisterOAuthConfig(); #if DEBUG builder.Logging.AddDebug(); #endif -
Save and close the MauiProgram.cs file.
Best Practice: The access token is stored directly in the code as a convenience for this tutorial. Do not store credentials directly in source code in a production environment.
Run the app
Click Debug > Start Debugging (or press <F5> on the keyboard) to run the app. If your app uses user authentication, enter your ArcGIS Online credentials when prompted.
Deploy the app to a Windows, Mac, iOS, or Android device. Allow the app to access your precise location if prompted. You will see your device's current location displayed on the map. Different location symbols are used depending on the auto pan mode and whether a location is acquired. See LocationDisplayAutoPanMode for details.
By default, a round blue symbol is used to display the device's location. The location data source tries to get the most accurate location available but depending upon signal strength, satellite positions, and other factors, the location reported could be an approximation. A semi-transparent circle around the location symbol indicates the range of accuracy. As the device moves and location updates are received, the location symbol will be repositioned on the map.
What's next?
Learn how to use additional API features, ArcGIS location services, and ArcGIS tools in these tutorials: