Model-View-ViewModel (MVVM) is a popular design pattern for XAML-based app development. MVVM helps you to separate your app's user interface components from the data and logic components by dividing the components into three categories according to their role: Model, View, and ViewModel.
The MVVM pattern is well-documented and you can find guidance and examples online. The purpose of this topic, therefore, is not to provide step-by-step MVVM instructions, but rather to introduce the pattern, provide resources for more information, and describe how to use it with ArcGIS Maps SDK for .NET.
Basics of MVVM
In the Model-View-ViewModel design pattern, the Model represents your app's data, the View contains the UI elements the user interacts with, and the ViewModel is the mediator that sits between (and connects) the Model and the View.
-
Model—Classes that represent data consumed in the app. These are typically simple data classes with properties to hold values. Models should not contain business logic. In an ArcGIS Maps SDK for .NET app, classes in the API, such as
Map,FeatureLayer, andBasemap, are examples of Models. -
View—Interactive user interface (UI) elements, such as XAML pages and user controls. In an ArcGIS Maps SDK for .NET app,
GeoView(such asMapViewandSceneView) are examples of a View. -
ViewModel—Classes that wrap data (coming from a Model) and provide business logic for the UI (Views). ViewModels are the heart of an MVVM implementation. They provide data in a form that is usable by the View and contain code to handle events and other logic the View requires. ViewModels also notify the View when data changes, allowing the UI to automatically update when underlying data is updated.
In a pure MVVM implementation, components should fall exclusively within one of these categories. A View class, such as a XAML page and its UI components, should only contain code related to the user-interface. Likewise, all business logic that powers the app must be provided by a ViewModel. Design patterns are guidelines, not rules, however, and it may not always be possible or practical to implement a pure MVVM architecture. The goal is to separate UI code from business logic as much as possible. If creating a pure MVVM implementation gets in the way of delivering a straightforward and maintainable app, then it's okay to bend the rules a little.
For most developers, the ViewModel is where the majority of their work is done. These classes provide data (either coming from a Model or from within the ViewModel itself) in a form that is usable for the View. ViewModels may contain code to handle events for controls on the page or other logic required by the View. The ViewModel is also responsible for notifying the View when data changes, allowing the UI to automatically update when the underlying data changes.
When to use MVVM
The MVVM design pattern offers several advantages depending on the type of app you're building, the size of your development team, and how your team collaborates. One advantage is that it enables UI designers and developers to work on a project simultaneously. The data binding support provided by .NET apps allows you to bind controls in the UI (View) to data and functionality exposed in ViewModel classes. The separation of UI and business logic also makes it easier to test and maintain an app and to reuse code more easily. For example, a ViewModel that contains logic to display a map can be reused in multiple apps simply by binding other Views to the existing ViewModel.
These advantages of MVVM don't mean that it's always the most appropriate design pattern for every app. Its benefits are most apparent in larger, more complex apps. For smaller apps, the overhead of implementing MVVM may not be justified, and a simpler architecture may be more appropriate.
Implement MVVM
The process of implementing MVVM in your Maps SDK for .NET app is straightforward. The Maps SDK for .NET is designed to work well with MVVM and provides several features that make it easy to implement the pattern. Although basic, all Maps SDK for .NET tutorials use an MVVM pattern. For a more complete example of an MVVM implementation, see the Map Viewer demo app.
Create an MVVM project from a template
The easiest way to get started with MVVM in your Maps SDK for .NET app is to use one of the project templates that come with the SDK. These templates provide a starting point for your app and include a basic MVVM implementation. To create a new MVVM project from a template, start by following the steps in the Install and set up topic to install the templates for Visual Studio.
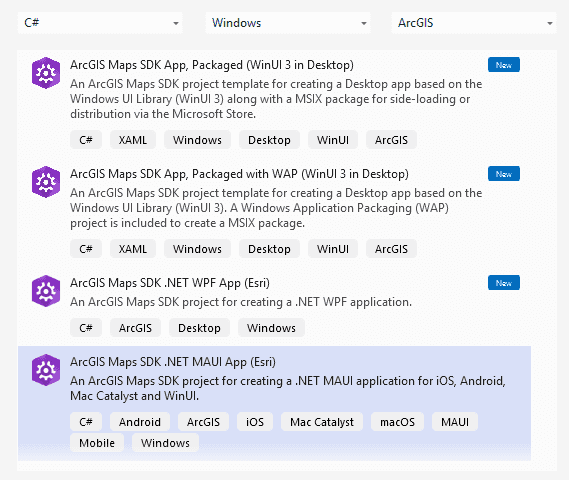
The next time you choose to create a new project in Visual Studio, you will see ArcGIS project templates for all available platforms, as shown in the following image. These templates all use the MVVM design pattern.
Use the GeoViewController
The GeoView (and its derived classes like MapView and SceneView) is a complex UI component that is tightly integrated with the underlying map or scene. This tight coupling can make it challenging to implement a clean MVVM architecture. An app often requires direct manipulation of the view (such as panning and zooming) in response to user input or data changes, which can blur the lines between the View and ViewModel.
To help address these challenges, the Maps SDK for .NET Toolkit includes Geo, a helper class for enabling Model-View-ViewModel patterns in ArcGIS Maps SDK for .NET applications. This helper class allows you to perform operations on the GeoView from your ViewModel, through an attached proxy-object that ensures you keep ViewModel and View separated. The Geo class can manage most common GeoView operations, such as setting the viewpoint, performing an identify operation, and showing callouts. Operations that are specific to subclasses of GeoView, such as MapView or SceneView, are not accessible via this helper class without additional work. Because the Geo class is designed to be extended, however, you can add support for these additional operations as needed.
To use the Geo class in your app:
-
Install the ArcGIS Maps SDK for .NET Toolkit NuGet package in your project.
-
Create a public property of type
Geoin your ViewModel and initialize it (inline or in the ViewModel's constructor):View Controller Use dark colors for code blocks Copy public GeoViewController MyGeoViewController { get; } = new GeoViewController(); -
Add the toolkit namespace to your XAML page (syntax may vary depending on your project's platform):
Use dark colors for code blocks Copy xmlns:toolkit="using:Esri.ArcGISRuntime.Toolkit.UI" -
Bind the
Geoproperty of theView Controller GeoView(MapVieworSceneView) to theGeoproperty in your ViewModel. For example:View Controller Use dark colors for code blocks Copy <esriUI:MapView x:Name="MyMapView" Map="{Binding Map}" toolkit:GeoViewController.GeoViewController="{Binding MyGeoViewController}"/> -
Use the
Geoproperty in your ViewModel to manipulate theView Controller GeoViewas needed. For example, to set the viewpoint of the map view:Use dark colors for code blocks Copy MapPoint malibu = new MapPoint(-118.7798, 34.0259, SpatialReferences.Wgs84); MyGeoViewController.SetViewpointAsync(new Viewpoint(malibu, 10000));
For a complete example of the Geo class in an MVVM app, see the Geo sample in the toolkit samples.
Learn more about MVVM
For more information about the MVVM design pattern, see the following resources:
Maps SDK for .NET Resources
- Map Viewer demo app
- GeoViewController toolkit component
- Using ArcGIS Maps SDK for .NET in an MVVM pattern (blog post)
General MVVM Resources (Microsoft)