Use a route displayed in the real world to navigate.
Use case
It can be hard to navigate using 2D maps in unfamiliar environments. You can use full-scale AR to show a route overlaid on the real-world for easier navigation.
How to use the sample
The sample opens with a map centered on the current location. Tap the map to add an origin and a destination; the route will be shown as a line.
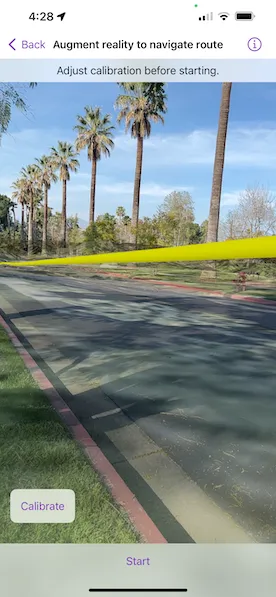
When ready, tap the camera button to start the AR navigation. Calibrate the heading before starting to navigate.
When you start, route instructions will be displayed and spoken. As you proceed through the route, new directions will be provided until you arrive.
How it works
- The map page is used to plan the route before starting the AR experience. See Navigate route, Find route, and Offline routing samples for a more focused demonstration of that workflow.
- Pass the resulting
RouteResultand the inputRouteTaskandRouteParametersto the view used for the AR portion of the navigation experience.- The route task and parameters are used to support a rerouting capability where routes are recalculated on-the-fly if you deviate. Due to service limitations, this sample doesn’t support on-the-fly rerouting. You can incorporate offline routing to support rerouting in your app.
- Start ARKit tracking with continuous location updates when the AR view is shown.
- Get the route geometry from the first route in the
RouteResult. Use the scene’s base surface to apply elevation to the line so that it will follow the terrain.- First, densify the polyline to ensure that the elevation adjustment can be applied smoothly along the line with
GeometryEngine.densify(_:maxSegmentLength:) - Next, create a polyline builder with a spatial reference matching the input route geometry
- Get a list of all points in the polyline by iterating through parts and points along each part
- For each point in the polyline, use
surface.elevation(for: point)to get the elevation for that point. Then create a new point with the x and y of the input and z as the returned elevation value. This sample adds 3 meters to that value so that the route line is visible above the road. Add the new point to the polyline builder withbuilder.add(newPoint) - Once all points have been given an elevation and added to the polyline builder, call
toGeometry()on the polyline builder to get the elevation-adjusted route line.
- First, densify the polyline to ensure that the elevation adjustment can be applied smoothly along the line with
- Add the route geometry to a graphics overlay and add a renderer to the graphics overlay. This sample uses a
MultilayerPolylineSymbolwith aSolidStrokeSymbolLayerto visualize a tube along the route line. - The
WorldScaleSceneViewhas a calibration view that uses sliders to manipulate the heading (direction you are facing) and elevation. Because of limitations in on-device compasses, calibration is often necessary; small errors in heading cause big problems with the placement of scene content in the world.- The calibration view slider in the sample implements a ‘joystick’ interaction; the heading is adjusted faster the further you move from the center of the slider.
- When the user starts navigating, create a
RouteTracker, providing aRouteResultand the index of the route you want to use; this sample always picks the first returned result. - Create a location data source and listen for location change events. When the location changes, call
track(_:)on the route tracker with the updated location. - Keep the calibration view accessible throughout the navigation experience. As the user walks, small heading errors may become more noticeable and require recalibration.
Relevant API
- GeometryEngine
- LocationDataSource
- RouteResult
- RouteTask
- RouteTracker
- Surface
- WorldScaleSceneView
About the data
This sample uses Esri’s world elevation service to ensure that route lines are placed appropriately in 3D space. It uses Esri’s world routing service to calculate routes. The world routing service requires authentication and does consume ArcGIS Online credits.
Additional information
This sample requires a device that is compatible with ARKit on iOS.
Unlike other scene samples, there’s no need for a basemap while navigating, because context is provided by the camera feed showing the real environment. The base surface’s opacity is set to zero to prevent it from interfering with the AR experience.
A digital elevation model is used to ensure that the displayed route is positioned appropriately relative to the terrain of the route. If you don’t want to display the route line floating, you could show the line draped on the surface instead.
World-scale AR is one of three main patterns for working with geographic information in augmented reality. Augmented reality is made possible with the ArcGIS Maps SDK Toolkit. See Augmented reality in the guide for more information about augmented reality and adding it to your app.
In most navigation scenarios, this sample does not allow the user to pan to calibrate or adjust the altitude with a slider. This is because the origin of the camera is constantly being reset by the location data source when the deviation is greater than a threshold. The location data source provides continuous location and heading updates, and are used to reset the origin camera when the device movement has accumulated certain amount of deviation. To use different tracking modes for the AR experience, or to use the slider to manually calibrate, change the parameter of WorldScaleSceneView's initializer accordingly.
Tags
augmented reality, directions, full-scale, guidance, mixed reality, navigate, navigation, real-scale, route, routing, world-scale
Sample code
// Copyright 2024 Esri//// Licensed under the Apache License, Version 2.0 (the "License");// you may not use this file except in compliance with the License.// You may obtain a copy of the License at////   https://www.apache.org/licenses/LICENSE-2.0//// Unless required by applicable law or agreed to in writing, software// distributed under the License is distributed on an "AS IS" BASIS,// WITHOUT WARRANTIES OR CONDITIONS OF ANY KIND, either express or implied.// See the License for the specific language governing permissions and// limitations under the License.
import ArcGISimport CoreLocationimport SwiftUI
@available(macCatalyst, unavailable)struct AugmentRealityToNavigateRouteView: View {    /// The view model for the map view in the sample.    @StateObject private var model = MapModel()
    /// The error shown in the error alert.    @State private var error: (any Error)?
    /// The point on the map where the user tapped.    @State private var tapLocation: Point?
    var body: some View {        MapView(            map: model.map,            graphicsOverlays: model.graphicsOverlays        )        .locationDisplay(model.locationDisplay)        .onSingleTapGesture { _, mapPoint in            tapLocation = mapPoint        }        .onDisappear {            Task {                await model.locationDisplay.dataSource.stop()            }        }        .task(id: tapLocation) {            guard let tapLocation else { return }
            do {                try await model.addRouteGraphic(for: tapLocation)            } catch {                self.error = error            }        }        .task {            do {                try await model.setUp()            } catch {                self.error = error            }        }        .overlay(alignment: .top) {            instructionText        }        .toolbar {            ToolbarItemGroup(placement: .bottomBar) {                toolbarButtons            }        }        .errorAlert(presentingError: $error)    }
    /// The buttons in the bottom toolbar.    @ViewBuilder private var toolbarButtons: some View {        Spacer()        NavigationLink {            ARRouteSceneView(model: model.sceneModel)        } label: {            Image(systemName: "camera")                .imageScale(.large)        }        .disabled(!model.didSelectRoute)
        Spacer()        Button {            model.reset()            model.statusText = "Tap to place a start point."        } label: {            Image(systemName: "trash")                .imageScale(.large)        }        .disabled(!model.didSelectRouteStop && !model.didSelectRoute)    }
    /// The instruction text in the overlay.    private var instructionText: some View {        Text(model.statusText)            .multilineTextAlignment(.center)            .frame(maxWidth: .infinity, alignment: .center)            .padding(8)            .background(.thinMaterial, ignoresSafeAreaEdges: .horizontal)    }}
@available(macCatalyst, unavailable)private extension AugmentRealityToNavigateRouteView {    // MARK: Map Model
    /// A view model for this example.    @MainActor    class MapModel: ObservableObject {        /// A map with an imagery basemap style.        let map = Map(basemapStyle: .arcGISImagery)
        /// The map's location display.        let locationDisplay: LocationDisplay = {            let locationDisplay = LocationDisplay()            locationDisplay.autoPanMode = .recenter            return locationDisplay        }()
        /// The graphics overlay for the stops.        private let stopGraphicsOverlay = GraphicsOverlay()
        /// A graphics overlay for route graphics.        private let routeGraphicsOverlay: GraphicsOverlay = {            let overlay = GraphicsOverlay()            overlay.renderer = SimpleRenderer(                symbol: SimpleLineSymbol(style: .solid, color: .yellow, width: 5)            )            return overlay        }()
        /// The map's graphics overlays.        var graphicsOverlays: [GraphicsOverlay] {            return [stopGraphicsOverlay, routeGraphicsOverlay]        }        /// A point representing the start of navigation.        private var startPoint: Point? {            didSet {                let stopSymbol = PictureMarkerSymbol(image: .stopA)                let startStopGraphic = Graphic(geometry: startPoint, symbol: stopSymbol)                stopGraphicsOverlay.addGraphic(startStopGraphic)            }        }
        /// A point representing the destination of navigation.        private var endPoint: Point? {            didSet {                let stopSymbol = PictureMarkerSymbol(image: .stopB)                let endStopGraphic = Graphic(geometry: endPoint, symbol: stopSymbol)                stopGraphicsOverlay.addGraphic(endStopGraphic)            }        }
        /// A Boolean value indicating whether a route stop is selected.        var didSelectRouteStop: Bool {            startPoint != nil || endPoint != nil        }
        /// A Boolean value indicating whether a route is selected.        var didSelectRoute: Bool {            startPoint != nil && endPoint != nil        }
        /// The view model for scene view in the sample.        let sceneModel = SceneModel()
        /// The status text displayed to the user.        @Published var statusText = "Tap to place a start point."
        /// Performs important tasks including setting up the location display, creating route parameters,        /// and loading the scene elevation source.        func setUp() async throws {            try await startLocationDisplay()            try await makeParameters()            try await sceneModel.loadElevationSource()        }
        /// Starts the location display to show user's location on the map.        func startLocationDisplay() async throws {            // Request location permission if it has not yet been determined.            let locationManager = CLLocationManager()            if locationManager.authorizationStatus == .notDetermined {                locationManager.requestWhenInUseAuthorization()            }
            locationDisplay.dataSource = sceneModel.locationDataSource
            // Start the location display to zoom to the user's current location.            try await locationDisplay.dataSource.start()        }
        /// Creates walking route parameters.        func makeParameters() async throws {            let parameters = try await sceneModel.routeTask.makeDefaultParameters()
            if let walkMode = sceneModel.routeTask.info.travelModes.first(where: { $0.name.contains("Walking") }) {                parameters.travelMode = walkMode                parameters.returnsStops = true                parameters.returnsDirections = true                parameters.returnsRoutes = true                sceneModel.routeParameters = parameters            }        }
        /// Adds a route graphic for the selected route using a given start and end point.        /// - Parameter mapPoint: The map point for the route start or end point.        func addRouteGraphic(for mapPoint: Point) async throws {            if startPoint == nil {                startPoint = mapPoint                statusText = "Tap to place destination."            } else if endPoint == nil {                endPoint = mapPoint                sceneModel.routeParameters.setStops(makeStops())
                let routeResult = try await sceneModel.routeTask.solveRoute(                    using: sceneModel.routeParameters                )                if let firstRoute = routeResult.routes.first {                    let routeGraphic = Graphic(geometry: firstRoute.geometry)                    routeGraphicsOverlay.addGraphic(routeGraphic)                    sceneModel.routeResult = routeResult                    try await sceneModel.makeRouteOverlay()                    statusText = "Tap camera to start navigation."                }            }        }
        /// Creates the start and destination stops for the navigation.        private func makeStops() -> [Stop] {            guard let startPoint, let endPoint else { return [] }            let stop1 = Stop(point: startPoint)            stop1.name = "Start"            let stop2 = Stop(point: endPoint)            stop2.name = "Destination"            return [stop1, stop2]        }
        /// Resets the start and destination stops for the navigation.        func reset() {            routeGraphicsOverlay.removeAllGraphics()            stopGraphicsOverlay.removeAllGraphics()            sceneModel.routeParameters.clearStops()            startPoint = nil            endPoint = nil        }    }}
// Copyright 2024 Esri//// Licensed under the Apache License, Version 2.0 (the "License");// you may not use this file except in compliance with the License.// You may obtain a copy of the License at//// https://www.apache.org/licenses/LICENSE-2.0//// Unless required by applicable law or agreed to in writing, software// distributed under the License is distributed on an "AS IS" BASIS,// WITHOUT WARRANTIES OR CONDITIONS OF ANY KIND, either express or implied.// See the License for the specific language governing permissions and// limitations under the License.
import ArcGISimport ArcGISToolkitimport AVFAudioimport SwiftUI
@available(macCatalyst, unavailable)extension AugmentRealityToNavigateRouteView { /// A world scale scene view displaying route graphics from a given model. struct ARRouteSceneView: View { /// The view model for scene view in the sample. @ObservedObject var model: SceneModel
/// A Boolean value indicating whether the use is navigating the route. @State private var isNavigating = false
/// The error shown in the error alert. @State private var error: (any Error)?
var body: some View { VStack(spacing: 0) { WorldScaleSceneView { _ in SceneView( scene: model.scene, graphicsOverlays: [model.routeGraphicsOverlay] ) } .calibrationButtonAlignment(.bottomLeading) .onCalibratingChanged { isPresented in model.scene.baseSurface.opacity = isPresented ? 0.6 : 0 } .task { do { try await model.startTrackingLocation() } catch { self.error = error } } .overlay(alignment: .top) { Text(model.statusText) .multilineTextAlignment(.center) .frame(maxWidth: .infinity, alignment: .center) .padding(8) .background(.regularMaterial, ignoresSafeAreaEdges: .horizontal) } .onAppear { model.statusText = "Adjust calibration before starting." } .onDisappear { model.stopNavigation() } Divider() } .toolbar { ToolbarItemGroup(placement: .bottomBar) { Button("Start") { isNavigating = true } .disabled(isNavigating) .task(id: isNavigating) { guard isNavigating else { return } do { try await model.startNavigation() } catch { self.error = error } } } } .errorAlert(presentingError: $error) } }}
@available(macCatalyst, unavailable)extension AugmentRealityToNavigateRouteView { // MARK: Scene Model
/// The view model for scene view in the sample. @MainActor class SceneModel: ObservableObject { /// A scene with an imagery basemap. let scene = Scene(basemapStyle: .arcGISImagery)
/// The graphics overlay containing a graphic for the route. private(set) var routeGraphicsOverlay = GraphicsOverlay()
/// The elevation surface set to the base surface of the scene. private let elevationSurface: Surface = { let elevationSurface = Surface() elevationSurface.navigationConstraint = .unconstrained elevationSurface.opacity = 0 elevationSurface.backgroundGrid.isVisible = false return elevationSurface }()
/// The elevation source with elevation service URL. private var elevationSource = ArcGISTiledElevationSource(url: .worldElevationService)
/// The route tracker. private(set) var routeTracker: RouteTracker?
/// The route result. var routeResult: RouteResult?
/// An AVSpeechSynthesizer for text to speech. private let speechSynthesizer = AVSpeechSynthesizer()
/// The route task that solves the route using the online routing service, using API key authentication. let routeTask = RouteTask(url: URL(string: "https://route-api.arcgis.com/arcgis/rest/services/World/Route/NAServer/Route_World")!)
/// The parameters for route task to solve a route. var routeParameters = RouteParameters()
/// The data source to track device location and provide updates to route tracker. let locationDataSource = SystemLocationDataSource()
/// The status text displayed to the user. @Published var statusText = ""
init() { elevationSurface.addElevationSource(elevationSource) scene.baseSurface = elevationSurface }
/// Loads the scene elevation source. func loadElevationSource() async throws { await scene.baseSurface.elevationSources.load() }
/// Tracks the location datasource locations. func startTrackingLocation() async throws { for await location in locationDataSource.locations { try await routeTracker?.track(location) } }
/// Creates a graphics overlay and adds a graphic (with solid yellow 3D tube symbol) /// to represent the route. func makeRouteOverlay() async throws { let graphicsOverlay = GraphicsOverlay() graphicsOverlay.sceneProperties.surfacePlacement = .absolute let strokeSymbolLayer = SolidStrokeSymbolLayer( width: 1.0, color: .yellow, lineStyle3D: .tube ) let polylineSymbol = MultilayerPolylineSymbol(symbolLayers: [strokeSymbolLayer]) let polylineRenderer = SimpleRenderer(symbol: polylineSymbol) graphicsOverlay.renderer = polylineRenderer
if let routeResult, let originalPolyline = routeResult.routes.first?.geometry, let elevatedPolyline = try await addingElevation(3, to: originalPolyline) { let routeGraphic = Graphic(geometry: elevatedPolyline) graphicsOverlay.addGraphic(routeGraphic) }
routeGraphicsOverlay = graphicsOverlay }
/// Densifies the polyline geometry so the elevation can be adjusted every 0.3 meters and adds /// an elevation to the geometry. /// - Parameters: /// - z: The z elevation. /// - polyline: The polyline geometry of the route. /// - Returns: A polyline with adjusted elevation. private func addingElevation(_ z: Double, to polyline: Polyline) async throws -> Polyline? { guard let densifiedPolyline = GeometryEngine.densify(polyline, maxSegmentLength: 0.3) as? Polyline else { return nil } let polylineBuilder = PolylineBuilder(spatialReference: densifiedPolyline.spatialReference) for part in densifiedPolyline.parts { for point in part.points { let elevation = try await elevationSurface.elevation(at: point) let newPoint = GeometryEngine.makeGeometry(from: point, z: elevation + z) // Put the new point 3 meters above the ground elevation. polylineBuilder.add(newPoint) } } return polylineBuilder.toGeometry() }
/// Starts navigating the route. func startNavigation() async throws { guard let routeResult else { return } routeTracker = RouteTracker( routeResult: routeResult, routeIndex: 0, skipsCoincidentStops: true ) guard let routeTracker else { return }
routeTracker.voiceGuidanceUnitSystem = Locale.current.measurementSystem == .us ? .imperial : .metric
try await routeTask.load()
if routeTask.info.supportsRerouting, let reroutingParameters = ReroutingParameters( routeTask: routeTask, routeParameters: routeParameters ) { try await routeTracker.enableRerouting(using: reroutingParameters) }
statusText = "Navigation will start."
// The category is set so that the navigation instructions are spoken even when silent mode is turned on. let session = AVAudioSession.sharedInstance() try session.setCategory(.playback, mode: .voicePrompt) try session.setActive(true)
await startTracking() }
/// Stops navigating the route. func stopNavigation() { speechSynthesizer.stopSpeaking(at: .word) routeTracker = nil }
/// Starts monitoring multiple asynchronous streams of information. private func startTracking() async { await withTaskGroup(of: Void.self) { group in group.addTask { await self.trackStatus() } group.addTask { await self.trackVoiceGuidance() } } }
/// Monitors the asynchronous stream of voice guidances. private func trackVoiceGuidance() async { guard let routeTracker else { return } for await voiceGuidance in routeTracker.voiceGuidances { speechSynthesizer.stopSpeaking(at: .word) speechSynthesizer.speak(AVSpeechUtterance(string: voiceGuidance.text)) } }
/// Monitors the asynchronous stream of tracking statuses. /// /// Updates the route's traversed and remaining graphics when new statuses are delivered. private func trackStatus() async { guard let routeTracker else { return } for await status in routeTracker.$trackingStatus { guard let status else { continue } switch status.destinationStatus { case .notReached, .approaching: if let route = routeResult?.routes.first { let currentManeuver = route.directionManeuvers[status.currentManeuverIndex] statusText = currentManeuver.text } case .reached: statusText = "You have arrived!" @unknown default: break } } } }}
private extension URL { /// The URL of the Terrain 3D ArcGIS REST Service. static var worldElevationService: URL { URL(string: "https://elevation3d.arcgis.com/arcgis/rest/services/WorldElevation3D/Terrain3D/ImageServer")! }}